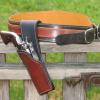
Red Cent Report post Posted July 26, 2014 My first venture into the dipping of leather into a pool of dye may be my last. I was doing a double buckle and had three pieces cut. The main belt, the liner and the belt "strap" that encircles the main belt. I poured Fieblings dark brown pro oil dye that had been diluted 50/50 with alcohol in to baking pan. Almost to the top. I proceeded to place one end into the pan and fed the straps through the dye kinda slow. After drying, it was not fit for sale. Some long areas were lighter and some different in color. So I slowly ran them through again. Streaked. Hung them over a drying bar in front of a fan and I produced the stiffest strips of leather I have ever encountered. I applied NFO to the fronts and backs and let dry. Then I did what I should have done. I airbrushed them. Came out really dark brown but looked good. Some slow bending of the leather brought some suppleness. I (almost) completed the belt last night, thankful I didn't have to trash the leather. Here is a picture. It is obvious in the cold (90 degrees) light of day I need to put the airbrush to work a little more and finish some detail. Quote Share this post Link to post Share on other sites
JLSleather Report post Posted July 26, 2014 That the leather you got from New York? I had the same issue. Finally took that leather and threw it out. If I would have known, I could have just tore up a couple $100 bills and saved myself some time and aggravation. Quote Share this post Link to post Share on other sites
Dwight Report post Posted July 26, 2014 Well, . . . I have to admit I've never had that kind of trouble, . . . the worst problem I ever had was doing a bunch of belts one time, . . . not thinking, . . . got in a hurry, . . . dipped em and hung em up by the buckle ends to dry. The next day they (except for one black one) were dry, . . . and the color ran from very light at the buckle end, . . . to very dark at the other end, . . . the dye had migrated. What I do when my brain is in gear, . . . lay the belt on the down side edge for about a half hour, . . . flip it and let it dry for the next 24 hours or so. All of them come out nice and uniform, clean looking, and the correct color (most of the time anyway). I also only use about 3/4 of a quart of dye, . . . isn't so messy that way. May God bless, Dwight Quote Share this post Link to post Share on other sites
Red Cent Report post Posted July 26, 2014 JL, this leather thing has got me so rattled about trying to figure good leather out, I, sometimes, go pour about three fingers of George Dickel and go set on the porch so my blood pressure comes down. I am not sure what leather it was. I have some Zack White, some RJF, and a little of Tandy on the table. If you laid the belt out on a table horizontal to you, about half of the belt (in a diagonal) was OK and the other half had a very dark red tint to it. After the second dip, the dark red area became a little more darker. I laid the strips out on the garage side deck in the sun. WOW! Now I know what will make a very stiff holster. Between black specks turning up from out of nowhere to this makes a feller a little frustrated. I guess it goes with the territory. JLS, was it that bad? What is interesting is that a very experienced leather maker over on Cas City (Chuck Burrows) just informed us he bought most all his leather from RJF. Go figure. Quote Share this post Link to post Share on other sites
Red Cent Report post Posted July 26, 2014 BTW, the center belt was sprayed with dark brown last night. After the picture I sprayed another coat of dark brown on it and I believe it is more brown now than red. Why the reddish tinge with dark brown Fiebling's Pro Oil dye? Quote Share this post Link to post Share on other sites
JLSleather Report post Posted July 27, 2014 (edited) Yeah, the leather was that bad. Downright spongey -- I wasn't even going to waste time tooling it. Like trying to leave a permanent impression in a marshmallow. I sewed an avenger style holster right quick, gonna try a color. It's what .. like 2/3 of a foot, so if it don't work, so what! Outside of the bend in the holster was almost black (darker than I thought that dye would even go) and the rest MUCH lighter.. just a band of dark down the fold about 3" wide. Thought as a 'last ditch' effort, I'd dye it solid black. Same results .. part of the leather sucked the dye right in, some wouldn't. Took the lighter 6/7, gonna try maybe two layers. On a 50" strap, I could stretch it an inch without trying all that hard. Pathetic. I did find a piece of the 3/4 to work as a LINING for a 'jeans' belt. The rest, I decided I didn't need the headache. Already out the money, no point in also being out the peace of mind. One other experienced holster maker didn't care for it either (same supplier, different batch). Oh, well.. now I know. Oh, and Fiebing's browns have always had a reddish tint. If you don't like the reddish, go with the chocolate instead of the dark brown. Here's a couple belts I did WAY back, just for this display reason. Both dyed the same way, top one with "brown" and bottom with "chocolate". Edited July 27, 2014 by JLSleather Quote Share this post Link to post Share on other sites
Red Cent Report post Posted July 27, 2014 Well, the customer wants a dark brown. To me that means darker than walnut. I have the Fieblings Golden Brown and it makes a beautiful a beautiful brown but not really dark brown. I have two double shoulders coming from RJF. I asked him to hand pick some firm leather. We will see. Quote Share this post Link to post Share on other sites
Chief31794 Report post Posted July 27, 2014 I won't be ordering any more RJF leather. Had some of the same problems above. Another problem I had with one item is that I taped the back to prevent dye, when I took the tape off (Duct Tape), the back side had "dissolved" from the tape glue, it was a mess. Plus, I bought a drum dyed side, color looks okay, however, I'm not sure how they dyed it, but the dye only penetrated the leather about what you'd expect from an air brush, other drum dyed leather I've used was dyed through and through. When I put a stitching groove in this, it needs to be redyed and you can't get a color to match perfectly. I bought 2 sides and a shoulder, I'm using it mostly on my black items, black is the only color I've gotten it to take consistently. I had been reading some of the complaints out here, wasn't going to add any but changed my mind. When I checked into this leather several members vouched for it as excellent leather and value, he may be getting it from a different place than he was. Lesson Learned, Chief Quote Share this post Link to post Share on other sites
robertmeco Report post Posted July 27, 2014 Well, the customer wants a dark brown. To me that means darker than walnut. I have the Fieblings Golden Brown and it makes a beautiful a beautiful brown but not really dark brown. I have two double shoulders coming from RJF. I asked him to hand pick some firm leather. We will see. Maybe mahogany would be the darker brown you are looking for. Quote Share this post Link to post Share on other sites
Red Cent Report post Posted July 27, 2014 Robertmeco, the dark brown dye came out OK, although the tint is visible on any non slicked edge. I burnish the belt holders but you can see the back side a little with the tint. And there are other certain places. The interesting part is RJF gets his leather from a well known wholesale house. "Thoroughbred Leather is Jeff Ballard, who supplies Hidecrafters as well as many other clients- like RJF leather (one of the banner sponsors up above). Johanna posted that in 2010. Hope the next two double shoulders work. Quote Share this post Link to post Share on other sites
Red Cent Report post Posted July 27, 2014 http://leatherworker.net/forum/index.php?showtopic=25572 Well, Zack White has leather now. Quote Share this post Link to post Share on other sites
BigJake Report post Posted July 27, 2014 I have to chime in here and admit to being a user of RJF leather. In the beginning I only ordered veg tan and was satisfied with the product. Later I order some drum dyed black and was satisfied with that as well. My last order included an order for a medium brown drum dyed double back. When it arrived I was surprised to see that the flesh side had little or no dye at all and the penetration on the hair side was very minimal......like it had been sprayed. I called Roger and he stated it was in fact "Drum dyed" but not all the way thru. I'm still trying to figure out how that could be managed. Reqardless, I though I could still use it. I tried some scrap pieces using an arcylic sealer and it turned out OK. I'm thinking this would save some time in the holster making, so cut out a pair of holsters and a belt which would be a matching set. I ocassionally use a product sold by Weaver called Leather Firmer which is used in place of water during the wet forming. Never had a problem before with this product. So I dip the holsters in the leather firmer and some of the dye leached out in the chemical. Put the holsters out to dry with the pistols inside. The next day after partial drying they were almost chocolate brown, much darker than before diping. Again, no issues with this product when using natural veg tan leather. Now I had to try to match the belt to the holster color or use the leather firmer on the belt. I was able to match the color using a spray gun. The customer likes the rig even though it was darker than what he originally ordered. My take on this and must be taken as my opinion only is RJF is dying the veg tan himself using a sprayer. He did mention to me in an earlier conversation that he had spent many hours in a spray booth dying leather........in his past. This was months before my issue with the med brown back. I think he still gets his product from Throughbred and their quality may have slipped a bit, even with the veg tanned. The opinion I now have is I will buy drum dyed black only from RJF and the browns from another source. As a side note, the black is dyed thru and thru and the Leather Firmer has no effect and the dye does not leach out. Quote Share this post Link to post Share on other sites
Troy I Report post Posted July 27, 2014 After reading through this post...I'm a little concerned and confused. ..who is a good supplier for leather straps, 1.25 inches wide, 9/10+ oz, and of course veg tanned. I have purchased from Ludlow in the pass, but I remember reading a post that he is trying to sell his business and his website shows his leather straps are out of stock. Out of the 30 straps I purchased, about 5 were very soft and stretched very easy. ..in other words unusable for my projects. My stock is really low and I need to resupply ASAP. I use the straps to make M1907 rifle slings. Troy Quote Share this post Link to post Share on other sites
camano ridge Report post Posted July 27, 2014 I get straps from Springfield leather they are HO andI have not had any problem with them. Quote Share this post Link to post Share on other sites
Red Cent Report post Posted July 29, 2014 Today I received two double shoulders from RJF. They look beautiful. I asked Roger to pick out a couple firm hides and he did. Noticeably harder to cut the 8-9 ounce shoulder. The 5-6 ounce feels firm also. Going to dip dye holsters tonight and see what happens in the morning. Quote Share this post Link to post Share on other sites
Red Cent Report post Posted July 30, 2014 I hate to dye leather! Quote Share this post Link to post Share on other sites
Dwight Report post Posted July 30, 2014 I hate to dye leather! Me too, . . . but if it turns out like it should, . . . sure beats trying to color them with a sharpie marker. Here are two belts I made today, . . . one is saddle tan, . . . the other is sunburst. Both dip dyed in a 9 x 14 pan in about 3/4 of an inch of dye (about a pint and a half). Both dyes were 50/50 mix of dye and thinner. Somehow, . . . one of us is doing something the other one is not doing, . . . But even though I don't like the process, . . . I like the product. May God bless, Dwight Quote Share this post Link to post Share on other sites
SteelcityK9Cop Report post Posted July 30, 2014 Disclaimer: I am a leatherworking noob When I started I bought a giant box of scrap leather from Springfield Leather... I noticed that there were all kinds of different types of leather in there.. spongy stuff..dense stuff... all took dye different. Some dipped mahogany looked dark brown and some dark brown looked almost black. I ordered a W&C side for holsters and belts.. have not had an issue dip dying at all. I'm getting good penetration with two dips (letting first soak in and then going for second and will rub it in a bit with my gloved fingers. I think there is a direct correlation between leather quality and dipping results. I am also dipping my Resoline...one good dip soaks in quick... a second is a little tricky...if I dip too long the risk for it to settle on top and not soak into the grain increases. Quote Share this post Link to post Share on other sites
Red Cent Report post Posted July 30, 2014 I dipped the new leather in full strength Fiebling's Pro Oil Dark Brown. I used a baking pan and immersed the holsters and spread the dye around generously with gloved hands. The I laid them flat on the concrete floor. The next morning, no dark edges but several areas looked like cordovan. I am finishing the holsters today and airbrushing any areas that reddish. I have Golden Brown which looks like a light walnut color. I also have Saddle Tan, Light Tan, and Mahogany. I made this belt and tried to match holster color (Mahogany). Saddle Tan looks OK. And, of course Vinagroon always works. Either I got ahold of some weird leather or Dark Brown has to go. Quote Share this post Link to post Share on other sites
Treed Report post Posted July 30, 2014 (edited) Red.... of course the biggest thing as others have said is the quality of the leather. I have struggled as others with dye when I first started and learned a thing or two. First any leather you will use has spots that absorbed differently.... Next is that dye is a solid suspended in a liquid. Any leahter that you are going to dye will have oil, waxes and other impurities that are left over from the tanning or picked up from handling, around a shop etc. 1 When I am ready to dye I clean my leather with a oxlic acid,,,,(numerous threads on other products). 2 I dampen my project with water to open up the pours in the leather (drying back to original color) 3 I shake my dye to mix everything up, the dye will settle to the bottom and the liquid will move to the top ( I use Fieblings pro dye mixed 50 50 with denatured alcohol, like lighter colors) 4 I select the pan and pour the dye.... I pull off 3 to 4 sheets of paper towel ( I use the blue shop paper towel... better absorption and don't come apart) 5 I then dip my project making sure that the whole projects is covered well. Remove and let excess dye run off just a couple of quick shakes. 6 I grab a towel and start buffing my project to remove all excess dye. I buff and buff making sure any dye that has not penetrated is removed from the project. 7 No matter what the dye job looks like I set it aside and let it dry. Some areas will absorb more and some areas less and with drying time the dye will move or migrate to the dry areas evening out the dye job most of the time. I then oil and dry to see how the whore process took. There are some leather that need touching up after. This process works for me but as in leather there are as many ways of doing the same thing as there are leather workers. The biggest thing is removing any dye that has not initially been absorbed. If this is allowed to set on the leather it will evidently be absorbed causing a darker area or will dry on the top leaving a solid dye that will rub off onto clothing or hands. When people have rub off issues most of the time it is because of dye not being absorbed (do much dye, bad dye, bad leather, old dye, etc) or because the initial dye looks blotchy they keep adding dye and evidently there is more dye than the leather can absorb. It takes a lot of practice and practice to find the right process... I know living in the Northwest that my process in the summer is different than winter with all the rain and humidity. PS..... holsters are really hard item to get the dye job to match the belt. As you mold and push the leather around on the holster you compress the fibers making it tougher for the dye to absorb. The belt does not get this treatment so its absorption is greater. When doing a matching set I usually will use a glass creaser on the belt to compress the fibers trying to even out the absorption rate. Edited July 30, 2014 by Treed Quote Share this post Link to post Share on other sites
Red Cent Report post Posted July 30, 2014 #1 was introduced to me just a few days ago. All this time and I had never read (I think) about OA. #6 I have not done. Are you saying that after you let the leather drip a minute or so, you wipe the piece of leather, back and front with a paper towel?I usually air brush and I work a lot with the natural leather treated with NFO and neutral shoe polish when dry.And, I color everything before I construct. Like using drum dyed leather. A lot of my belts are colored on the main piece and the lining is usually natural.I dip dyed two pieces of 5-6 ounce in some of the dark brown dye cut with alcohol. After they were dry, I could have hurt you bad with them. Armor hard. They were the holster lining and about three applications of NFO got them to the point that they could be used. I am happy the customer chose black thread so that I can adjust anything to the right shade. I am sewing up the welt in a few minutes. After I get them done, I will take pictures. Quote Share this post Link to post Share on other sites
Treed Report post Posted July 31, 2014 I only let the dyed piece drip off excess dye for seconds if it is running off, then hit it with the paper towel and start my buffing. I want to get the initial soaking of dye to be uniform and do not want any excess to stay on the leather as any excess will over dye in the areas that it is left. When I buff the project it is with mostly a circular motion. I only use the blue shop towels, the white house hold towel will not hold up and will leave pieces everywhere. The 5-6 you dyed how much was the dye cut with alcohol as this will affect the leather when dyed or it could have been the leather. I only use Herman Oak and after I dye I use a good coat of neats foot oil on the project. I bounce back and forth between dyeing before I construct and dyeing after construction depending on the look, the project or what else is on the drying rack or dyeing table at the time. As I said earlier practice with scraps. As it have practice on scraps i make notes on the back for future reference as to the dye alcohol portions. Also I don't have much in climate control in my shop so different times of the year I have to adjust my procedures. Quote Share this post Link to post Share on other sites