


megganpowell
-
Content Count
17 -
Joined
-
Last visited
Recent Profile Visitors
1,855 profile views


-
I found this while browsing Youtube and thought I'd share. He gives a really concise and helpful explanation of the different leather types. Maybe I'm just a leather nerd...
-
Dwight, I used your crockpot trick that you mentioned in another thread. I'll have to try the 1:1 neatsfoot beeswax ratio next. Thanks for the tips!
-
1 ounce beeswax: 1 ounce paraffin: 2 ounce neatsfoot. It came out just a tad harder than saddle soap. Just used it on a fresh piece of imported vegtan and it did okay but I think it might need some more neatsfoot. Or I need to experiment with heating the leather and/or wax before applying. I don't feel like it really soaked in (just sitting on the surface) and it's a little splotchy for my liking.
-
Just melted my lot down with some paraffin and neatsfoot oil. Beautiful wax and smells heavenly, too.
-
Thank you everyone for your input. Turns out it was the arbor itself catching on the burnisher, not allowing it to go all the way on. I ended up grinding the shaft down in the middle where it was uneven (thanks, China) and problem solved. Still doesn't explain why the Ryobi didn't work either. This bench grinder is not a variable speed and I don't necessarily want to wear down my already well-loved drill press so I guess it's 3200 rpm for me until I feel like messing with power tools again. I'd rather be craftin'.
-
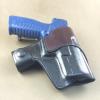
I've tried both a Ryobi and a WEN bench grinder to try and make a motorized burnisher. They are both cheap 6" grinders with 1/2 arbors. I also bought a pro edge burnisher that is supposed to fit motors with a 1/2" arbor, but the hole doesn't extend deep enough into the dowel. See picture for why it's not fitting. The screw is tightening on the thread and thus the burnisher is not sitting perfectly straight on the arbor. Turn it on and it's not pretty. This is my first experience with modifying power tools and three trips to the hardware store later, I can now see why people shell out big $$ for the ready-to-go edge finishers. I've seen plenty of threads about this working but apparently I'm missing something. Can anyone tell me exactly what brand/motor they bought to make this work? Any help is appreciated.
-
Tandy pro waterstains are my favorite and only dye I use on a regular basis. The reason they are so bright on the leather used in that picture is because the leather was very light to begin with. As the veg tan "ages," the colors will be less vibrant.
-
This guy knows his stuff, too. I use GoGreen to clean out my airbrush instead of buying expensive airbrush cleaner, though. Hope this helps!
-
I have two setups that I alternate between depending on what I'm working on. For smaller or more detailed projects, I use the Neo Iwata Airbrush with the mini air compressor... https://www.amazon.com/Gravity-Feed-Dual-Action-Airbrush/dp/B004INERK4 https://www.amazon.com/Iwata-Neo-Air-miniature-compressor/dp/B00DV4PTCQ/ref=sr_1_cc_3?s=aps&ie=UTF8&qid=1474423626&sr=1-3-catcorr&keywords=iwata+mini+air+compressor For bigger projects and large-area dye jobs, I use a $12 airbrush from Home Depot with the Senco PC1010 air compressor... http://www.homedepot.com/p/Senco-1-Gal-1-2-HP-Portable-Electric-Air-Compressor-PC1010/100615090 I don't need two setups - it just worked out that way. It depends on what projects you want to use it for. I am glad I started with the nicer Iwata airbrush, though, as the cheap one I have is not dual-action and I would not have known the difference. I will say that I wish I would have researched how to clean my airbrush before I just jumped in to using it. It would've saved me the headache of cleaning dried up acrylic out of the tip. Check out airbrushtutor on Youtube.
-
I'll claim "A" if it's still available.
-
I made a video about making a watch strap
megganpowell replied to udol leather's topic in Leatherwork Conversation
This video is very helpful - thank you! What is the name of that tool that you used to gauge the thickness? -
Good Glue Pots
megganpowell replied to Jaynkelley's topic in Dyes, Antiques, Stains, Glues, Waxes, Finishes and Conditioners.
I got mine from Springfield http://springfieldleather.com/16721/Jar%2CPlastic%2CCement%2C32oz/ Here is another one: http://www.tandyleather.com/en/product/cement-keeper-alco-teflon-pot This forum has some good answers, as well: http://leatherworker.net/forum/index.php?showtopic=43984 -
Does anyone know of any brands that carry bright color stains besides browns and reds. I have been using Tandy leather all-in-one stains but I'm not happy with the quality and the colors I was using are discontinued anyway. I have been using the professional eco-flo water stains but I was wondering if anyone knew of any stains available that are darker in the stamp impressions. I hope that made sense lol. I don't want to have to hand paint the impressions with two coats to make them darker. Or maybe something to add on top of the waterstain to make it multi-dimensional. I was thinking of maybe trying Fiebing's natural hi lite stain on top of the waterstain. I don't have high hopes for that idea, though. Any ideas would be appreciated!
-
Little Accident With Fiebings Leathercraft Cement
megganpowell replied to reddevil76's topic in How Do I Do That?
Next time, while the dye is still wet, use a plain old eraser to erase the cement! I've never tried it after the dye has already dried, but I've heard it works while the dye is still wet. -
I use Angelus acrylic paints for painting leather dog collars (which go through quite a bit of wear and tear too) and they hold up great. Angelus colors stay more true with wear than the Tandy brand I have tried. The Tandy acrylics tend to fade over time from what I've experienced. I believe the 1-shot paints are enamel. Correct me if I'm wrong. I've never used enamel on leather. Acrylic is the standard for painting leather because it is flexible and bends with the leather. Enamels are great for sign and car painting but I'm not sure how flexible they are.