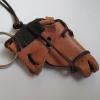
DoubleC Report post Posted January 28, 2012 I love some of the boxes people do on here so I decided to try and mold one with bricks. I decided I wanted a picture of my horse as the part that folds over the front. I cased a piece of leather last night and started as soon as I woke up today. I figured I'd have to draw it several times to get it right. Plus she was tied to a rail in her halter with a saddle on and I didn't want either in the picture. So when I finished and LIKED it, (some mistakes that will disappear with beveling around her and a background) I now don't have a clue to put in this 'other' huge area. I'm attaching the leather and the pic I drew it from. Any ideas for this, any at all? Thanks so much, Cheryl Quote Share this post Link to post Share on other sites
Tree Reaper Report post Posted January 28, 2012 Hi Cheryl; To keep it simple I would bevel around the horse, when you stain it wipe off the horse right away and leave the back ground for 45 seconds more then wipe it off. Quote Share this post Link to post Share on other sites
Cyberthrasher Report post Posted January 29, 2012 Well, if you're going for realistic, I have absolutely NO idea. But, if you want something artistic, the first thing that popped into my head was clouds. Something like the clouds in this picture (simple google image search for "tattoo clouds") could look really nice in the background. http://www.tattoos-beauty.com/image-files/cross-tattoos-with-flames.jpg Quote Share this post Link to post Share on other sites
DoubleC Report post Posted January 29, 2012 Hi Cheryl; To keep it simple I would bevel around the horse, when you stain it wipe off the horse right away and leave the back ground for 45 seconds more then wipe it off. Quote Share this post Link to post Share on other sites
DoubleC Report post Posted January 29, 2012 Hi Cheryl; To keep it simple I would bevel around the horse, when you stain it wipe off the horse right away and leave the back ground for 45 seconds more then wipe it off. Thanks Kevin, I was going to use dye on it. I did bevel it yesterday but not well, pic attached. I guess I wasn't clear, do you think I should tool something into the background? Or that just the horse is enough? I cut it as square as it's going to get because Sylvia said it was longer in the back, so I drew the hooves down to see how far off it was. That part will be cut off. Thanks, Cheryl Quote Share this post Link to post Share on other sites
DoubleC Report post Posted January 29, 2012 Well, if you're going for realistic, I have absolutely NO idea. But, if you want something artistic, the first thing that popped into my head was clouds. Something like the clouds in this picture (simple google image search for "tattoo clouds") could look really nice in the background. http://www.tattoos-b...with-flames.jpg That would have looked nice Thrash if I hadn't taken a perfectly good picture, beveled it to death, then when Syl told me I had the back longer that the front, tried to cut it as square as i could from the piece of leather I had it on and no room for them now. I just need more practice with my tools. Fortunately I'm not going to need the whole horse and may be able to use from below the shoulder across to below the hips. Actually though, as much as I love going for the artistic, I meant tooling of some sort. since I may just get disgusted with this, I am going to try my basketweave between where the legs are and then just let it fade out after a few rows. If I'm going to mess it up, as I think I already did when I beveled it, might as well mess it up good, and get some practice in :-) Thanks for writing. Cheryl Quote Share this post Link to post Share on other sites
Tree Reaper Report post Posted January 29, 2012 Hi Cheryl; What bevelers are you using? When you bevel, put the edge of the beveler in the cut and tip the handle towards the horse so that the beveled portion doesn't wander too far away from the image. Over all it looks ok, I wouldn't scrap it. Quote Share this post Link to post Share on other sites
TwinOaks Report post Posted January 29, 2012 Cheryl, do you know what pointillism is? If so, and you have a backgrounder, stamp in the outlines of a hill in the distance with maybe a tree in the foreground. Use heavier blows from the mallet to set these impressions a bit deeper and likewise with any details like clouds or tree branches. Then fill the areas between - sky has no tooling except for clouds. Meadow has some tooled in tufts of grass. You can do what I call "friction burnishing" by rubbing the face of the leather with a tight weave cloth and a good bit of pressure. You're giving the leather a friction burn, and it will keep the slightly darker color. Use that method to shade the area of the meadow. Use the beveler like a pencil and just drag in some lines suggesting taller grass. The key to doing this in leather is to think in terms of negative space. All the elements of the composition are at the same level...you need to push everything BUT those elements 'back' to make them stand out. You can push the open space back through tooling, color, shading, etc. OR You can pull the elements you want 'forward' by stretching the leather (from the back) to make the elements stand above the surface of the leather- this is done by embossing, the use of lifters, and undercuts. Quote Share this post Link to post Share on other sites
DoubleC Report post Posted January 29, 2012 Hi Cheryl; What bevelers are you using? When you bevel, put the edge of the beveler in the cut and tip the handle towards the horse so that the beveled portion doesn't wander too far away from the image. Over all it looks ok, I wouldn't scrap it. Bevelers? LOL. I have to B197 that came in my original starter kit almost two years ago. I beveled that spot to death, along with the other I'm attaching. I went back over it with the rounded end of my stylus a gazillion times and tried to bevel it better. I do hold it that way but at times it wanders out of the cut line and takes a trip. Maybe I'm not cutting deep enough or more likely clean enough around those parts. As you can see they're both rounded and small and I haven't used my swivel knife but a few times. I know that's the meaning of swivel but I don't have good control of it yet. Is there anyway to repair those before I dye it? Quote Share this post Link to post Share on other sites
Tree Reaper Report post Posted January 29, 2012 (edited) Well you already know that you can't expect great results without all the required tools. You might be able to dampen the leather and smooth those areas out with a modeling spoon. Just keep carving the head area, it has the most detail and will use less leather until you are happy with the results. You might carve a half dozen before you are satisfied. Practice on drawing straight lines and curves then bevel those on scrap leather. http://leatherworker.net/forum/index.php?showtopic=35327&pid=218874&st=0entry218874 Edited January 29, 2012 by Tree Reaper Quote Share this post Link to post Share on other sites
DoubleC Report post Posted January 29, 2012 Cheryl, do you know what pointillism is? If so, and you have a backgrounder, stamp in the outlines of a hill in the distance with maybe a tree in the foreground. Use heavier blows from the mallet to set these impressions a bit deeper and likewise with any details like clouds or tree branches. Then fill the areas between - sky has no tooling except for clouds. Meadow has some tooled in tufts of grass. You can do what I call "friction burnishing" by rubbing the face of the leather with a tight weave cloth and a good bit of pressure. You're giving the leather a friction burn, and it will keep the slightly darker color. Use that method to shade the area of the meadow. Use the beveler like a pencil and just drag in some lines suggesting taller grass. The key to doing this in leather is to think in terms of negative space. All the elements of the composition are at the same level...you need to push everything BUT those elements 'back' to make them stand out. You can push the open space back through tooling, color, shading, etc. OR You can pull the elements you want 'forward' by stretching the leather (from the back) to make the elements stand above the surface of the leather- this is done by embossing, the use of lifters, and undercuts. Ok Mike I think I understand what you mean except when you say put the tree in the foreground, do you mean the foreground of the hill or the horse? I hate to sound dumb but I want to make sure I do it right. I can draw all of those things I don't need a background tool, well unless you mean like my camo. Well the only tree I can really draw, or I guess I've ever tried to was a pine. I'll use my stylus to draw those things, actually have some of pics on here of the Vermont mountains. well can look out my window and see them. Wait that won't work because would be using the mallet on it. Mike my tools consist of the 6 you get in a package from Tandy, a 3D mare and foal, a horseshoe (because that's how I sign my initials) a basket weave, oh and lets not forget the rose. That particular one is a favorite of Kevin's :-) Actually everything you mentioned could be done with my camo and beveler. Even Thrash's clouds if I tipped it. And I have denim to burnish with. But it this going to make it a little busy on an approximately 7 & 1/2" x 7 & 1/2" inch piece of leather? Quote Share this post Link to post Share on other sites
DoubleC Report post Posted January 29, 2012 Well you already know that you can't expect great results without all the required tools. You might be able to dampen the leather and smooth those areas out with a modeling spoon. Just keep carving the head area, it has the most detail and will use less leather until you are happy with the results. You might carve a half dozen before you are satisfied. Practice on drawing straight lines and curves then bevel those on scrap leather. http://leatherworker...=0 Thanks Kevin, I have plenty of scraps now. Someone told me to contact yaklady but I can't find her in the member list anymore. What a talent, I wish she was still here. Quote Share this post Link to post Share on other sites
TwinOaks Report post Posted January 29, 2012 I meant that the tree should be between the horse and the hill.....visually. And I was mentioning using a backgrounder to create a pointillist type image where you have the image, but you've actually drawn no lines. I'll whip up something here in a few minutes, and post it...but it'll take a few minutes because after making it, I've got to take the picture and then get my wife's computer to get the image - because I can't find my cheap little camera that I just transfer the memory chip from the camera to my computer. BRB..... Quote Share this post Link to post Share on other sites
DoubleC Report post Posted January 29, 2012 I meant that the tree should be between the horse and the hill.....visually. And I was mentioning using a backgrounder to create a pointillist type image where you have the image, but you've actually drawn no lines. I'll whip up something here in a few minutes, and post it...but it'll take a few minutes because after making it, I've got to take the picture and then get my wife's computer to get the image - because I can't find my cheap little camera that I just transfer the memory chip from the camera to my computer. BRB..... ok Mike. I am pretty much finished with except for burnishing so I hope this is kinda what you had in mind. Quote Share this post Link to post Share on other sites
TwinOaks Report post Posted January 29, 2012 One thing to keep in mind....you are LEARNING. If you choose to not do this with the current piece, just tuck the info away for use on another project. Here's an example of a 2 tool background. The C834 is used (though you can do the same thing with a camo tool) with many light, overlapping strikes to give a 'choppy' appearance for the 'meadow' in the center of the piece. Full strikes are used in the tree to suggest some foliage, and in the foreground for 'clumps' of grass. There's also one or two places where I drug the tool to suggest some longer reeds. The A104 (small backgrounder) is used for the mountains in the way-back background and for the trunk/branches of the tree. Nothing is actually drawn with 'hard' lines. Instead the piece uses shading/backgrounding and especially varying depth of the tooling, to make the image. If you don't have a backgrounding tool, you can make one out of a stick/dowel. Just take it outside and 'stamp' it on a sidewalk. The concrete is a rough enough texture to give you some pattern and is hard enough to imprint the softer wood, making a negative image of the concrete on the end of the wood. Anyway, here's the pic: P.S. I antiqued it to give it a little more definition for the picture. Quote Share this post Link to post Share on other sites
DoubleC Report post Posted January 29, 2012 One thing to keep in mind....you are LEARNING. If you choose to not do this with the current piece, just tuck the info away for use on another project. Here's an example of a 2 tool background. The C834 is used (though you can do the same thing with a camo tool) with many light, overlapping strikes to give a 'choppy' appearance for the 'meadow' in the center of the piece. Full strikes are used in the tree to suggest some foliage, and in the foreground for 'clumps' of grass. There's also one or two places where I drug the tool to suggest some longer reeds. The A104 (small backgrounder) is used for the mountains in the way-back background and for the trunk/branches of the tree. Nothing is actually drawn with 'hard' lines. Instead the piece uses shading/backgrounding and especially varying depth of the tooling, to make the image. If you don't have a backgrounding tool, you can make one out of a stick/dowel. Just take it outside and 'stamp' it on a sidewalk. The concrete is a rough enough texture to give you some pattern and is hard enough to imprint the softer wood, making a negative image of the concrete on the end of the wood. Anyway, here's the pic: P.S. I antiqued it to give it a little more definition for the picture. Well I didn't put any finish on mine yet, was waiting to see what you did. I did what I thought you meant, but I didn't get a tree into it. So I did try and this is the top if my first molded box that's finally about dry, and I wasn't expecting either to be perfect. Actually Sienna's picture came out so good compared to what I thought it would, I had to keep it. Anyway this is how I did the mountain, clouds and grass. Not nearly as realistic as yours Mike, but still it made me think so The next one will be better. I love your idea of making a background tool so I'm definitely going to do that. I just got leather and a swivel knife last Saturday so I feel like I'm very rich. I'm going to save your picture and the tools you used in my folder for the next time around. Thanks for all your help. Cheryl Quote Share this post Link to post Share on other sites
UKRay Report post Posted January 29, 2012 Cheryl, I get some good effects with a pebble type backgrounder. The joy is that this is such a 'forgiving' way to cover mistakes and I make quite a few! Okay, you won't get a picture, as such, but you can use the pebble background to highlight a large subject very easily. Hope this helps, if not then I guess you didn't pay much for my thoughts! lol Ray Quote Share this post Link to post Share on other sites
DoubleC Report post Posted January 29, 2012 Cheryl, I get some good effects with a pebble type backgrounder. The joy is that this is such a 'forgiving' way to cover mistakes and I make quite a few! Okay, you won't get a picture, as such, but you can use the pebble background to highlight a large subject very easily. Hope this helps, if not then I guess you didn't pay much for my thoughts! lol Ray Ray I can tell you I pay attention to everything people say, honestly. It gets tucked away in my head then I have to look for 2 hours to find it, but I do listen. I've seen your work so it would be silly of me to ignore what you say. But I'm afraid I don't pay well :-( Would a penny for your thoughts work? LOL. Cheryl Quote Share this post Link to post Share on other sites
UKRay Report post Posted January 29, 2012 You are far too generous, Cheryl! E294 series Craftools work well for me but there are plenty of others that can help to cover choppy bevelling, etc etc - believe me, I use all kind of tricks to rescue potential disasters. All's fair in love and leatherworking... LOL Ray Quote Share this post Link to post Share on other sites
DoubleC Report post Posted January 29, 2012 You are far too generous, Cheryl! E294 series Craftools work well for me but there are plenty of others that can help to cover choppy bevelling, etc etc - believe me, I use all kind of tricks to rescue potential disasters. All's fair in love and leatherworking... LOL Ray I am a firm believer in THAT Ray, LOL Quote Share this post Link to post Share on other sites
Sylvia Report post Posted January 29, 2012 I use all kind of tricks to rescue potential disasters. All's fair in love and leatherworking... LOL Ray Happy Accidents... or "Art of the Mistake." I am very familiar with that too. Quote Share this post Link to post Share on other sites