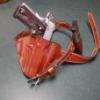
Lobo Report post Posted March 25, 2009 Hobby Tom sent me a PM, which I attempted to reply to without success. Tom's inquiry dealt with sewing holsters on a machine. It seems that he is forming the holster first, sewing around the edges without much difficulty, but when sewing the outline of the handgun finds that the machine chews up the leather. Tom, if you see this: Sewing after forming is just about impossible to do on a machine without the problems you mentioned. I do my sewing first, then do my wet-forming. To lay out the stitch lines we must take into consideration the thickness of the handgun so that the leather will mold around the piece as closely as possible. Measure the handgun thickness, then allow one-half of that measurement around the outline of the handgun on your pattern, and this will set your stitch pattern. Some stretching during forming is normal, and this allows the leather to fully encase the handgun as closely as possible for a nice snug fit. When laying out a new pattern I start with a close trace of the outline of the handgun, marking the position of safeties, ejection ports, revolver cylinders and other features onto the pattern. Next, I draw parallel lines through the pattern where I want the belt to be, this also allows us to determine holster cant (angle of carry on the belt). Next I lay out stitching lines for the outline of the handgun, as described above. Then I draw in the overall outline of the holster, making sure that what I want enclosed is enclosed and what I want clear (safeties, etc) is clear of the leather. The pattern than can be laid out onto the leather, traced and cut, pieces assembled, stitch lines transfered onto the leather, sewn and be ready to form. If the holster is a pancake style the pattern can simply be reversed for the rear panel (a separate pattern for the rear panel will be needed if there are features there that differ from the front side). If the holster pattern requires a fold to enclose the handgun (Avenger style, etc), the cut leather can be dampened then folded over as flat as possible, allowed to dry, then sewn and be ready for wet-forming. Needless to say, any exterior attachments (like belt loops, mouth reinforcements, etc) that won't be accessible after the holster is sewn must be sewn prior to assembly of the pieces and final sewing. I hope this helps you. Quote Share this post Link to post Share on other sites
ABC3 Report post Posted March 25, 2009 Lobo, Thanks, I got it. I don't know why you could not PM me but all is well. Quote Share this post Link to post Share on other sites