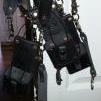
Halitech Report post Posted October 29, 2014 Haven't gotten into guns because their isn't a big market around here but had a customer contact me asking so figured I'd try one first. Made from 6oz veg tanned, dyed with dark cocoa brown and finished with carnauba creme. I know I should have left more on the left side where the belt loop is, will on the next one. Just used a toy gun to mold it with since it was just a test Quote Share this post Link to post Share on other sites
camano ridge Report post Posted October 29, 2014 (edited) You did not ask for a critique, however I am going to throw a few things out for you that may help on the next one and even on this one. Beauty is in the eye of the beholder. This holster is a little blocky for my liking however if it works for you go with it. I would round the corners off a little bit more, sharp corners do not last long. You need a stitch line that follows the countour of the gun. I think you are going to find that this holster will loosen up very quickly in use with a real gun. Even now you could follow your mold line as close as possible with an overstitch wheel to mark stitching holes, then pooke your stitch holes with an awl and stitch. You will have improved retention that will not loosen up on you. Here is an example of the approximate stitch line: Edited October 29, 2014 by camano ridge Quote Share this post Link to post Share on other sites
Halitech Report post Posted October 29, 2014 Thanks camano, like I said, haven't done much in the way of holsters so the things you have pointed out are nice things to know. I was following the directions for a pattern I found and it didn't say to get in there close but it does make sense. I'll give it a shot and see how it goes. Quote Share this post Link to post Share on other sites
camano ridge Report post Posted October 29, 2014 (edited) It looks like you were probably using the pattern and tutorial from Eightbits (Roy29). That one was for a semi with a laser and with the gun he used the stitch line was apropriate, although I think it could have been a little tighter to. Look at the picture and compare to yours you will see your gun sits further away from the stitch line then his. You can use that pattern for many small semi's just adjust the stitch line to give you a snug fit. pancake for semi w laser.pdf Edited October 29, 2014 by camano ridge Quote Share this post Link to post Share on other sites
Halitech Report post Posted October 29, 2014 I think that was the one I used. I'll run a closer stitch line to tighten it up and keep it in mind for any future ones I do. It's a learning process and one I'm enjoying Quote Share this post Link to post Share on other sites