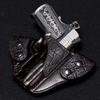
markush Report post Posted September 27, 2011 This is the second go at this IWB pattern and my third holster overall. I reduced the cant from the first one, which was about 40 degrees to 30 degrees for this one. I know it's still pretty extreme but it really helps to conceal the full-size grips of the pistols I have. I may eventually make one with a more "normal" 15-20 degrees but I want to try an OWB next. I Incorporated a couple of your guys suggestions from the first one, like running a groove along the entire edge front and back...I like it. I also tried to do the sharp detail lines in the boning...I need work with that for sure. I put the T-nuts between the layers, which adds a nice touch, but I'm not so sure it's necessary...? I keep thinking, what if one gets stripped out? The whole holster is then garbage! I tried to get a little fancy with the Elephant trim...I'm really happy with it and it's my favorite part of the holster. I could never understand why holster makers charged so much to add exotic trim...I get it now! It took me and extra 45 minus each just to stitch the belt loops. Then you have the extra time of gluing, burnishing, ETC. The one thing that bothers me about this holster is the sharp line boning...I really need to improve that! I would greatly appreciate suggestions on how to improve there! And of course feel free to let me know of anything else that should or could be better or different...critique away. Sweat-shield Some of my edge burnishing Quote Share this post Link to post Share on other sites
Guy W Report post Posted September 27, 2011 (edited) wow that looks great. i really like it. you hand stitched this if I understand right? what's your process? it looks really clean. on my first holster i dremel drilled out the holes then did the stitching and it wasn't terrible but the holes don't look as clean as yours. Edited September 27, 2011 by Guy W Quote Share this post Link to post Share on other sites
markush Report post Posted September 27, 2011 wow that looks great. i really like it. you hand stitched this if I understand right? what's your process? it looks really clean. on my first holster i dremel drilled out the holes then did the stitching and it wasn't terrible but the holes don't look as clean as yours. Thanks, yeah I hand stitch. I drill also but with a drill press and a 1/16 bit. I go over the marks left by the over-stitch wheel with a scratch awl/center punch. This creates a larger, perfectly round impression that helps me guide the drill bit into the mark. That step goes a long way in helping me to keep the stitches evenly spaced and centered down the middle of the groove. So I groove, run the over-stitch wheel, mark the holes with the awl, drill, and then stitch. While I am happy with how my stitching comes out, It is labor intensive for sure and something I'd like to change. I really need to find a good stitching awl and give that a shot. Mark Quote Share this post Link to post Share on other sites
Guy W Report post Posted September 27, 2011 thanks for the reply mark. i also used a 1/16" drill bit, but with a dremel not a press. i didn't do the scratch awl idea. The problem i am having with my stitches is the holes that the dremel makes seem a little too big and the thread doesn't fill it so you still see the holes. it just isn't all really tight like yours appears. I did try a smaller drill bit but then I couldn't get my needle through the hole. not sure what I should try. I also had a question about your elephant hide. Do you just glue that on top of the normal leather then stitch around it? it looks really nice. I was thinking of trying to do something with ostritch leg but I was going to maybe inlay into in between 2 thinner pieces of leather but putting it right on top like you have done looks pretty nice. if you don't mind i'd like to hear about your process for doing that as well. thanks and good job again I like it. Quote Share this post Link to post Share on other sites
mattsh Report post Posted September 28, 2011 Beautiful rig! Nice stitching too. Good Job. Quote Share this post Link to post Share on other sites
wizard of tragacanth Report post Posted September 28, 2011 That looks really nice markush... nice clean work, and I really like the contrasting materials. Nick Quote Share this post Link to post Share on other sites
markush Report post Posted September 28, 2011 Keep in mind that I am as green as they come to all of this and what I am telling you, be it right or wrong, is just my own limited experiences and thoughts. There are much more knowledgeable people on here that could give you better answers, but I'm happy to give you my 2 cents worth, plus a little extra thrown in for free. I didn't think it was worth mentioning before but I do one other thing after I'm done stitching. I've read where people recommend running the over-stitch wheel over the threads when done. Well I don't do that...instead I take a rubber mallet and go around the entire stitch line front and back to flatten everything out some. I don't know if this will help to close up your holes that little bit extra or not, but it may be worth a try. Yeah, the Elephant is simply glued on top of a thin (3-4oz in my case) piece of veg-tan then stitched after that. Or in the case of the reinforcement peice...glued to a layer of veg-tan, glued to the holster, and then stitched. I've seen where makers simply attached the exotic reinforcement piece to the holster without using the extra layer in-between. This looks great but I don't think it actually does much to reinforce the mouth of the holster, at least not with Elephant. Elephant is tough as nails but is quite "floppy" and I can't see it adding any rigidity without putting it on top of veg-tan. I've got some Ostrich scraps that I used to sandwich a piece of veg-tan and tried to burnish the edge...I could not get it to burnish and blend with the veg-tan! Elephant on the other hand takes a little more work to burnish and blend, but it does get there. Good luck with that Ostrich, if you can get the edges to look good you'll have to share your method with me! Mark Quote Share this post Link to post Share on other sites
Eaglestroker Report post Posted September 28, 2011 The fit and finish on that is really second to none, very nice work and excellent edges. I still can't seem to get to that level on edges. Quote Share this post Link to post Share on other sites
PHIPPS CRAFTED LEATHER Report post Posted September 28, 2011 Great looking holster, a question about the elephant piece, did you attach that after wet moulding the leather or did your sew it on and then mould? Quote Share this post Link to post Share on other sites
jlaudio29 Report post Posted September 28, 2011 Nice quality piece. As far as your comments on the elphant not adding enough reinforcement by itself with out adding a layer to it first, it actually does add a pretty good amount of reinforment by itself. I have made a few like this and i was actually suprised at what kind of reinforcement it adds. Quote Share this post Link to post Share on other sites
markush Report post Posted September 28, 2011 Nice quality piece. As far as your comments on the elphant not adding enough reinforcement by itself with out adding a layer to it first, it actually does add a pretty good amount of reinforcement by itself. I have made a few like this and i was actually suprised at what kind of reinforcement it adds. Thanks, I figured that might be the case. Never having used it before I decided I'd err on the side of too much reinforcement rather then not enough and attached it to the veg-tan. Quote Share this post Link to post Share on other sites
markush Report post Posted September 28, 2011 Great looking holster, a question about the elephant piece, did you attach that after wet moulding the leather or did your sew it on and then mould? Since it was sewn on I had to attach it even before the front and back pieces of the holster were joined. Then I vinegarooned and molded it. It is already sewn on here. Quote Share this post Link to post Share on other sites
MADMAX22 Report post Posted September 29, 2011 That turned out really nice. Think it fits the appearance of the M&P very well. Quote Share this post Link to post Share on other sites
Big O Report post Posted October 1, 2011 Nice! If that's not perfect, it's gotta be the next best thing. Quote Share this post Link to post Share on other sites