Jump to content
Sign in to follow this  
Joon1911

Mouthband reinforcement for Holsters

Recommended Posts

Hi,

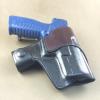
I have been dabbling at making holsters for myself the last several months or so. I was wondering what type of metal holstermakers use underneath the second layer of leather when you see a reinforced holster mouthband similar to this:

600bd3b4.jpg

Also I have questions as to how I go about adding the reinforcement from a methodical standpoint. Do I add it prior to molding the leather to the pistol? Do I add the reinforcement after a prior moulding, etc... You get the point. Can anyone give me an idea from a process standpoint how I would go about reinforcing the mouthband of my holsters?

Thanks

Share this post


Link to post
Share on other sites

I believe one of the types of metal is 'stainless' spring steel bands. I haven't done it with metal...yet...but I have tried Kydex. It worked out well enough, but my opinion is that Kydex is the product of the devil. Unless you have a shop set up to work with it..maybe.

The way I did it was to layout and punch the stitch lines, then stitch most of the reinforcement. I left a little gap to insert the hard stuff, then completed the stitch. Keep in mind that I hand stitch just about everything. Perhaps K-man or BOOMstick can chime in here with their thoughts. They are both pro holstermakers and will have a vast amount more info on the subject.

Share this post


Link to post
Share on other sites

I've made metal reinforced holsters for cowboy action shooting and have also used metal to reinforce the holster hanger loops for a buscadero gun belt.

Both times I used aluminum. For the buscadero belt I just cut some ovals from an extra piece of aluminum guttering, but for the holster I got a thicker sheet of aluminum from Lowes. I used a band saw to cut it to shape and then I filed and sanded off the sharp edges. The aluminum in the holster ran from the skirt to the back side of the holster so the shooter can adjust how far the holsters stand away from his body. My customers are happy with the results.

Share this post


Link to post
Share on other sites

For the holster shown in the photo attached, the basic method is as follows:

1. sew the forward portion of the holster

2. fold the two sides apart

3. lay in the reinforcement and apply the outer leather band

4. sew the reinforcement into place

5. bend the reinforcement to desired shape

6. sew the rear portion of the holster.

Completed holster can then be formed to final shape, finished, hardware attached, etc.

Best regards.

Share this post


Link to post
Share on other sites

Join the conversation

You can post now and register later. If you have an account, sign in now to post with your account.
Note: Your post will require moderator approval before it will be visible.

Guest
Reply to this topic...

×   Pasted as rich text.   Paste as plain text instead

  Only 75 emoji are allowed.

×   Your link has been automatically embedded.   Display as a link instead

×   Your previous content has been restored.   Clear editor

×   You cannot paste images directly. Upload or insert images from URL.

Sign in to follow this  

×
×
  • Create New...