Jonny Mohr Report post Posted October 25, 2011 Hi all, My first attempt at a leather helmet was frustrating and didn't turn out to my standards, as well as being too small for my unusually large cranium! It was from a pattern on armourarchive.org. http://www.armourarchive.org/patterns/leatherhelm_gerhard/ I will post a pic of mine ASAP In the meantime, I would like your thoughts on how to go about forming the leather, patterns, order of processes, such as what order to rivet each piece, should I form and dye the leather prior to assembly, and any useful ideas or comments Here are a few pics of the type of helmet I am trying to make Thanks for any and all input Quote Share this post Link to post Share on other sites
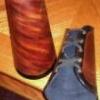
Jonny Mohr Report post Posted October 26, 2011 (edited) Here is the pic of my first helmet, as promised BTW, i have seen some absolutely amazing helmets made by members, I hope over time to get the simple stuff down and someday be able to craft such fine works of art as i've seen posted by members here Edited October 26, 2011 by Jonny Mohr Quote Share this post Link to post Share on other sites
Burke Report post Posted October 27, 2011 Well, if nothing else, your first helm looks nice. I found helmets to be one of the most intimidating pieces of armor to make, primarily because of the difficulty in sizing. Try making your own pattern. What I have done with some success: find a kids safety helmet, cover the top in a thick layer of masking tape, then cut the tape vertically. after you peel it off, find the center point and cut radial slits in it so that you can lay the masking tape pattern flat. Once it's flat, you've found your pattern. cut out the leather piece in the shape of the flat pattern, and sew the slits back together. Then do the same for the other side and sew them both together. Once you have the general pattern, scan it into photoshop, measure the circumference of your head, then adjust the length of the pattern to the circumference. Here is the piece in its pre assembly stage, which I cut from a pattern made in the above manner. And the finished piece: Something I haven't tried, but for a more custom fit, put a stocking cap on, and wrap your own head in masking tape. Quote Share this post Link to post Share on other sites
Jonny Mohr Report post Posted October 28, 2011 Thanks so much for the help, It's greatly appreciated, and thank you so much for your generosity in taking the time to post such useful and detailed instruction. Can't thank you enough, Great post, and your work is awesome! Quote Share this post Link to post Share on other sites
jkrayer Report post Posted April 1, 2017 Hello, I made two of the three helmets from the original post going on 15 years ago. They were inspired by old norse spangenhelms and the work of an earlier leather crafter, Wolfgaard Armory. Wolfgaard made theirs with 4 and 8 straps so I tried to set mine apart by making them with 6. The helmets were made from 10oz leather rivets and nylon thread plus of course standard dyes and finishes. Pattern I'll describe how to make a 4 strap pattern because from there its just math to get to 6 or 8. To make the pattern you want three measurements. Around your head at the widest point, over your head front to back and over your head side to side. Your pattern should look like 4 'L's. The horizontal part of all of the 'L's should equal the measurement around your head divided by 4. 2 of the vertical parts should equal 1/2 the measurement front to back and the other two 1/2 the measurement side to side. I recommend adding 1.5" to the measurement around your head for material width and padding. Also round up from there to the nearest 1/8 inch divisible by 4 (or your number of straps) to make measuring and cutting easier. That is to say of the distance around your head is 22 7/16 inches add 1 1/2 to get 23 15/16. Since 23 15/16 is hard to divide by 4 round up to 24 which is easy to divide by 4. From there I'd draw all of this out on construction paper and do a loose fitting. The straps the go over your head will need some adjustment. The front to back straps should butt end to end and the left to right straps should but those. Once its all taped up put another piece of paper inside the dome and trace to the middle section. Essentially you want an oversized tear drop shape. Putting it together I'd do most of my dyeing and finishing before assembly. You may want to hold off on your finish for the fill pieces since you're going to saturate them with water soon. In fact do it now. Go throw them in a bucket and let them soak up as much water as they'll hold. Take the left and right sides of your helmet and butt stitch them together so you have a crown shape. Butt stitch the front and back straps. Then butt stitch the left and right to them so you have a dome. Take one of the fill pieces out of the bucket and squeeze out the water. Work it into a dome with your hands, a baseball or the bottom edge of a 4oz Fiebings antique container. Place the piece into your dome and mark out the rivet holes. Punch the whole and trim the piece down. As you rivet it in continue to work the dome shape. Do it three more times, let it dry and you're done. Quote Share this post Link to post Share on other sites