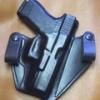
Randyc Report post Posted December 13, 2008 Hey guys This is my new proto-type belt slide (pancake holster) I built it around a Glock 23. I used 8/9 oz. Hermann Oak cowhide. I was going to try to build this one with 6/7 oz. leather on the outside of the holster, but changed my mind and went with the 8/9 oz. for the front and back of the holster. I also wanted to experiment with my own dye concoction. I wanted a nice shade of tan. I combined alcohol with a small amount of Fieblings light brown. I used three coats to dye to arrive at what you see. After dyeing, I rubbed in a less then lethal dose of Lexon conditioner to keep the holster from drying out. I did have one stitch go south on me when I accidently hit the gas pedel on my stitcher while also hitting the presser foot lift pedel. My only other plans for this one is cleaning up my belt slots a bit. Let me know what you think. Quote Share this post Link to post Share on other sites
stelmackr Report post Posted December 13, 2008 Let me know what you think. I see some of the same problems I have when cutting thicker leather, especially curved sections. The only solution I've found, other than sharper tools and a steadier hand, is to use a one-inch belt sander from Harbor Freight and smooth out the curve before using the edge beveler. http://www.harborfreight.com/cpi/ctaf/disp...Itemnumber=2485 Bob Stelmack Quote Share this post Link to post Share on other sites
carr52 Report post Posted December 13, 2008 I see some of the same problems I have when cutting thicker leather, especially curved sections. The only solution I've found, other than sharper tools and a steadier hand, is to use a one-inch belt sander from Harbor Freight and smooth out the curve before using the edge beveler.http://www.harborfreight.com/cpi/ctaf/disp...Itemnumber=2485 Bob Stelmack I've been using my Dremel tool with with a small 3/4" sanding drum on it. Tom Quote Share this post Link to post Share on other sites
Randyc Report post Posted December 13, 2008 I see some of the same problems I have when cutting thicker leather, especially curved sections. The only solution I've found, other than sharper tools and a steadier hand, is to use a one-inch belt sander from Harbor Freight and smooth out the curve before using the edge beveler.http://www.harborfreight.com/cpi/ctaf/disp...Itemnumber=2485 Bob Stelmack Thanks guys. I've previously used a Dremel and now use a spindle sander prior to hand sanding my edges. After sanding I do my edge beveling. Those edges are actually as smooth as a babies butt. In these photos my light is coming in from the upper left verses directly over the holster. I've tried to cut down on the glare by moving the light around. The edges are the same color as the holster body. I did use a darker edge cote on the edge of the sweat guard. That is the only dark edge on this holster. The dark are you see is actually a shadow from the light. Thanks for the feedback, I just don't want you guys to think that I would leave a rough edge. Randy Quote Share this post Link to post Share on other sites
WaG35 Report post Posted December 14, 2008 Nice looking holster Randy. I think if you cut it a little shorter so the leather didn't gather arounf the muzzle, it might look a little better. Just my opinion and it's worth every penny of what you paid for it. Quote Share this post Link to post Share on other sites
Randyc Report post Posted December 14, 2008 Nice looking holster Randy. I think if you cut it a little shorter so the leather didn't gather arounf the muzzle, it might look a little better. Just my opinion and it's worth every penny of what you paid for it. Thanks That pattern started life as a holster for a Glock 34. I cut the bottom too short for the model 34. (I prefer to have the barrel totally covered in this type of holster) I decided to then mold it to a model 23. Another proto-type miss calcalation. I realize the puckered bottom appears a bit tacky but the unintentioned result is a little more comfort in the hip area where the botton of the barrel sits on hip. I normally leave around 1/8" of leather below the barrel. With the price I paid for that. Hermann Oak side, I didn't want to send that one to the junk bin. I carried in that holster on duty all last week. Once I clean up a couple of design issues, I may start using that pattern for additinal belt slide holsters. Over all I'm happy with the tan color. I got kind of tired of black, black, and more black Quote Share this post Link to post Share on other sites
Srigs Report post Posted December 14, 2008 Good job Randy. I get the happy foot at times and have started a holster for a full size gun and turned into a compact holster . I do like the tan color you have done. Keep up the good work. Quote Share this post Link to post Share on other sites
Lobo Report post Posted December 18, 2008 Cutting the heavy leather easily? I use an electric sheet metal shear, made for cutting detailed patterns in auto body work up to 18 gauge steel. Works like a charm, and I can cut 20 holster patterns of 8-9 oz. shoulders in an hour. My production is getting up to a point where I will have to look at a pneumatic press and dies for routine production of about a dozen patterns, saving the hand cutting for custom work. But that will cost a few thousand bucks when I get there. My normal production is now about 15 to 20 per week, plus 3 to 6 special orders, so I am almost at the tipping point for automating the cutting process. Nice edges? After sewing I wet the piece, then use a belt sander to dress down all the edges uniformly. For tight areas and inside-radius curves the small drum sander works the same way. The moisture keeps the sander from scorching the leather. Also, the wet leather rolls up at the edges nicely and when it has dried it is very easy to run the edge beveler around the edges for a perfectly uniform result. Then it is ready to get wet again for the wet forming process, followed by a quick burnishing of the edges, and you are ready to apply final finishes and send it off to the customer. Quote Share this post Link to post Share on other sites
dickf Report post Posted December 18, 2008 Randy, I'm no expert, but I think this is a great start. Attached is a quick edit to your photo which illustrates what I would do differently next time (but like I said, I'm no expert). I think I would get a steel ruler and slightly angle the slots. Good work - I'd love to get my hands on that Artisan you have. Quote Share this post Link to post Share on other sites