glockanator Report post Posted November 16, 2011 Cut my pattern out and all glued up. Any suggestions on sewing this bad boy up? This is my first holster. Quote Share this post Link to post Share on other sites
wizard of tragacanth Report post Posted November 16, 2011 Are you going to cut belt slots for attachment? If so, it's hard to tell from the pic but it looks like the slots will be rather small, maybe not. My recommendations are to wet mold the holster, cut the belt slots, sew as closely to the gun as possible and hopefully, round off the square corners at the bottom of the holster a little bit. For sewing, I use a drill press with a 1/16" bit to drill the holes. Tandy sells waxed linen thread (or waxed nylon) and stitching needles (10 pack). The 25 yard spool of thread will do at least half a dozen holsters. After sewing, sand the edges, dye the holster if you want, slick the edges and finish with a top-coat. Nick Quote Share this post Link to post Share on other sites
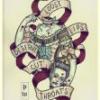
mlapaglia Report post Posted November 16, 2011 (edited) Get a pack of #0 Harness needles from Tandy. The needles with the large eye are a pain to use as they get really hard to pull through the hole. If you don't or cant use a drill bit, like no drill press to keep the bit 90 deg to the leather, get a diamond awl and use that to poke your holes. You will also need an over stitch wheel and a groover. Before you get anything buy "The art of hand sewing leather" By Al Stolhman. It will answer all your questions about sewing. You want to use a saddle stitch on the holster. The picture below is an example of my first holster with all its mistakes. The stitching at the top strap is ok but the line around the trigger guard was so bad I had to add the second line to get the to stay in the holster. I show you this so no matter what mistakes you make it will be better than this one, Get the book, read it twice, then make sure you are close to your trigger guard when you stich that side of the holster. The second picture is of my second holster and the stitching is better although it could have been a little closer to the trigger guard. The last picture is an approximate stitch line as I really could not tell where the gun is inside the holster. IT should give you an idea on what to do. If not let me know and Ill try to help more. Don't be afraid of messing up, its only leather. You have a good start at a holster. Read the book and give it a shot. Michael Edited November 16, 2011 by mlapaglia Quote Share this post Link to post Share on other sites
glockanator Report post Posted November 16, 2011 Get a pack of #0 Harness needles from Tandy. The needles with the large eye are a pain to use as they get really hard to pull through the hole. If you don't or cant use a drill bit, like no drill press to keep the bit 90 deg to the leather, get a diamond awl and use that to poke your holes. You will also need an over stitch wheel and a groover. Before you get anything buy "The art of hand sewing leather" By Al Stolhman. It will answer all your questions about sewing. You want to use a saddle stitch on the holster. The picture below is an example of my first holster with all its mistakes. The stitching at the top strap is ok but the line around the trigger guard was so bad I had to add the second line to get the to stay in the holster. I show you this so no matter what mistakes you make it will be better than this one, Get the book, read it twice, then make sure you are close to your trigger guard when you stich that side of the holster. The second picture is of my second holster and the stitching is better although it could have been a little closer to the trigger guard. The last picture is an approximate stitch line as I really could not tell where the gun is inside the holster. IT should give you an idea on what to do. If not let me know and Ill try to help more. Don't be afraid of messing up, its only leather. You have a good start at a holster. Read the book and give it a shot. Michael Thanks for the advice! This is the pattern I am using http://www.leathercraftlibrary.com/p-1042-big-gun-comfort-by-bill-mckay-series-1e-page-5.aspx As far as sewing could I use one of these? Or would it be better to use just a needle and thread? http://www.tandyleatherfactory.com/en-usd/search/searchresults/1216-00.aspx Quote Share this post Link to post Share on other sites
mlapaglia Report post Posted November 16, 2011 (edited) Thanks for the advice! This is the pattern I am using http://www.leathercr...-1e-page-5.aspx As far as sewing could I use one of these? Or would it be better to use just a needle and thread? http://www.tandyleat...ts/1216-00.aspx Those are great if you are making sails or tents. It will not give you the quality of stitch or look as good as using a manual Saddle Stitch. A saddle stitch is strong and will not unravel if one of the threads break. The lock stitch that the sewing awl does will unravel if it breaks. It looks like a great tool and for the right purpose it is, but its not a good idea for sewing a holster. I looked at your pattern and from the one on the left it looks like I got the layout of the stitch line pretty close. Thats thanks to all the folks here who listened to and responded to my constant questions about stitch lines. Michael Edited November 16, 2011 by mlapaglia Quote Share this post Link to post Share on other sites
Dwight Report post Posted November 18, 2011 (edited) A saddle stitch is strong and will not unravel if one of the threads break. The lock stitch that the sewing awl does will unravel if it breaks. It looks like a great tool and for the right purpose it is, but its not a good idea for sewing a holster. I'm afraid I'm going to have to seriously disagree with the final comment. All sewing machines use a lock stitch, . . . and the vast majority of commercially produced holsters are done on sewing machines. In modern holster making, . . . in many cases, . . . the stitching can be just so much decoration on top of a properly molded holster that was cemented together and will only come apart under severe duress. Hand stitching, using a saddle stitch, has it's place, but to infer that it is vastly superior to machine stitching is simply not a valid comment. May God bless, Dwight Edited November 18, 2011 by Dwight Quote Share this post Link to post Share on other sites
mlapaglia Report post Posted November 18, 2011 (edited) Dwight, Either I explained it wrong or you misunderstood. My reference was the sewing awl in this line, "but its not a good idea for sewing a holster". I firmly believe that the saddle stitch by hand is better than the lock stitch done with the sewing awl when done on leather by hand. If not I would expect most of the saddle makers that hand sew to use the sewing awl instead of the saddle stitch. Sewing machines were not a consideration in my comment. In the drawing below I feel the label "hand stitch" should read "Saddle Stitch". I do not have a sewing machine so I will not attempt to comment on the quality or durability of its stitch. Sorry if I did not explain it clearly. Michael Edited November 18, 2011 by mlapaglia Quote Share this post Link to post Share on other sites
TwinOaks Report post Posted November 18, 2011 Glock... Get a diamond (cross section) awl, a pack of needles from walmart, and "How to Hand Sew". You can use a fork for your stitch spacer if you need to, all you're doing is making marks to tell you where the holes go. I have to agree that the "stitching awl" is not the best tool for the job. It's fantastic for making repairs where there were already stitches, but not for making the hole AND the stitch. However, unlike a sewing machine, it does NOT provide even tension for each lock stitch. Starting out, you need to learn how to hand sew - it'll teach you the value of proper construction. If you can't afford a thousand bucks for a sewing machine, no big deal. Katsass hand sews all his leather and it looks superb. On the layout phase, Michael had one part backwards - do your edges first, THEN layout your stitch line. That way even if you have to adjust the shape, the stitch still stays a constant distance from the edge. Read Hidepounder's tutorial on how do finish edges. Once you have all that done, give it a light coat of olive oil, let it get a sun tan for a couple of hours, and hit it with two coats of Mop-n-glo (wiped on lightly and let the first one dry before adding the second). Quote Share this post Link to post Share on other sites
katsass Report post Posted November 18, 2011 Glock... Get a diamond (cross section) awl, a pack of needles from walmart, and "How to Hand Sew". You can use a fork for your stitch spacer if you need to, all you're doing is making marks to tell you where the holes go. I have to agree that the "stitching awl" is not the best tool for the job. It's fantastic for making repairs where there were already stitches, but not for making the hole AND the stitch. However, unlike a sewing machine, it does NOT provide even tension for each lock stitch. Starting out, you need to learn how to hand sew - it'll teach you the value of proper construction. If you can't afford a thousand bucks for a sewing machine, no big deal. Katsass hand sews all his leather and it looks superb. On the layout phase, Michael had one part backwards - do your edges first, THEN layout your stitch line. That way even if you have to adjust the shape, the stitch still stays a constant distance from the edge. Read Hidepounder's tutorial on how do finish edges. Once you have all that done, give it a light coat of olive oil, let it get a sun tan for a couple of hours, and hit it with two coats of Mop-n-glo (wiped on lightly and let the first one dry before adding the second). The only thing I'd add would be to dilute the Mop&Glo 50/50 with water. Mike Quote Share this post Link to post Share on other sites
glockanator Report post Posted November 18, 2011 (edited) Thank you all for your input I was considering getting one of these bad boys to make my holes. Thoughts? http://www.tandyleat.../88043-535.aspx or http://www.tandyleatherfactory.com/en-usd/home/department/Tools/8065-295.aspx Edited November 18, 2011 by glockanator Quote Share this post Link to post Share on other sites
mlapaglia Report post Posted November 18, 2011 (edited) Thank you all for your input I was considering getting one of these bad boys to make my holes. Thoughts? http://www.tandyleat.../88043-535.aspx or http://www.tandyleat...s/8065-295.aspx Get "The Art of Hand Sewing Leather" book and then get a regular diamond shaped awl. What you are looking at is a chisel and while it has its use its not as good as a diamond awl. Get this http://www.tandyleat...s/31218-01.aspx or http://www.tandyleat...ts/3318-01.aspx and http://www.tandyleat...ts/3319-05.aspx I like the second option as you can replace the blade when it breaks. I started out with the chisels and they left large holes on the leather. With the awl they tend to close up and look better. FYI, if you can afford it get two blades so when one breaks you can keep going and not have to run to the store. IF you use the awl get a wine or champagne cork and hold it behind the leather so you punch through the leather and into the cork. Saves the fingers and makes it easier to use. If you can afford it buy this and you have almost everything you need. http://www.tandyleat...s/11189-00.aspx but its not cheap. You can either use a fork to mark your hole placement as suggested above or buy an overstitch wheel. If you are going to buy only one wheel get this one http://www.tandyleat...ts/8079-06.aspx Its a 6 per inch If you can afford it get this one as it has a 5,6 and 7 per inch wheel. http://www.tandyleat...ts/8091-00.aspx It you do want to stay with the chisels then get the chrome one its cheaper and no real difference. To save your sanity get one of these too http://www.tandyleat...ts/8067-00.aspx that punches 4 at a time. after the first punch place the first leg in the last hole to line up the spacing for the next 3. You use the single for corners and strange curves. But if at all possible stick with the Awl. you will appreciate it in the long run. Michael Once you get over the sticker shock we can talk about one of these. http://www.tandyleat...ts/8074-00.aspx its for making a groove in the leather to mark and stitch so the stitches do not get worn down as fast. Its not required but nice to have. Edited November 18, 2011 by mlapaglia Quote Share this post Link to post Share on other sites
katsass Report post Posted November 19, 2011 Thank you all for your input I was considering getting one of these bad boys to make my holes. Thoughts? http://www.tandyleat.../88043-535.aspx or http://www.tandyleat...s/8065-295.aspx FWIW from the old grumpy guy; I don't think much of stitching chisels. Many think that my thoughts are not worth much, (to put it nicely) however, I have taught more than a few to stitch and feel that starting with a Dremel type tool is the best. NOT TO MAKE HOLES TO STITCH THROUGH, but as pilot holes to follow with a good diamond awl. Use a 3/64" drill bit, it's itty-bitty .... less than 1/16". Drill your holes carefully so as to ensure that the backside is as straight as the front. To stitch, insert the awl into the pilot, ensuring that you keep it at the proper angle (see Al Stohlman's books on stitching) Make your stitch, and proceed to the next. In time you'll just drill a dozen or so holes and finally slip and stick that awl into a spot that has no pilot and just stuff that sucker right on through. Soon you are just using an awl. JMHO and experience. Mike Quote Share this post Link to post Share on other sites
glockanator Report post Posted November 19, 2011 Get "The Art of Hand Sewing Leather" book and then get a regular diamond shaped awl. What you are looking at is a chisel and while it has its use its not as good as a diamond awl. Get this http://www.tandyleat...s/31218-01.aspx or http://www.tandyleat...ts/3318-01.aspx and http://www.tandyleat...ts/3319-05.aspx I like the second option as you can replace the blade when it breaks. I started out with the chisels and they left large holes on the leather. With the awl they tend to close up and look better. FYI, if you can afford it get two blades so when one breaks you can keep going and not have to run to the store. IF you use the awl get a wine or champagne cork and hold it behind the leather so you punch through the leather and into the cork. Saves the fingers and makes it easier to use. If you can afford it buy this and you have almost everything you need. http://www.tandyleat...s/11189-00.aspx but its not cheap. You can either use a fork to mark your hole placement as suggested above or buy an overstitch wheel. If you are going to buy only one wheel get this one http://www.tandyleat...ts/8079-06.aspx Its a 6 per inch If you can afford it get this one as it has a 5,6 and 7 per inch wheel. http://www.tandyleat...ts/8091-00.aspx It you do want to stay with the chisels then get the chrome one its cheaper and no real difference. To save your sanity get one of these too http://www.tandyleat...ts/8067-00.aspx that punches 4 at a time. after the first punch place the first leg in the last hole to line up the spacing for the next 3. You use the single for corners and strange curves. But if at all possible stick with the Awl. you will appreciate it in the long run. Michael Once you get over the sticker shock we can talk about one of these. http://www.tandyleat...ts/8074-00.aspx its for making a groove in the leather to mark and stitch so the stitches do not get worn down as fast. Its not required but nice to have. I already have most of this stuff that my grandma had when she died. the only thing I dont have is an awl and the needles a thread which is no big deal. I think I am just over thinking this a little to much is all. Do I need to wet for the holster then sew or the other way around. does it matter ini the long run? Thanks for all the help. Quote Share this post Link to post Share on other sites
mlapaglia Report post Posted November 19, 2011 I already have most of this stuff that my grandma had when she died. the only thing I dont have is an awl and the needles a thread which is no big deal. I think I am just over thinking this a little to much is all. Do I need to wet for the holster then sew or the other way around. does it matter ini the long run? Thanks for all the help. I moisten the leather around the area I will be doing the groove and the overstitch wheel. The wheel really wont leave a good mark if you use it on dry leather. Then I start sewing and do not go back and re-wet it as it dries. Don't soak it to do the groove and overstitch just moisten it a little about a 1/4 inch wide along the edge. The only time you want to wet the holster or at least get it really damp is when you go to mold and bone the leather over the gun. Get your awl and harness needles and waxed thread, grab the book and take a scrap of leather and give it a try, groove it, mark it with the overstitch and sew about 6 inches. You will see its not has hard as you are making it. Slightly off topic, is that veg tanned leather you are using? Michael Quote Share this post Link to post Share on other sites
glockanator Report post Posted November 19, 2011 Slightly off topic, is that veg tanned leather you are using? Michael Yessum Quote Share this post Link to post Share on other sites
glockanator Report post Posted November 25, 2011 I got it all stiched up and wet molded but the gun just slids out like there is no retention at all. Any suggestions on how to fix this. I will post some pics when I get to my camera Quote Share this post Link to post Share on other sites
wizard of tragacanth Report post Posted November 25, 2011 Pics are definitely needed for us to be of any more help at this point. Quote Share this post Link to post Share on other sites
glockanator Report post Posted November 25, 2011 Quote Share this post Link to post Share on other sites
Haystacker Report post Posted November 25, 2011 I'm not sure how to tighten up your holster. You can try remolding. After wetting the holster, let it sit for a while. Try molding when the holster is almost dry. Follow the lines of the pistol with a sharpie or something like that. The other thing you may consider is a retaining strap. Hi ride holsters are challenging. The higher the revolver is on the belt the harder it is to keep the gun from wanting to tip out at the top, above the belt line. On your next hi ride revolver holster try using a little more leather above the belt line, like the one I attached. Just keep in mind you don't want to interfere with the firing grip. I guess you realize, at this point, holster making is addicting! Best regards. Jeff Quote Share this post Link to post Share on other sites
mlapaglia Report post Posted November 25, 2011 A lot of retention comes from the molding and stitching around the trigger guard. You have very little of the trigger guard inside the holster. You should try molding and boning the cylinder as detailed as possible and get as much detail as you can around the cylinder area. This may help hold the holster. You might need to place an additional stitch line between the gun and the current line to decrease the space in the holster. This will make the gun tighter. Make sure to mold and bone both sides. I would work on making the molding and boning as tight and formed as possible. This will increase the tension and hopefully fix the issue. Worst case you would either have to add a strap or chuck in in the scrap box and start over. Most of us have done that at least once. What weight is the leather? Where did the leather come from? Michael Quote Share this post Link to post Share on other sites
glockanator Report post Posted November 26, 2011 A lot of retention comes from the molding and stitching around the trigger guard. You have very little of the trigger guard inside the holster. You should try molding and boning the cylinder as detailed as possible and get as much detail as you can around the cylinder area. This may help hold the holster. You might need to place an additional stitch line between the gun and the current line to decrease the space in the holster. This will make the gun tighter. Make sure to mold and bone both sides. I would work on making the molding and boning as tight and formed as possible. This will increase the tension and hopefully fix the issue. Worst case you would either have to add a strap or chuck in in the scrap box and start over. Most of us have done that at least once. What weight is the leather? Where did the leather come from? Michael I soaked the holster and jammed the gun in there as far as it would go and that it were it stopped. I also wrapped the gun in saran wrap and I think that is why it is so lose in the holster now. Quote Share this post Link to post Share on other sites
mlapaglia Report post Posted November 26, 2011 What weight is the leather? 8/9, 5/6, 9/10?? You want the leather wet. not dripping but more than just damp like when you case it. Its called "Wet forming" for a reason. You might want to read this quote by TwinOaks, http://leatherworker.net/forum/index.php?showtopic=35437&view=findpost&p=219512 you will find it helpful. Oil up the gun and try one layer of saran wrap and re-wet the holster. Then mold and bone the cylinder, the trigger guard (as much as there is, and any where else you can find to increase the hold on the gun. If it has an ejector strap on the bottom make sure to bone that real well. Anywhere you can get some detail so it will hold. When you first push the gun into the holster it might stop sooner than it should., Work it and try to push it in farther. Your original picture had the gun in farther. With some effort and work you should have the trigger guard up against that first curve of the stitch line. It just takes time and effort. Its not easy. You are asking the leather to stretch and its not going to want to. But it will. I had one that would not go into the wet holster more than 2 inches at first. With work and stretching the leather it made it all the way in. Depending on how wet you start with you might have to do it 4 or more times as it drys. After an hour or so it should be dry enough to remove the gun. Do not let it dry with the gun in place. Place it in an oven set to 150-190 DegF for 20 minutes. The leather needs to get to 120-130 deg. So keep an eye on it and maybe let it go a little more. Just dont over bake it and burn it. After you remove it from the oven place it in front of a fan for several hours or over night. Make sure the air is flowing through the inside of the hostler and not against one side. This will dry the inside really well. Hopefully at this point you will have a better fit on the holster. Michael Quote Share this post Link to post Share on other sites
glockanator Report post Posted November 26, 2011 I dont really get the whole weight thing so I couldnt tell you. Sorry. I did use four layers as an attempt to line the holster though. Quote Share this post Link to post Share on other sites
mlapaglia Report post Posted November 26, 2011 (edited) Leather is sized by weight. 1 sg ft of 1/64 thick leather is 1 oz. so 8/9 oz leather would be 8/64 (1/8) to 9/64. In other countries its done in metric. for your holster a good weight would be 8/9 but 7/8 or 9/10 would work on also. Its good to know the weight of the leather so you know if you have the right thickness for the project you are working on. In this case it would help to know how thick a single layer was to see how difficult it would be to bone the leather. the heaver the leather the harder it is to get good detail out of. If you have a caliper or are good with a ruler take a piece of your scrap and measure it. Most of my holsters are done in 8/9 oz leather. I am working on a cell phone case today that is using 4/5 oz leather. It's just something that is useful to know when you use leather. was this a scrap piece or did you buy it as a larger amount? Your receipt might tell you the size. Michael Edited November 26, 2011 by mlapaglia Quote Share this post Link to post Share on other sites
Denster Report post Posted November 26, 2011 One ounce weight of leather equals 1/64 of an inch thick. Example 8oz is nominally 1/8in thick. Since you used four layers you have a grain side in and out which is a good way of making holsters if you don't over do it. In any case when you wet it dunk it in warm water with a few drops of dishwashing liquid in it to help break the surface tension. With your four layer a 4 or 5 second dunk should get it plenty wet. Wait until the outside of the holster starts to return to normal. Then open the holster in the barrel and triggerguard area. I use a forming stick but a hammer handle works good also. Then insert the gun, skip the saran wrap, with blue guns I wax the outside with stainless don't worry about it. If you can't get the gun all the way in work on the tight spots with the hammer handle until you can get it in. Once it is in start moving the leather around the major details with your thumbs you can then bone in the fine details with whatever boning tools you prefer. Once it is done immediately remove the gun and put in into an oven or heat box. If you are using an oven have a cooking thermometer inside because the dial temp are notoriously inaccurate. You don't want the oven to get hotter than 135 degrees at max. Leave it in for twenty to thirty minutes at least, longer won't hurt. After you take it out let it air dry a fan does help. Side note temperatures from 150 to 190 will give you a large cowrind something llike a pork rind but not as tasty. Quote Share this post Link to post Share on other sites