Shooter McGavin Report post Posted July 19, 2011 So I'm building a pancake holster for my buddy who is a big fan of "Swamp People" on some television station.. Anyway when he seen my Caimen Tail he just about flipped out wanting a holster done with featuring the tail. I've done a number of exotics but generally bond them to a thin veg-tan backer and stitch it on like any other trim panel. This Caimen tail, however, seems to lend itself better to somehow have the cut ends covered entirely. I came up with 2 different ideas on how to do this. Of course, the finished product will always look entirely different than a few pieces of cut leather laying on the table. Idea 1 is a 7-8 oz "frame" around the piece of tail. The inner stitch groove would attach the frame and the tail to the front piece of leather. The outer stitch groove would actually be the stitch lines for the firearm profile. Idea 2 is to cut a 3-4oz "cover" that is the same shape as the front piece of leather, but have a window cut in it to expose the tail thru. Anyone care to share their experiences with either of these ideas? I only have 1 piece of brown tail, so only 1 chance lol. Thanks a bunch! Quote Share this post Link to post Share on other sites
DCKNIVES Report post Posted July 20, 2011 I much prefer to do full inlays rather than an"add-on" piece, so I would go with your second idea.Feel free to look at my site, as I have quite a few inlays there, as well as a tutorial under"Knife Info".Dave Quote Share this post Link to post Share on other sites
TexasJack Report post Posted July 20, 2011 Dave does beautiful work; take his advice. That is a beautiful hide for inlaying. Quote Share this post Link to post Share on other sites
katsass Report post Posted July 20, 2011 Nobody does inlay work any better than Dave does...I'd listen to his suggestion. Mike Quote Share this post Link to post Share on other sites
Shooter McGavin Report post Posted July 20, 2011 Dave, do you have a separate website for your holster work? Do you guys see anything I need to address before I put these pieces together with glue and thread? I'm figuring I should dye and burnish the "window" opening first. Any other advice? Thanks all ! Quote Share this post Link to post Share on other sites
DCKNIVES Report post Posted July 20, 2011 Thanks to TJ and Mike for thier kind comments.Yes, look under Knife Gallery for my leatherwork (sorry ,it's the way program for the site is).Yes, by all means dye and burnish the window prior to gluing and sewing.Dave Quote Share this post Link to post Share on other sites
Shooter McGavin Report post Posted July 21, 2011 I ended up using the 7-8 for the front layer and the 3-4 for the inside layer. Hopefully I can stitch it tomorrow. Fella needs it by the 30th for a BBQ. I hope it turns out OK, I'm honestly a bit nervous on this one. Quote Share this post Link to post Share on other sites
JohnBarton Report post Posted July 21, 2011 If you haven't already stitched this up I recommend that you bevel (skive actually) the inside edges of the top piece and add a slightly smaller piece behind the gator in the same shape. This will push the inlay to be closer to flush with the top piece. I gleaned this technique reading Peter Main's posts and have used it ever since with much nicer results on my inlays. Here is an example: http://www.jbcases.com/gillian.html These pictures don't fully convey what I want to impart. But the center of the inlays is level with the top piece. This is due to the plugs we put in and the beveled edges in the cavity on the top piece. This makes it look much more like a true inlay rather than two pieces of leather on different levels. No matter what though it looks as if your holster is going to be sweet! Quote Share this post Link to post Share on other sites
kid terico Report post Posted July 21, 2011 Dave does outstanding inlays of all types. Here are 2 of my croc inlay rigs to give you some idea. One holster only and other holster and belt. KT Quote Share this post Link to post Share on other sites
mmirob Report post Posted July 22, 2011 You guys are simply amazing... I must try an inlay. This is what I have been doing but this technique looks so cool! Quote Share this post Link to post Share on other sites
Shooter McGavin Report post Posted July 22, 2011 mmirob: yep, thats the style I typically do as well. I guess we can call it an "overlay"? Is that beavertail? Also, that belt is sharp as all getout. I agree. The stuff these guys posted in here is amazing! Simply amazing. Quote Share this post Link to post Share on other sites
K-Man Report post Posted July 23, 2011 (edited) Shooter: In my opinion, what you show in your pictures is more in line with a filagree type of work. A lot of people, IMO, incorrectly call the filagree work an inlay. JohnBarton shows the way a true inlay of a skin should be done. In essence, you're bringing the exotic skin up to the same level as the top grain of the leather. Here's an example of an overlay that I've done, which is beaver tail btw: An example of an inlay: Chuck Burrows shows in his knife sheath dvd how to do the inlay. I also have one of those tear-off sheets that I picked up from Leather Factory, which shows how to do the inlay. You might check with a local LF to see if they have one. If not, you're welcome to borrow mine. Edited July 23, 2011 by K-Man Quote Share this post Link to post Share on other sites
kid terico Report post Posted July 23, 2011 I have a Chuck burrows CD also and he says thats how he does it. No where have I seen it etched in stone what is the correct and only way to do inlay opposed to filigree.One of each . KT Quote Share this post Link to post Share on other sites
K-Man Report post Posted July 23, 2011 (edited) No where have I seen it etched in stone what is the correct and only way to do inlay opposed to filigree. http://en.wikipedia.org/wiki/Inlays_and_onlays_(bookbinding) For some reason the link does not link directly to the respective section. However, you can find the section in wikipedia within that link that pertains to inlay on leather. YMMV Edited July 23, 2011 by K-Man Quote Share this post Link to post Share on other sites
DCKNIVES Report post Posted July 23, 2011 I frankly don't see where it matters, all the definitions say "normally flush", but its still a matter of preference.I explain both methods in my tutorial and leave it up to the maker.I also explain both ways when I teach students.My personal preference is recessed and yes I have done raised inlays, though many hides do not lend themselves to being padded.I am reasonably sure that I have done more inlay's than most on this forum, because that's what I have chosen to specialize in for 20 years.I have also done some filigree work, which i consider quite a bit different.I have always strived to try new things and have inlayed all kinds of exotics, stones, wood,Ivory,carbon fiber, and different kinds of metal, while certainly not traditional, they were well accepted.I just don't see being close minded when it comes to artwork and I think it stifles creativity.Dave Quote Share this post Link to post Share on other sites
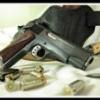
Shooter McGavin Report post Posted July 30, 2011 Thanks for the advice from everyone. Here was the final result. Buddy was very happy! Quote Share this post Link to post Share on other sites
Eaglestroker Report post Posted July 30, 2011 You should be happy as that looks fantastic my friend Quote Share this post Link to post Share on other sites
DCKNIVES Report post Posted July 30, 2011 It turned out very well.Dave Quote Share this post Link to post Share on other sites