Lobo Report post Posted October 18, 2013 Customer contacted me a couple of months ago, explained that he had a tanned African elephant hide that he would like to have a number of holsters, belts, and pouches made from. I explained the different types of tanning methods, what works for holsters and what doesn't, asked him to send me a small piece of his hide. It was nicely tanned and would have worked very well for garments or upholstery, due to being very soft and flexible, but not suitable "as is" for what the customer wanted. I proposed to use his hide as an overlay on cowhide to produce his order. He liked the idea and sent me a large section of hide with an order for 3 holsters, 3 pouches, and 3 belts. Holster rig #1 is my Enhanced Pancake model with slide shield option, made for the 5" Model 1911 pistol with neutral cant, produced as follows: 1. holster front is of 6/7 veg-tanned cowhide, smooth side in against the handgun, with 4/5 oz. elephant hide laminated to be exposed on the front. 2. holster back is of two layers of 5/6 oz. veg-tanned cowhide laminated flesh-side to flesh-side. 3. matching single pouch is of 5/6 oz. veg-tanned laminated with elephant hide flesh-side to flesh-side. 4. matching belt is 8/9 oz. veg-tanned cowhide laminated to 4/5 oz. elephant on outer side. Holster rig #2 is essentially the same as #1, made for the 4.25" Model 1911 pistol, standard forward cant.. Holster rig #3 is similar in construction, Model 1-D Pancake with Dual Carry Option (strong-side or cross-draw, 3-slot pancake), made for the 2-1/8" J-frame .357 magnum, with 6-round drop pouch. Elephant hide was cemented to the cowhide using Fiebings Tanners Bond cement. Adhesion was excellent and these holsters went through the wet-forming and boning processes with very good results and no delamination at all. The elephant hide has an extreme surface texture. This prevents stitch grooving, but the Cobra Class 4 stitcher set the stitches in so firmly that they are all but invisible in the textured surface. Edge stitching was accomplished using the roller guide. Remainder of assembly stitching was done using a colored pencil line to identify the stitch pattern. The elephant hide as received was a very dark charcoal gray shade. I used Fiebings Black Oil dye on all surfaces to create an even overall appearance. One mistake was made on holster #1. Customer had specified neutral cant, but I made it with standard butt-forward cant. That "mistake" will now be for my assistant's husband (deputy sheriff) Christmas present. Customer also requested that I keep enough of the elephant hide to make a rig for myself, which I will probably get around to one of these days. Quote Share this post Link to post Share on other sites
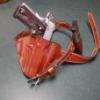
longtooth Report post Posted October 19, 2013 (edited) I also, did a elephant holster for a 1911 commander. Your right on the stitches but the problem I had was it such a strong hide the belt loops where to stiff and I had to take a layer off on the back side to make it easier for the holster to conform to the belt and the customer's body. Edited October 19, 2013 by longtooth Quote Share this post Link to post Share on other sites
longtooth Report post Posted October 19, 2013 This is the holster I was talking about in the above comment. Quote Share this post Link to post Share on other sites
katsass Report post Posted October 19, 2013 Ray, As a rule, in general, etc. etc. I just don't care for overlay work -- this is an exception, but I'd not expect anything else from you. Mike Quote Share this post Link to post Share on other sites
Denster Report post Posted October 19, 2013 Ray. Pretty darn nice particularly for someone who doesn't regularly work with exotics. Quote Share this post Link to post Share on other sites
Eaglestroker Report post Posted October 21, 2013 That looks extremely nice, I've had limited experience with the stuff. Enough to now it's had to get an edge look good like that. I love the revolver rig! Quote Share this post Link to post Share on other sites
SooperJake Report post Posted October 21, 2013 Nice, Ray! Quote Share this post Link to post Share on other sites
renegadelizard Report post Posted November 3, 2013 Very nice Ray, I do a lot of elephant rigs and belts, mostly overlay stuff...and pretty much just like you did yours...i love working with elephant, shark and hippo..those are my top three...all except edging...there is no easy way to edge them, i just keep at it....here is an example Quote Share this post Link to post Share on other sites
Matt Alsaker Report post Posted November 11, 2013 Very nice Ray, I do a lot of elephant rigs and belts, mostly overlay stuff...and pretty much just like you did yours...i love working with elephant, shark and hippo..those are my top three...all except edging...there is no easy way to edge them, i just keep at it....here is an example I proposed to use his hide as an overlay on cowhide to produce his order. I've done several inlays, but never an overlay. I really like elephant and ostrich hides I've seen many of you overlay. I'm considering an overlay with an alligator hide I just picked up. Is alligator an okay hide to try as an overlay? With an overlay, do you guys run the exotic to the edge - then bevel and burnish like you normally would? Quote Share this post Link to post Share on other sites
renegadelizard Report post Posted November 11, 2013 I've done several inlays, but never an overlay. I really like elephant and ostrich hides I've seen many of you overlay. I'm considering an overlay with an alligator hide I just picked up. Is alligator an okay hide to try as an overlay? With an overlay, do you guys run the exotic to the edge - then bevel and burnish like you normally would? i have done alligator overlays, and they are a pain...the backs of all of mine were really hairy...but after you shave them down real good they work just fine...i run mine to the edge, bevel, dye, then burnish while the dye is still wet...it seems to finish better for me that way...also, make sure you pay attention to the very edges when it comes to shaving them down...alligator and ostrich both have many layers of flesh that seem to matte down, so after you shave it, pull up on it with your fingernails to make sure you have it all...dilute your glue on these as well, it penetrates better and keeps these layers from separating... Quote Share this post Link to post Share on other sites