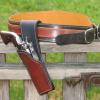
dakotawolf Report post Posted March 31, 2014 Beautiful burnishing on the outside edges. What is your inspiration for the design? Quote Share this post Link to post Share on other sites
Colt Hammerless Report post Posted March 31, 2014 Neat Red Cent. I'm going to build a cross draw for my friend's Sig 226 for when he's hiking. He was concerned with scratching the gun and I was just today thinking that I'll probably bring the leather up just as you have there. Is this for you or a customer? Wondering what conditions it's expected to be carried in that would call for that treatment. Hiking? Standing at a workbench, and constantly banging the shooter into stuff? Paul Quote Share this post Link to post Share on other sites
LTC Report post Posted March 31, 2014 this same thread is posted seven times...lol Quote Share this post Link to post Share on other sites
tallhorse89 Report post Posted March 31, 2014 this same thread is posted seven times...lol kind of ironic considering the thread title lol Quote Share this post Link to post Share on other sites
Red Cent Report post Posted March 31, 2014 What tha!!! The site refused my post and told me I couldn't do that a few times. I tried one more time, took a potty break, and came back to this. Sheezz! Well anyway, the design just came to me. Saves inside of coats and jackets. I used to destroy the inside of my suit coat. That Commander and a National Match tore holes until I deburred the sights. One could mold the outside "ear" to lay in closer and not much printing would be seen. Thanks about the burnishing. I take pride in a good edge. Quote Share this post Link to post Share on other sites
doubleh Report post Posted March 31, 2014 What tha!!! The site refused my post and told me I couldn't do that a few times. I tried one more time, took a potty break, and came back to this. Sheezz! Well anyway, the design just came to me. Saves inside of coats and jackets. I used to destroy the inside of my suit coat. That Commander and a National Match tore holes until I deburred the sights. One could mold the outside "ear" to lay in closer and not much printing would be seen. Thanks about the burnishing. I take pride in a good edge. I like it---a lot. A good edge is just as important as any other aspect of a leather project. Maybe more so. I don't care how good your tooling or stamping or sewing is, if the edge isn't up to snuff it ruins the whole thing. Quote Share this post Link to post Share on other sites
Eaglestroker Report post Posted March 31, 2014 I've seen a lot of Roy Baker pancakes, with only the front covering the side/sights etc before sweat shields were popular. It's something you don't see as much of but folks who want it definitely understand why. Nice work Quote Share this post Link to post Share on other sites
Red Cent Report post Posted March 31, 2014 Thank you. Quote Share this post Link to post Share on other sites
MDH Leatherworks Report post Posted April 1, 2014 Red Cent , what is your process on your edges? Great holster and great edges! Quote Share this post Link to post Share on other sites
Red Cent Report post Posted April 2, 2014 After I cut and glue, I square all the edges with a band sander and/or a drum sander. I bevel then I sand with a hand held hook and loop rubber block with 220 grit. I finish with a sponge that is impregnated with fine grit. Sponge forms a great rounded edge and removes the "hair" from the edge. I apply water with my fingertips (sparingly) and burnish with my home made dowel rod burnishing tool on a drill press. At this point, I usually have a glass smooth edge. I use Fieblings brown and black edge dye. When fully dry, I burnish again. Another glass smooth surface. Then, normally, I apply an acrylic I bought at Zack White. It is a proprietary coating that he doesn't advertise. My little plastic bottle has #250 hand written. I also have a large bottle of #300 also hand written. Let it thoroughly dry, buff with a t-shirt and a good edge jumps out at you:). Sometimes, after the dye, some bumps may appear that are remedied with the sponge. Burnish again. I have gotten away from the glycerin bar soap, beeswax, and/or paraffin for the most part. If a certain piece is stuborn, I may resort to beeswax:). Quote Share this post Link to post Share on other sites
4wheeler4 Report post Posted April 4, 2014 After I cut and glue, I square all the edges with a band sander and/or a drum sander. I bevel then I sand with a hand held hook and loop rubber block with 220 grit. I finish with a sponge that is impregnated with fine grit. Sponge forms a great rounded edge and removes the "hair" from the edge. I apply water with my fingertips (sparingly) and burnish with my home made dowel rod burnishing tool on a drill press. At this point, I usually have a glass smooth edge. I use Fieblings brown and black edge dye. When fully dry, I burnish again. Another glass smooth surface. Then, normally, I apply an acrylic I bought at Zack White. It is a proprietary coating that he doesn't advertise. My little plastic bottle has #250 hand written. I also have a large bottle of #300 also hand written. Let it thoroughly dry, buff with a t-shirt and a good edge jumps out at you:). Sometimes, after the dye, some bumps may appear that are remedied with the sponge. Burnish again. I have gotten away from the glycerin bar soap, beeswax, and/or paraffin for the most part. If a certain piece is stuborn, I may resort to beeswax:). Thanks for the tips, your work is always top notch!!!! Quote Share this post Link to post Share on other sites
Red Cent Report post Posted April 5, 2014 Thank you. Quote Share this post Link to post Share on other sites
MDH Leatherworks Report post Posted April 5, 2014 Thank you for laying out your process on your edges - great work! Quote Share this post Link to post Share on other sites
marine mp Report post Posted April 7, 2014 Red Cent, Nice work. I myself have gone to just using H2O as my edge burnishing "secret " formula!!!!! Take care...Semper-fi Mike Quote Share this post Link to post Share on other sites