Kelvandor
-
Content Count
12 -
Joined
-
Last visited
-
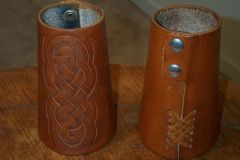
Hey all, I've been absent for some years, as life has a way of doing that to one... I got tapped to do another sword scabbard, and needed to get my hands back under me. Threw this together to see if I still knew which end of a stitching awl to poke into the leather. It's a pancake style sheath for a Myerchin knife and marlin spike that I've had for years. Used 1.0 Tiger Thread for the stitching. I'm an old-school flax user, so that was new for me... Messed up dying the edges, but otherwise I think it didn't turn out too badly (considering I've been away from the bench for quite a while, now)... -Kel
-
 EF leather dye is pretty much that: a water-based dye for leather. The Hi-Lite color stain is a bit different. I tend to think of it as a type of antique gel. It's used about the same as an antique; you apply it, leave it for about 2-5 minutes, then wipe it off. Instead of a dark stain filling in the depressed areas of your carving/stamping, the color of the Hi-Lite fills it in. It also gives the entire area you applied it an overall 'sheen' of the Hi-Lite color. Maybe one of the more experienced members here can give a better description... -Kel
 -
When I made this thing, I thought about just a thick pad of leather or some such on the end of a stick. I didn't think about the wax thing. The reason I ended up with this was so that I could still see how far through the leather I put the awl blade, so's I don't push too far -Kel
-
Hello all! I'm one of those that always seems to have bits and pieces of general stuff around my shop for all kinds of crafts and hobbies. When reading up the 'How-To' on getting good edge finishes and seeing the parts about sanding the edges first with small sanding drums that would fit in a drill, I figured that I had enough stuff around that I could make my own. I started with small wooden spools I had left over from another project. You can pick these up at any craft store for $3 a bag of 20 spools. I took some dowel that was just big enough around to fit in the spool hole and cut some short lengths to use as a shaft; about twice as long as the spools. Then I glued the dowels into the spools using some yellow wood glue. After that, I cut some sandpaper in different grits to fit around the spool and glued the paper on the spools. I used 150 grit and 220 grit here and used glue-stick on the sandpaper back. Just make sure you have glue right up to the edge of the paper. I left one spool blank to use as an edge burnisher/slicker. After all the glue dries, just chuck it into your drill and sand away! Just with a quick tally, I think you could put together a dozen of these for less than $10 even if you had to buy everything new. Hope these are a help! -Kel
-
For all those who hand-stitch on a stitching horse or pony and who's off-hand fingers are sore on the tips from supporting the back of your work while you push the awl through: I came up with a small tool that takes the place of my fingers. Since I have an awl in one hand all the time, I figured getting used to having something in the other hand as well wouldn't be too hard. It's a short piece of broomhandle that I cut a notch in to allow the awl blade to clear. Hope this is a help! -Kel
-
I know some may thump me in the head for this: I've found that the Lansky kits actually work pretty well for keeping most of my larger blades sharp, including my round knives. I can keep a constant angle on any blade with the jig included, and the stone grits go from 80 to 2000. As long as I don't try to rush, and strop afterwards, I can keep my blades practically vorpal. Lansky kits are not very expensive, and there are a couple of brands out there that sell the same style system. -Kel
-
After reading a couple of the post here on the Vinegroon process it struck me that I know this....or at least, I know a slightly different form of this: The process sounds almost exactly like the Iron-Gaul ink formulas and processes. Maybe someone here with a better understanding of the details can point out the differences? If they are virtually the same process, I would tend to get a bit worried about using Vinegroon. There is a lot of information published about the deteriorating effects of Iron-Gaul ink and the problems archivists are having in preserving older documents because of it. Has anyone noticed these effects on older vinegroon'ed leather? Or is the process different enough that it's not a worry? -Kel
-
Hello All, I'm not exactly new to leatherwork, but I am new to the forum and site. Been poking around with leather for about 5 years. I'm now wanting to get into it on a more serious basis, and am not ashamed to do the whole "DUH, How I do dat?!" thing... I've put a couple of pics up in the Gallery, and there's an entry in the Fountain Pen Network forum of a pen case I put together for a member there. Good to find the site, and I'll be spamming what questions I have shortly! -Kel
-
-