RWB Report post Posted August 28, 2010 (edited) Here is a Modified Association that I just finished.The customer wanted the fork pretty wide so I had the fork widened to 4 1/2 inch stock. A full inch wider from front to back than what Bill Bean normally makes them. The swells are only 4 inches of that there is a 1/2 inch lip on the front of it. It was pretty heavy and stout, but I kinda like the look of it. It has 14 inch swells. Tell me what you don't like about it. I always like the criticism. I tried to round that front jockey out a bit more. Tell me what you think, Troy and Darcy. I know both of you guys thought that on previous saddles that I didn't get it round enough. I guess I'm still working out what you mean by that. I'd like to ask for your critique as well, Keith. Anyway anything negative is welcome. For that matter anything positive is welcome to. I've got to find a better way to take photos. Thanks, Ross Edited August 28, 2010 by RWB Quote Share this post Link to post Share on other sites
steveh Report post Posted August 28, 2010 Looks very nice. I like the shape of the fork. The extended lip looks great. Tooling looks great. Is the horn a wood post? What leather did you use? What type of finish did you use? steve Quote Share this post Link to post Share on other sites
aermotor Report post Posted August 28, 2010 Ross, I think your big swells look cool. I would like to see a picture from behind to see the shape of them. Under the swells, the cut-out on the seat jockey looks a little narrow. From a cowboy's point of view, I like that, though. If it gets very wide there, it puts a bind against a rider's leg. Also, I like the background that you used in the photograph. It really shows your saddle well. Very nice saddle. Aermotor Quote Share this post Link to post Share on other sites
jwwright Report post Posted August 28, 2010 Real nice job Ross. I agree with aermotor about the width of the seat jockey under the swell.................I think it's because your line there runs uphill a little bit in comparison to the rest of your lines. A very nice saddle overall though. Do you edge dye as a matter of course on every saddle, or only do so upon customer request? JW Quote Share this post Link to post Share on other sites
Billy H Report post Posted August 28, 2010 Hey Ross, Nice Rig! I'm With you, Swell Forks always catch my eye. I am glad that you are able to get some saddles out there, around this part of the country people are given horses away and puttin tack on EBAY. Tough economy now. Billy Quote Share this post Link to post Share on other sites
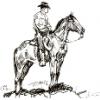
kseidel Report post Posted August 28, 2010 (edited) Ross, Good looking saddle overall. Nice light oil color. Tooling looks good... can't see enough of it to comment on details. I am posting a picture with notes relating to parts on the saddle for more detailed critique. I will be happy to elaborate on the finer points if you wish. This is only meant to be helpful for you in the future and not to be discouraging in any way. I think the swell shape looks great. I have done several with 5" stock ans a lot of lip out the front. I think they look great. Had a couple of nice visits with your father this month... he seems like a fine craftsman also. Keith Edited August 28, 2010 by kseidel Quote Share this post Link to post Share on other sites
TroyWest Report post Posted August 28, 2010 Hello Ross, I think we all agree the tree looks great. Really punchy. I think the critiques have been good. Everything Keith said was certainly good. The roundness of that front jockey is much improved over the other saddle. As Keith noted the overall appearrance and shape of the saddle is attractive. I say this a lot, but you could hang a set of rigs on a saddle with stirrup leathers and ride it. Everything else is for comfort or cosmetics. These are a very big deal which can make you or break you so it is an important study and a fun one to us saddle junkies. The glaring thing to me is the welt. You centered it on the swell but not in the middle of the widest point of the swell, again as Keith noted it should go right down to the screw. It could be further forward like a bronc saddle but it would need to be much further. Another thing that I would do is make the edge of the cantle more rounded. It is flat on top, then a corner, flat back, then a corner. I prefer that whole back edge to be a nice round like the barrel of a shotgun, if that makes sense. I have to end this as my wife needs her laptop so I'll go upstairs on the other computer and finish this critique. Troy Quote Share this post Link to post Share on other sites
RWB Report post Posted August 28, 2010 Hi Everybody, I appreciate all the kind words. It helps to have other eyes on stuff to help a guy out. JW, I'm glad you saw that line running uphill. It seems like I always struggle with that line. I don't know why I have so much trouble with it. As far as the dyed edges go I pretty much dye all my edges except when it is a contract saddle or the customer doesn't want it. I just like the look of it personally. I think it gives a nice finished look to a saddle. Chas Weldon told me here recently that he didn't like the "painted" look that it gave a saddle, but I guess it is just a difference of opinion. Tell me what you think. Keith, I appreciate the critique. It was just what I was looking for. I would like to ask you a few question about your comments, and please don't think that I am questioning your judgment. I would just like to understand what you are saying better. So for starters my first question is about the front of my skirts. Why would I want to have a straighter line at the front of my skirts? Don't I want to match the full round look that the back of my skirts have? Question #2 What is to deep for the rigging to be? I as a standard I put the bottom of my rigging plate at 6 3/4 inches off the lowest part of my front bar pad. Should I be at 6 1/4"-6 1/2 inches? Question #3 Why is my front seat jockey to narrow? I can see where I need to lower it to match my back jockeys. I obviously failed to get those lines to match. But why do I need to raise it higher on my swell? Question #4 Why is my welt to high? Looking at my questions I guess I sound like a child. Why? Why? Why? Again I appreciate all your help. I hope that I am not a nuisance, and if I am just tell me. I'm glad that you had some good conversations with Dad. He is a pretty handy guy. Art, wood, sculpting, and pretty much anything else he puts his mind to he can do. And he does it well. Of course I am biased, but in spite of that I know he is good. Thanks again, Ross Brunk Quote Share this post Link to post Share on other sites
TroyWest Report post Posted August 28, 2010 Again these are only opinions as I saw a saddle today of a well known maker with a roll like yours, a bit squared off, so opinions are like noses. Everybody has one and there are usually a couple of holes in them. While I also like the shape of the skirts and the housing being parallel, when you get to where the housing goes under the seat jockey it flares a bit upward. It is only slight but with the skirt sloping downward there it takes away a bit from the loveliness of the lines. I am being nit-picky here, but you want people to look at your saddle and say, man those are nice lines. You really want the front jockey and rear jockey to have lines that either go straight across in perfect line as on a semi square rig or a gentle downward curve that would perfectly intersect. When you fit those jockeys, get back off 10 ft. and look at it. You can see those discrepancies from a distance easier than when right on top of them. I think you should sew your binder a bit further down rather than stopping 3/4" from the bottom. You are doing a lot of things well Ross. Your housings look like they are down nice and tight. Your tooling is looking good, and you have a great attitude for learning. Troy Quote Share this post Link to post Share on other sites
RWB Report post Posted August 29, 2010 Hi Troy, Thanks, not only for the compliments but the critique as well. Like I told Keith I appreciate it when someone is willing to help. As far as your opinion goes, your right some peoples opinions aren't any good, but I asked for yours because I value it. You have always been helpful and you do good work. As far as the cantle binding goes I think your right. I didn't like it when I got done with it either. How far off of my seat should I start my stitches? I did notice were my back jockeys come up a bit, but I had a hard time sucking them down tight without them. They had a lot of snap to them when I got done, but I think I need to compesate and cut them a little lower in the future. Again I appeciate it. Ross Quote Share this post Link to post Share on other sites
jwwright Report post Posted August 29, 2010 JW, I'm glad you saw that line running uphill. It seems like I always struggle with that line. I don't know why I have so much trouble with it. As far as the dyed edges go I pretty much dye all my edges except when it is a contract saddle or the customer doesn't want it. I just like the look of it personally. I think it gives a nice finished look to a saddle. Chas Weldon told me here recently that he didn't like the "painted" look that it gave a saddle, but I guess it is just a difference of opinion. Tell me what you think. Ross...........I understand having a little trouble getting that line. I had a hard time with it for a while, and I still get one a little more uphill than I intended once in a while. For me, what is helpful is..............when I am fitting the seat, and have cuts around the swell done, I then put my rear housing jockeys on the saddle, and draw them down tight as they would be on the finished saddle. Then, I make sure I have the saddle sitting on the stand at the same angle as it would be on the average horse. I use the bottom edge of the rear housing jocks as a guide to getting a level paralell line to the front of the saddle, and make a couple light reference marks on the seat jockey. I have a couple of templates with seat jockey shapes that I like, and use them as reference for marking those lines. I'm sure there are better, easier ways to get it done......but this is what I came up with to help with consistantcy on that line. On the edge dying.............I think your saddles look good with it. I have dyed some on show saddles, and some ranch/performance saddles upon request. I did a couple with brown color that I liked. I think it's sure a personal preference thing, and I don't know that I have a preference on that...........but I do have a preference for nice saddles like this one you've shown us. JW Quote Share this post Link to post Share on other sites
kseidel Report post Posted August 29, 2010 Ross, I like your saddle, and I want to help you with the finer points that can be elusive. I am being a bit more critical than necessary, but it looks like you are ready for some more advanced lessons to move to the next level. Lets see if I can answer your questions... Why would I want to have a straighter line at the front of my skirts? Don't I want to match the full round look that the back of my skirts have? You do want to have a complimentary shape in front as in back, but it is impossible to have a matching curve as it is not the same size, and you do not have the same space to fill. You do not want the skirt to extend as far in front of the tree as in the back, and you are getting too far in front. In order to make the front match the back, you need the longest point of the skirt to be higher up and not down in the center of the skirt. Make the longest point about where your breast collar dee is, and start sloping back from there. Remember that you have only about 2/3rds the depth in front as in back and you need to be straight by the time you reach the rigging, or close to it. You are not trying to copy the back, only compliment it. Question #2 What is to deep for the rigging to be? I as a standard I put the bottom of my rigging plate at 6 3/4 inches off the lowest part of my front bar pad. Should I be at 6 1/4"-6 1/2 inches? Do not be too dependent on specific measurements for where your rigging should be. Match it to the proportions of your saddle. Once your flat plate drops below the skirt, it has relief and is low enough. Unless you have a very shallow skirt for a very large horse, you do not have to drop the rigging extra low. Many drop riggings have gotten so low as to interfere with the shoulder movement of the horse, and require very short cinches. Question #3 Why is my front seat jockey to narrow? I can see where I need to lower it to match my back jockeys. I obviously failed to get those lines to match. But why do I need to raise it higher on my swell? The "skinny" seat jockey looks emaciated next to the heavy swell. You went to a lot of effort to make a swell that has some mass and a powerful appearance, and the seat jockey needs to be proportionately massive. Also, over time the seat leather will shrink away from the swell leaving a gap at the back lower portion. This should be cut higher up the back of the swell, and with a little larger radius around the lower rear quadrant to better compliment the swell shape. Question #4 Why is my welt to high? A welt does not need to extend to over the top of the swell. The leather will stretch and shape a great deal, and you do not have to take out all of the slack with the welt. It is subject to excessive wear, and is unattractive. As Troy mentioned, you can run the welt in different places and at different angles... wherever and however you want. Make it compliment the rest of your design. When running it down the outside edge, it must run straight and centered. Looking at my questions I guess I sound like a child. Why? Why? Why? Again I appreciate all your help. I hope that I am not a nuisance, and if I am just tell me. It is difficult advance beyond a certain level without assistance. You are advanced enough to need more than "basic" suggestions. I always have a WHY for everything that I do, and am happy to share it with you. Keep striving for greater precision and you will become more methodical and consistent in your work. I happen to like the squared corner cheyenne roll cantle bindings. I do them on a lot of saddles. Rounded are probably more appropriate for hard working saddles I suppose. Again, match them to your overall design. I hope this helps answer these questions. If you want more clarity or explanation, just ask and I will try to make it more clear. Respectfully, Keith Quote Share this post Link to post Share on other sites
D.A. Kabatoff Report post Posted August 29, 2010 (edited) Hi Ross, That's a nice looking saddle. You are starting to take on a recognizable style of your own and your efforts show. As far as any critique, I think most of what I see has been mentioned by Troy and Keith. I think it's important to keep in mind the style of saddle that appeals to you and your customers. You don't want to assimilate into something that isn't what you have in mind. To give you an example of what I mean, if you look at the shape of your seat jockey... From the rear ear it immediately slopes forward and as it comes up towards the screw under the swell it slopes forward. This is a very different style than the type of jockey that I like to make. My jockey typically comes straight down and sometimes even slopes backward from the rear ear and then does the same towards the front of the jockey. The reason I mention this is because each style presents it's own challenge in trying to keep the overall balance of the saddle. My seat jockey will typically appear larger than yours and will naturally cover more of the rigging and transition into the front jockey in a different way. It's not to say one way is right or wrong but it will confuse the issue for you if you try to combine the two styles. It's been mentioned that you need more leather directly below the fork but this will probably require changes to your seat jockey and perhaps even your rigging pattern and fender size to achieve the balanced look you want. I think you'd do well to take a look at J.W. Wright's saddles as your seat jockey is similar in style. If you look at his front jockeys you will notice that they are deeper than your own and you will see how he has tackled the challenge of transitioning them into the seat jockeys. Look at the size and shape of his rigging pattern and you can see how it differs from your own and what changes you need to make it appear balanced. Two points I'd reiterate that are unrelated to jockey style: I'd agree that you need to shorten up the front of your skirt by a good inch. On your cantle binding you probably have room for three maybe four more stitches before the binding disappears under the seat... i'd sew just as low as you can. A couple minor points that are just my own preference, the line you scribed into the seat and fenders, I would move that closer to the edges of the leather so that it's in a similar position to the beaded line on the rear jockeys and rigging. The other point would be the beaded line on your rigging above the rigging plate is getting quite close to the stitching... it looks nice when there is the same amount of leather on either side of the stitch line. Other than that you are doing smooth, functional work and the pride you have in your work shows. Darcy Edited August 29, 2010 by D.A. Kabatoff Quote Share this post Link to post Share on other sites
RWB Report post Posted August 30, 2010 I just wanted to say thanks again. Keith, that was very helpful. I answered most of my questions. Now I just need to go out into the shop and apply it on the next one. Maybe one of these days I will be able to get away from the shop and come down to Cody and just stop and visit. It's always cool to visit your store. JW again always appreciate the input. Try dyeing some more edges, it gets addicting. Try some British Tan , it's not as stark of a contrast. Darcy, I appreciate the comments. I'll have to digest them and see how I change things on the next one. Again Thanks Troy again, thank you. It's always a pleasure to have you criticize something. Have a great day. Ross Quote Share this post Link to post Share on other sites