Jump to content
markush

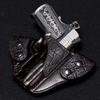
Showing First Mag Carrier And A Bunch Of Other Questions

Recommended Posts

First, here is the mag carrier I just finished to match my first IWB. The belt loops are really ugly this time and I will remake them.

74f95ae7.jpg

b8bf775d.jpg

This shows a bit of my edges, I'm pretty happy with them but someone mentioned they couldn't see them when I asked for a critique of the holster.

d534693f.jpg

Now some of my questions. My very first holster was a Cross Draw OWB for a J-Frame revolver and I'm showing a pic of it to help illustrate my questions...I know it's garbage so there's no need to point out all the bad.

First question is...how do you determine the stitch line spacing on a revolver? I just picked 3/8" distance around the gun out of the blue and you can see it wasn't enough to allow the gun to seat that last 1/4" into the holster.

My second question has to do with the holster and my mag carrier changing shape during wet molding. In these photos my patterns are shown under the finished items to show you how much they changed shape. Do I just redraw my patterns to compensate for the movement?

b413a6ca.jpg

36e4f46d.jpg

Third question is about spacers to fit between the belt loop and holster on IWB's. I didn't use them because I don't see them on very many other IWB holsters, and not having them doesn't seem to cause problems on the two pieces I've made. Are they just one of those little extras that some makers do?

And lastly, is there rule of thumb about distance of the snaps from the top of the belt on IWB stuff? I've got about a 1/4" . They work but it takes a little effort to snap them around the belt. I'm wondering if 1/2" would allow the holster to flop around on the belt?

Oh one more! What size edge beveler should I use for 7/8 and 8/9oz leather? I've just been hitting the edges with a belt sander before burnishing.

Edited by markush

Share this post


Link to post
Share on other sites

I can't answer the rest of your questions, but regarding revolver spacing: It's guess work. I've found the easiest way for me to get consistent results is to use welted designs but this may or may not work for you. Keep playing with it any you'll get it right!

Edited by Eaglestroker

Share this post


Link to post
Share on other sites

Markush; From the grumpy old man. As to your question as to stitch lines on wheel guns, this is my way for modern wheelguns ..... western rigs are a bit different... First off, autos are usually of equal width from breech to muzzle ... wheel guns aren't .... you need to take this into account. I measure the width of the cylinder and divide by 2. To this I add 1/2 the thickness of the leather used. This will be the distance from the original outline of the gun on my pattern, ie. my stitch line. This line is drawn from trigger guard to the frame at the distance determined AND is continued around the face of the frame to some extent. In other words, roughly follow the contour of the trigger guard and frame .... all of the way around the face of the frame. Draw in pencil and tweak as necessary.Stay roughly close to the actual outline of your pistol, but be aware of where the gun will seat in the leather. From there on its a matter of aesthetics. A revolver should seat in a holster on the face of the frame and/or the face of the trigger guard. Well molded in those areas, the barrel area can be wider and not so tight, as the molded area will not allow the barrel to wander around. Clear as mud ? A couple of pics. Notice that this is not the final pattern, but is the beginnig of the task .... you usually need to tweak a lot more than once. Mike

005.jpg

006.jpg

Edited by katsass

Share this post


Link to post
Share on other sites

That's actually some pretty clear mud there katass! Is it ok to assume that same measurement, half the cylinder width plus leather, will work when the stitching continues around the entire gun as in a pancake holster?

Edited by markush

Share this post


Link to post
Share on other sites

Markush: In answer to your question. On pancakes, I just use 1/2 the thickness of the gun, the trace of the gun on the pattern gives you plenty of space for the thickness of the leather. In fact, depending on the thickness of leather used, you may have to ease the stitch line in a bit for a tight fit. Lighter leather .... closer on the stitch line. Something that after doing some, you'll almost automatically pick up. On the pattern shown (a pouch type holster) there is no stitching along the back. Also, on pancakes you want to follow the contour of the gun quite closely. Hope this helps Mike

Edited by katsass

Share this post


Link to post
Share on other sites

Join the conversation

You can post now and register later. If you have an account, sign in now to post with your account.
Note: Your post will require moderator approval before it will be visible.

Guest
Reply to this topic...

×   Pasted as rich text.   Paste as plain text instead

  Only 75 emoji are allowed.

×   Your link has been automatically embedded.   Display as a link instead

×   Your previous content has been restored.   Clear editor

×   You cannot paste images directly. Upload or insert images from URL.


×
×
  • Create New...