

Kd Custom
-
Content Count
42 -
Joined
-
Last visited
Recent Profile Visitors
1,912 profile views
-
Thank y'all, I ended up getting a few from Weaver Leather pretty cheap!
-
Does anyone know where I could find heavy duty buckles for a weight lifting belt? Like the one in the picture or similar! Thank you!!
-
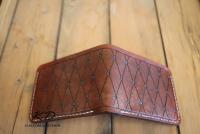
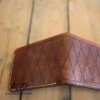
Yes those are the lines I was referring to, I stitched after stain was applied and everything was dry. I did not try to compress the leather in any way before stitching I think your right that is probably the key to working those out, and thank you!
-
Finally got to the point I needed an industrial sewing machine and went with the Cowboy 3200. Still have some fine-tuning to do for me but I love how it works and it sure beats spending an hour of labor on stitching!! You can see the lines on top of the material is there an adjustment for that or is that just normal? I made these three collars for Second Chance Farms. An amazing foundation that takes in disabled animals and helps them enjoy life. Thanks for looking!
-
 I need your help! I used a bottle of older dye I had, Eco-flow all in one chocolate cherry. Customer loved the sheath so much he ordered two more. One of them will be the same color that I have run out of. Also found out its discontinued, does anyone know of a source?? I would be open to matching the color as well if someone has an idea what would be close. Thanks!! Derek
 -
Tooled pancake holster
Kd Custom replied to fgabesz's topic in Gun Holsters, Rifle Slings and Knife Sheathes
Beautiful! -
Sig 938 Bbq Set
Kd Custom replied to greystoneleatherllc's topic in Gun Holsters, Rifle Slings and Knife Sheathes
Awesome set up. Looks amazing! Now, what the heck is a BBQ set?? haha -
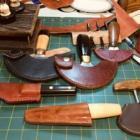
As far as the color changing goes do you have a picture of an example? What I believe is your tools are the reason you are not seeing any shading effect. For example my Hidecrafter bevelers leave an amazing shaded effect when I use them but the exact same Tandy Leather tool has no shading added to it. With your stamps even Tandy can vary from each type of beveler between smooth and textured. What stamps are you using? I have been doing leather work for several years now and the only time I submerge a piece of leather in water is if I am molding it. Take a plastic tupper-ware and put water in it with a little sponge. Simply brush that across the area you are tooling on and wait a few seconds then begin tooling. You have to re-wet the piece as you work periodically. Simple as that!
-
Awesome review maybe they are a newer company? I'd hope so with that kind of service... Hopefully you can give us an update when you put some through wear and tear!
-
I personally have a cheaper stitch groover that's unmarked, mostly likely from Tandy. It works perfectly for what it needs to be. Remember that a stitch channel is going to be covered up for the most part, so having a picture perfect channel is not necessary. However, they will not do special curves very well so I invested in cheap Ebay stitch groovers like these: http://www.ebay.com/itm/Leather-Leathercraft-Tool-Kit-Stitching-U-V-Shaped-Groover-Skiving-Edge-Beveler-/321704649257?hash=item4ae7176229:g:EpgAAOSw4SlV8PBu The combination of the two I am able to make a perfect channel and for under 20$. There are plenty of other tools that would benefit from spending the extra money. Hope I helped at all!
-
A Few New Items This Week
Kd Custom replied to Otto6294's topic in Gun Holsters, Rifle Slings and Knife Sheathes
Great work! -
Paladin Holster
Kd Custom replied to bushpilotmexico's topic in Gun Holsters, Rifle Slings and Knife Sheathes
Very clean work! The wrinkles are small, a non-leather worker wouldn't notice! -
Wow I'll check that out too! I tried to find them in bulk but the only had gold available and I would rather not spray paint them :/
-
I started from the bottom and went up, that is what I was thinking that maybe went to far down. Thanks I'll try that on the next one!
-
I just made a inside waistband holster and not sure why it is coming to a point out at the end. Is there a different way to do the end so it doesn't do this? Thanks!