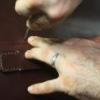
esantoro Report post Posted February 23, 2008 These explorations may be useful for others, but please don't try any of these adjustments unless we are all sure of what we are doing. I'm simply offering myself as a guinea pig. If it all works out, our little community will have the best 441 resource on the net, if it doesn't already. Please remember that anything I post regarding these adjustments is not necessarily correct and accurate but simply my best educated guesses. This post concerns itself with the amount of to and fro travel of the inner presser foot of the 441: I should have taken detailed pictures and notes before I adjusted anything. What prompted me to adjust this amount of to and fro travel is that with my new rt and lt side presser feet and inner groover foot, there was at least a half inch minimum distance between the inside edge of the outer foot and the outer edge of the inner foot (see pic) The attached pic shows post-adjustment when I narrowed that gap to a more acceptable 1/8". I was having some difficulty with skipped stitches with my raised needle plates and running without lower needle guide. The other day I replaced the lower needle guide and saw better stitches. However I also noticed that the the needle now ever so slightly grazes the front oval of the cutout in the needle guide, I believe because I had adjusted the to/fro travel of the inner foot, which also moves the needle bar the same distance. Now I must readjust that to and fro/travel, maybe 1/16" away from the front cutout oval of the needle guide. If memory serves correctly, I believe prior to any adjustments, the needle was centered in that cut out oval of the needle guide. That centering of the needle prompted me to wonder what if anything does that needle guide serve, if the needle is always centered in the cutout. I think I'm seeing better stitches when the needle is a bit more toward the front of that cutout but nottouching any metal of the needle guide. I believe the following is correct, but let's wait upon confirmed feedback from those with tried and trued experience and knowledge to be completely sure. Please note that this adjustment is for a feed-dog-less flat needle plate with a needle guide that has an oval cutout for the needle. Needle guides from Ferdco and Artisan may have a larger cutout for the needle to enter. 1. suspend the presser feet with the hand lift. 2. rotate the balance wheel so that the inner foot moves to its farthes forward point. 3. Rotate the balance wheel more until the needle has just entered the coutout in the needle guide. In may case, this means that the needle is ever so slightly grazing the front of that cutout, so I must make a small adjustment to move that needle about 1/16" back off that edge of the needle guide cutout. 4. Now you need to loosen the top allen head bolt in the vicinity of the balance wheel. This top bolt loosens the clamp on that thick bar running along the back of the machine. 5. Once loosened, you can now move the inner foot freely in its to and fro travel. Position the inner foot as required and retighten that allen head bolt. If I am incorrect in any of this, or ignorant of anything else I may have altered on the machine, someone please correct me. Ed Quote Share this post Link to post Share on other sites
esantoro Report post Posted February 23, 2008 I have a question. Does anyone know the adjustment to be made by loosening the bolt that sits lower on the bar clamp in question in the original post? ed Quote Share this post Link to post Share on other sites
Valnir Report post Posted February 8, 2015 Where can i buy this feet? The same like in photo 1. Quote Share this post Link to post Share on other sites
amuckart Report post Posted March 1, 2015 Can you clarify what you mean by needle guide, is it a part under the needle plate that replaces the feed dog like in the Ferdco patents? If it is, where did you get it? Thanks. Quote Share this post Link to post Share on other sites
Gregg From Keystone Sewing Report post Posted March 2, 2015 Esantoro, These 441s were setup more or less from the factory for sewing canvas type work, not leather. Your setup is not the factory standard setup, so adjustments may have to be made. Secondly, and more importantly, just because you have a machine that shows up from Juki or any knock off company it does not mean they sent it to you with the correct settings. You could be simply coping their mistakes. Or, maybe thier settings are not ideal for your threads, materials and jobs. Nice post, thanks again for sharing. Quote Share this post Link to post Share on other sites
Trox Report post Posted March 4, 2015 Hi Ed, it seems like this topic died with several unanswered questions. I will like to add the same question that Amuckart did, what kind of lower needle guide do you have in your machine and where did you get it? For those of you that do not know what this guide is used for. This type of lower needle guide are used when special needle plates do not allow the use of a feed dog. Skipping stitches may occur without it when the needle bends away from the hook tip. And that may happen with the 441`s long needle system, heavy thread tension and material. I believe the adjustment you are talking about is there to make sure the needle hits in the middle of the feed dog (or lower needle guide). It should not matter which screw on that bar clamp you open to make the adjustment, the result should be the same. (You should set your stitch length to zero and control your hook needle timing too. Without such guide or feed dog installed, your adjustment might have a influence on the hook/needle timing. Its nothing other than the plates needle slot that limits it) It is like Greg writes in his post; the Juki 441 machine is original set up to sew fabrics and most clones are again adjusted after the original Juki manual. It may not work well for your sewing conditions. The aftermarket leather attachments are again not made after Juki specifications and therefor requires a different adjustments. So there are no right or wrong here, just what works for you. Valnir, these attachments ( presser feet`s, dogs and plates for leather work) are sold by most 441 clone dealers, like Cobra, Cowboy and Techsew to mention some I do have most of these aftermarket feet's and plates, even bought from the same supplier; paddle feet's and harness feet might be made in different heights (like mine). And non of them have the same height as the original Juki foot. Thats a pain in the ........ when you change to a different foot; you have to adjust the alternating height (so both presser foot lift to the same height). I did experienced lot of skipped stitches using the harness and stirrup plate (the slotted and the raised special needle plates). Because of the lack of a lower needle guide and because the stirrup plate was to high (it changes the the thread loop size). And if your hook-needle timing is a bit off, you will for sure experience skipped stitches under these "extreme" sewing conditions. Even when it sewed well with the standard plate, it skipped stitches with the special plates. A perfect hook needle adjustment made it a bit better, but it still skipped stitches from time to time. I reduced the height of my stirrup plate and it preformed better with it, but it still needs a lower needle guide to sew perfect. So now my preferred setup is a smooth standard plate and smooth feed dog; all these fine attachments is almost never in use. Thats a shame because I need them, my hope is that a lower needle guide will solve the problem. But where do I find one? I hope I do not have to make one myself. So please keep this topic alive! Thanks Tor Quote Share this post Link to post Share on other sites
Wizcrafts Report post Posted March 4, 2015 (edited) Tor; Are you suggesting that this (as yet non-existent) lower needle guide would move like a normal feed dog, but would stay under the plane of the throat plate at all times? If so, an accessory smooth or toothed feeder could be modified so its vertical position slot allows it to drop down out of the way. This would require grinding down the curved bottom of the feeder and slightly increasing the upper length of the height slot, to let it drop farther down. It will probably still have enough usable vertical range to raise it up for normal use. The clamping screw might need a lockwasher between the screw head and the feeder shank, to lock it down against the pressure of the inside foot and leather. I suppose that someone willing to experiment on an extra feed dog might come up with your solution. I don't know about 441 clones in .EU, but most of them sold in the US and Canada have the smooth harness feet and feeder installed and the Juki presser feet and feeder with teeth in the accessory bag. Somebody who isn't using, or planning on using these so-called blanket feet might try modifying that feeder to drop down out of the way of the slotted and stirrup plates. Interestingly, my smooth feeder does not make contact with the bottom of my holster plate, so I can leave it in place without lowering it for that plate. But, it will not drop down far enough to clear the slotted or stirrup plates. Final note: my "blanket" feed dog (with teeth) has a more or less round needle hole that is nowhere near as wide as the smooth dog with a long slot in it. Edited March 4, 2015 by Wizcrafts Quote Share this post Link to post Share on other sites
amuckart Report post Posted March 4, 2015 Tor; Are you suggesting that this (as yet non-existent) lower needle guide would move like a normal feed dog, but would stay under the plane of the throat plate at all times? If so, an accessory smooth or toothed feeder could be modified so its vertical position slot allows it to drop down out of the way. This would require grinding down the curved bottom of the feeder and slightly increasing the upper length of the height slot, to let it drop farther down. It will probably still have enough usable vertical range to raise it up for normal use. The clamping screw might need a lockwasher between the screw head and the feeder shank, to lock it down against the pressure of the inside foot and leather. I suppose that someone willing to experiment on an extra feed dog might come up with your solution. I can't speak for Tor, but that's what I was asking about. The Ferdco machines had this part and they are described in the patents which I squirrelled out a while ago and listed in this post http://leatherworker.net/forum/index.php?showtopic=41581&p=259182 The patents were filed in 1993 and have lapsed, so my hope is that the other clone manufacturers will now start making and supplying these parts. Thanks. Quote Share this post Link to post Share on other sites
Trox Report post Posted March 4, 2015 (edited) Yes Amuckart, I am asking for the same thing too. I do not remember the topic in your link, but it has been discussed in other topics as well. I have not seen anybody selling such lower guide yet, but it seems like Ed knows about it. Hi Wiz, My machine came as a normal TSC 441 would have done, with no leather attachment what so ever, I bought all my attachments from the USA. I did not buy the holster plate, because I thought the stirrup would work very similar. Thats was before I knew anything about these problems and was trying to save some dollars, otherwise I would have chosen the holster plate. And yes, I thought about modifying my blanket feed dog to work as such guide; under a closed (top feed) needle plate.The reason I did not was because the original Ferdco patented lower guide had a different hole in it. And there was always small hints in topics that it was available, like in Ed`s. I should also do more research before altering my blanked feed dog, and you never know when it might be useful as it is some day (when its gone). Buying a finish lower "noodle" guide would of course be preferable. There was one member, I think it was the same one that made the 3D printed stirrup plates for us. Do you remember him? he altered his cowboy stirrup plate so he was able to use a feed dog beneath it. He grinded away most of the plate and it did not look very solid after this modifying, it was not much left of it. (there are a reason for the use stainless steel or similar hardened polished material in these plates) Until we get any answers from Ed and perhaps other who might know anything, I will leave my blanked dog alone. And instead trying to keep this topic alive long enough to get some answers. Thanks Tor Edited March 4, 2015 by Trox Quote Share this post Link to post Share on other sites
Trox Report post Posted March 4, 2015 Somebody should start making these lower needle guides, I think they might fit other machines too (perhaps the DA 205-370). They would sell to every one that uses a 441 with these closed "noodle plates". Safety against skipped stitches makes you breathe easier when sewing a valuable piece work. Tor Quote Share this post Link to post Share on other sites