Zooker Report post Posted February 16, 2013 I am going to make my own gun rig for cowboy action shooting, having no real leather experience, but a knack for the creative. I have created a pattern for fun and practice using a cap gun, as my real guns must be on the slow boat from Italy. The first photo is simply the pattern with the second showing the detail of the loop. The little tab extending from the bottom will be returned back to the skirt and riveted in place to make a loop for the tie strings. The third photo shows it mocked up with the black lines as the stitching and the red as the tooling. It will be a simple pattern using just a cut line, seeder and beveler. I have already determined I should ad about an inch to the belt loop to get it to hang lower. The loop will have a cross made of hammered copper attached to it. I am not sure how yet. Maybe a copper rivet, but I am open to suggestions. Any guidance or insight will be appreciated. Thanks, Ken Quote Share this post Link to post Share on other sites
Dwight Report post Posted February 16, 2013 John Bianchi, . . . of Bianchi Holster fame, . . . made a three tape VHS demo on how to make the rig you want to do. It is probably out there on DVD, . . . It is an awesome teaching exercise, . . . may be available on Ebay, . . . well worth a 40, 50, or 60 dollar price tag, . . . just in the leather you might save by using his process. I only disagree in a couple of areas, . . . nothing that makes any major difference, . . . I just do a few things a bit different, myself. From what I could see, . . . your patterns look OK. May God bless, Dwight Quote Share this post Link to post Share on other sites
camano ridge Report post Posted February 16, 2013 Overall the pattern looks ok. I would think about rounding the corners on the bottom of the skirt and the holster. You will find that sharp corners on leather get dogeared and beat up looking pretty quickly, they also have a tendacy to catch on things. The cross could be mounted with brads or copper rivets. I think I would JB Weld a couple of chicago screws to the back of the cross punch a couple of holes in the strap for the chicago screws and mount it that way. I f you wanted to take the time to do a double layer strap and cut out a cross shape window you could do it as an inlay. Quote Share this post Link to post Share on other sites
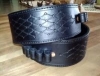
Zooker Report post Posted February 17, 2013 Thanks guys. @ Dwight: I have watched the Chuck Burrows videos and will try seeking out the Bianchi vids. Have you seen both and can you offer any comparisons? @ camano: when you say "round the corners" do you mean just the corners, or the whole concave bottom detail in general? I am making these out of two layers of 5-6 oz, glueing and sewing them back to back, so I could cut one layer around the copper cross and inlay it in the space. Would you think I need to stitch around the opening? Here is a photo of a quick sample of the tooling design. Quote Share this post Link to post Share on other sites
camano ridge Report post Posted February 17, 2013 (edited) As to the concave aspect it does not excite me, however it is your holster so make it the way you want and in your introduction you mentioned the creative aspect. I was merely pointing out that the way the desing looks in your paper mock up that those pointed areas as circled in the drawing will become beat up pretty quickly. Look at the hundreds of holsters on this siet and over on cascity.com on the leather shop forum. In most cases the only time you will see sharp corners on a holster is someones early attempts at holster making. I like the tooling as exampled in your post. Here is an example of similar desing on two holsters. Edited February 17, 2013 by camano ridge Quote Share this post Link to post Share on other sites
camano ridge Report post Posted February 17, 2013 Forgot to address the cross. If you were going to do it as an anlay yes you would hve to do a stitch line othewise over time th edge may lift and it may be posible that the inlay could even come out. However depending on how wide the edge would be surounding the cross you may be able to get away with just one stitch line. Quote Share this post Link to post Share on other sites
Zooker Report post Posted February 18, 2013 Thanks Camano, I appreciate the guidance. While I like to be creative, I also like to avoid recreating others "learning" moments. I may try a few more practice runs before my guns get here, but I hope to have a decent rig in the next month. Quote Share this post Link to post Share on other sites
Dwight Report post Posted February 18, 2013 Sorry, Zooker, . . . the only videos I've seen were the Bianchi ones, . . . which were three VHS tapes, . . . probably not 2 hours each, . . . but VERY thorough. You have to kind of overlook the obvious plugs for Tandy, . . . they certainly had some $$$ invested somewhere in the videos, . . . but all in all, . . . really good. He sewed his cartridge loops on, . . , I punch and lace mine, . . . he used a set of calipers for his stitch lines, . . . I use a gouge, . . . and when he was all done with the rig, . . . he dunked it in a bath of neatsfoot oil, . . . which I just don't do. All of the cowboy rigs on my website were created using his techniques. But he shows you how to make the proper curve in the belt that will keep you from coughing and your gunbelt winding up around your ankles, . . . he goes through the pattern process for both the belt and the holster, . . . honestly, I cannot imagine anyone being any more thorough. May God bless, Dwight Quote Share this post Link to post Share on other sites
robertmeco Report post Posted February 18, 2013 Bianchi's videos are on amazon and well worth the money Quote Share this post Link to post Share on other sites