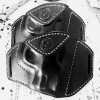
zaptoid Report post Posted May 9, 2009 This is my first go at a holster. I think I learned everything not to do the first time around. My biggest problem is getting the edges squared up and getting my holes square from front to back. The pattern was drawn based on a tut on the web I posted on here. I think I might set up a dremel in a drill press rig for sanding and drilling my holes next time around. Quote Share this post Link to post Share on other sites
coldmaker0 Report post Posted May 9, 2009 nice looking holster,sewing will get better with practice,i use the square shaped sewing punch from tandy for my holes Quote Share this post Link to post Share on other sites
kevinhopkins Report post Posted May 9, 2009 If that's your first one, You are going to really do well! Kevin Hopkins Quote Share this post Link to post Share on other sites
zaptoid Report post Posted May 9, 2009 (edited) nice looking holster,sewing will get better with practice,i use the square shaped sewing punch from tandy for my holes Thanks. I used the single diamond punch from tandy. The back looks fine but the sewing line is a bit sketchy. Making sure Im square with world when I punch is tricky. Im grooving the back also so If Im off just a tad when I go to groove some of my holes are off center of the groove. Edited May 9, 2009 by zaptoid Quote Share this post Link to post Share on other sites
zaptoid Report post Posted May 9, 2009 If that's your first one, You are going to really do well! Kevin Hopkins Thanks. It came out well but there are some mistakes here and there that once dyed kinda blend in. Its like the little dent on your truck that no one will see but you know its there and it drives you nuts. Im am definately hooked and cant wait to get going on the next one. Quote Share this post Link to post Share on other sites
Billsotx Report post Posted May 9, 2009 Thanks. It came out well but there are some mistakes here and there that once dyed kinda blend in. Its like the little dent on your truck that no one will see but you know its there and it drives you nuts. Im am definately hooked and cant wait to get going on the next one. Using the diamond awl punch your holes diagonally along your stitch line, as Al Stholman illustrates in his excellent book The Art of Hand Sewing Leather. He also explains how to get those awl holes in alignment on the back side. Looks good regardless, so build some more - repetition is the mother of skill! Quote Share this post Link to post Share on other sites
Lobo Report post Posted May 10, 2009 Very nice craftsmanship. Edges look very nice. Stitching looks pretty good. I think you see where an improvement can be made, here and there, and your next one will be professional quality work. Best regards. Quote Share this post Link to post Share on other sites
rhall Report post Posted May 10, 2009 Excellant first timer ,You are gonna do fine and improvements will come rapidly and naturally with every endever! Quote Share this post Link to post Share on other sites
Tac Report post Posted May 10, 2009 (edited) Since no one else mentioned it..... NICE GUN! I love my .40 Springfield XDm. All in all, a very good first attempt. I like the color and the molding looked well done. A drill press for the holes in the stitch line will definatley clean things up and cut your build time. A drum sander chucked in that same drill press will do wonders for your final edge finishing and beveling. A burnishing tool chucked in that same press will speed things up and produce professional grade edges in no time. (if you are thinking about a drillpress for the future, Harbor Freight and Tool has some decent table top versions for a very reasonable price) Practice makes perfect.... Once you have made yourself about 5 different holsters for each of your guns (one in each color to match your belts and shoes ) you will find yourself building holsters for all your friends and family... It's a rewarding hobby. -Tac Edited May 10, 2009 by Tac Quote Share this post Link to post Share on other sites
Jordan Report post Posted May 10, 2009 Very good 1st try. A word about sewing, if you glue the parts together,then sand or trim the edges equal before you gouge the sewing channel you can be pretty sure the groove on the back will line up if your tool is setup to follow the edge on both sides. Also machine and/or hand awl sewing makes a squarer hole compared to a round punch or drill bit. Purely a personal aesthetic choice but I find if the thread is not thick enough to disguise the round holes somewhat, they do not look as nice as the square one lying in the sewing channel. Quote Share this post Link to post Share on other sites
zaptoid Report post Posted May 10, 2009 Since no one else mentioned it..... NICE GUN! I love my .40 Springfield XDm. All in all, a very good first attempt. I like the color and the molding looked well done. A drill press for the holes in the stitch line will definatley clean things up and cut your build time. A drum sander chucked in that same drill press will do wonders for your final edge finishing and beveling. A burnishing tool chucked in that same press will speed things up and produce professional grade edges in no time. (if you are thinking about a drillpress for the future, Harbor Freight and Tool has some decent table top versions for a very reasonable price)Practice makes perfect.... Once you have made yourself about 5 different holsters for each of your guns (one in each color to match your belts and shoes ) you will find yourself building holsters for all your friends and family... It's a rewarding hobby. -Tac Hey Tac. Thanks for your input. Also nice to see another happy XDm customer mine is a .40 as well what a blast to shoot. Im actually gonna give that a go as far as drilling my holes and burninshing via drill press. Actually I will be using my dremel on low speed with the drill press attachment so we shall see how she goes. Eventually I will move up to a real drill press. Quote Share this post Link to post Share on other sites
TomLine Report post Posted May 13, 2009 I've tried drilling holes. A saddle maker's punch works better. The holes seem big, but they close-up on their own. I wore myself punching by hand with a hammer, so I took a press a friend gave me, and put the saddle maker's punch in it. It works GREAT!! Quote Share this post Link to post Share on other sites
zaptoid Report post Posted May 15, 2009 I've tried drilling holes. A saddle maker's punch works better. The holes seem big, but they close-up on their own. I wore myself punching by hand with a hammer, so I took a press a friend gave me, and put the saddle maker's punch in it. It works GREAT!! Super idea. I imagine you could pick one of them up second hand for a good price?!?! Quote Share this post Link to post Share on other sites