DoubleC Report post Posted February 17, 2012 I got these a while back and there's three I haven't go the slightest clue about. Number 1, and 3.....this has a wicked looking kinda serrated edge but only on one side, not serrated but spaces in the edge. (Has anyone noticed round fat wooden things don't wanna stay put on a scanner, LOL) and the knife thingy I put 12 on. and the Myers wheely thing is too loose to use. I thought one of those tiny pins had come out but there's not a hole for a pin on the other side. That's the tool the key goes to. I adore the one awl with the different handle, I think I could actually use it to sew with and not stab myself. The hole punch was suppose to be for stitching, but the holes are way too big I think to use to sew. Maybe lacing. Anyway, any ideas on what they are, how to clean and any idea on fixing the Myers thing would be greatly appreciated. Cheryl Quote Share this post Link to post Share on other sites
WinterBear Report post Posted February 17, 2012 Looks like some are cobbler's tools. You might be able to identify those by asking some of the bootmakers here. The tool at the middle at the bottom left (dark handle with a crack) might be a lacing fid. The wheeled thing looks like a speedy stitcher of sorts, but missing the needle. See if the end unscrews--if so, there might be a needle in there--it's a good place to store extra needles and the tool used to tighten the collet. I'm afraid I don't use the stitcher much--I have a similar model--but I prefer a strong handsewn saddle stitch to the lockstitch the stitcher produces. If a thread pops, several stitches will unravel (or possibly the entire stitching if you've got a bored Boy Scout who yanks on a loose thread), where with the saddle stitch, only one stitch will unravel if the thread breaks. It's good for patching canvas though. Quote Share this post Link to post Share on other sites
DoubleC Report post Posted February 17, 2012 Looks like some are cobbler's tools. You might be able to identify those by asking some of the bootmakers here. The tool at the middle at the bottom left (dark handle with a crack) might be a lacing fid. The wheeled thing looks like a speedy stitcher of sorts, but missing the needle. See if the end unscrews--if so, there might be a needle in there--it's a good place to store extra needles and the tool used to tighten the collet. I'm afraid I don't use the stitcher much--I have a similar model--but I prefer a strong handsewn saddle stitch to the lockstitch the stitcher produces. If a thread pops, several stitches will unravel (or possibly the entire stitching if you've got a bored Boy Scout who yanks on a loose thread), where with the saddle stitch, only one stitch will unravel if the thread breaks. It's good for patching canvas though. Thanks for you're help. Yeah a while back, well way back I got a 'speedy stitcher' and I don't use it either now. I don't know what a lacing fid is, but from the looks I guess makes bigger holes than a regular awl for lace, LOL. I wanted the tack puller, and the edger, and the awls and by the time I got these I had awls and 3 tack pullers that were given to me, LOL. So I guess I'll clean up the edger and use it and maybe just the others in a shadow box I have and display them. Well except the fid, don't think I have one of those. Cheryl Quote Share this post Link to post Share on other sites
Sylvia Report post Posted February 17, 2012 I think the forked thing is a tack puller. #12 is a cobblers blade though I've seen regular leather workers use them too as trim knives. Get out some WD40 and saturate the metal... allow to soak, then scrub with some fine steel wool. Or you could try an old gardener's trick. motor oil in a bucket of sand... plunge tools in and out for several minutes until the rust is gone. Quote Share this post Link to post Share on other sites
WinterBear Report post Posted February 17, 2012 I use my fid quite a bit, but not to enlarge holes so much (the edges of a fid should not be sharp, but more rounded than a lacing awl). Instead, I use the fid to help me make the lacing tight and smooth. Rather than trying to pick at the lace with my fingernails and scarring it, I slide the fid under the lace, press my thumb on top of the lace, so the lace is now sandwiched between the fid and the pad of my thumb, and gently pull. I find the fid indispensable when making turkshead knots and getting the flat lace to lie evenly, or when working a twist or kink out of a bit I'm lacing. Quote Share this post Link to post Share on other sites
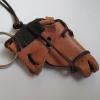
DoubleC Report post Posted February 17, 2012 I think the forked thing is a tack puller. #12 is a cobblers blade though I've seen regular leather workers use them too as trim knives. Get out some WD40 and saturate the metal... allow to soak, then scrub with some fine steel wool. Or you could try an old gardener's trick. motor oil in a bucket of sand... plunge tools in and out for several minutes until the rust is gone. OK< this was the best pic I could get but does anyone know what this green knife that has separations on one side is? I use my fid quite a bit, but not to enlarge holes so much (the edges of a fid should not be sharp, but more rounded than a lacing awl). Instead, I use the fid to help me make the lacing tight and smooth. Rather than trying to pick at the lace with my fingernails and scarring it, I slide the fid under the lace, press my thumb on top of the lace, so the lace is now sandwiched between the fid and the pad of my thumb, and gently pull. I find the fid indispensable when making turkshead knots and getting the flat lace to lie evenly, or when working a twist or kink out of a bit I'm lacing. I'm so glad you told me that, it just came back out of the box. I have been trying to get around to doing a rawhide turk head on a curb strap all night. Thanks so much. Quote Share this post Link to post Share on other sites
Sylvia Report post Posted February 17, 2012 OK< this was the best pic I could get but does anyone know what this green knife that has separations on one side is? I'm so glad you told me that, it just came back out of the box. I have been trying to get around to doing a rawhide turk head on a curb strap all night. Thanks so much. Can't really tell from the scan, but does it look like this in real life? http://www.cobblersupplies.com/servlet/the-424/Professional-Heavy-Duty-Steel/Detail Quote Share this post Link to post Share on other sites
DoubleC Report post Posted February 17, 2012 Can't really tell from the scan, but does it look like this in real life? http://www.cobblersu...ty-Steel/Detail No that's not it. You can't see the separations from the other side, and the side they are on that blade end bevels upward. I tried AGAIN by holding it but my hand slipped. Anyway this is the other side and if you look really closely at the top you can see the squared off little indentions. Quote Share this post Link to post Share on other sites
DoubleC Report post Posted February 17, 2012 I use my fid quite a bit, but not to enlarge holes so much (the edges of a fid should not be sharp, but more rounded than a lacing awl). Instead, I use the fid to help me make the lacing tight and smooth. Rather than trying to pick at the lace with my fingernails and scarring it, I slide the fid under the lace, press my thumb on top of the lace, so the lace is now sandwiched between the fid and the pad of my thumb, and gently pull. I find the fid indispensable when making turkshead knots and getting the flat lace to lie evenly, or when working a twist or kink out of a bit I'm lacing. I just used it making the turk head, and I don't think that's what I made but the fid works like a dream!!!! Quote Share this post Link to post Share on other sites
TwinOaks Report post Posted February 17, 2012 That mystery tool IS a tack/staple remover....just a well worn one. For the types of things you're currently working on, it probably won't see much use. Other than that, keep it around, there's no such thing as too many tools. Quote Share this post Link to post Share on other sites
DoubleC Report post Posted February 17, 2012 That mystery tool IS a tack/staple remover....just a well worn one. For the types of things you're currently working on, it probably won't see much use. Other than that, keep it around, there's no such thing as too many tools. Well I needed one for some upholstery I want to do, and ended up 3 regular ones, so this one is headed for the shadow box display. Thanks Mike. I need to tell Syl now. Cheryl No that's not it. You can't see the separations from the other side, and the side they are on that blade end bevels upward. I tried AGAIN by holding it but my hand slipped. Anyway this is the other side and if you look really closely at the top you can see the squared off little indentions. It's a worn out tack and staple remover I need sleep kinda bad. Quote Share this post Link to post Share on other sites
Sylvia Report post Posted February 18, 2012 Well I needed one for some upholstery I want to do, and ended up 3 regular ones, so this one is headed for the shadow box display. Thanks Mike. I need to tell Syl now. Cheryl It's a worn out tack and staple remover I need sleep kinda bad. Well, eat and get to bed, woman! Quote Share this post Link to post Share on other sites
WinterBear Report post Posted February 18, 2012 Glad the fid is working out for you. Just be careful, if you get too enthusiastic, it gives you enough of a grip you can overtighten and pucker your leather, pop the lace, or overstretch the holes (if you ask me how I know this, I'll tell you--experience! Usually followed by a lot of swearing). If you really want to get into knots, I suggest the Braiding subforum here, and also looking up the user "Knothead" here on this site. He does fantastic knots, and he and other people have some great tutorials and tips here on Leatherworker, and on Knot Heads World Wide (http://khww.net/news.php). Most knots are completely above my head for now. All I can manage right now is the 3-lead turksheads, with 4, 5, or 7 bights, and crown knots. I haven't figured out the "long" turksheads, or any of the 4 or 5 bight knots yet, let alone a pineapple knot. Most braids are still beyond me as well, I can do various 3 and 4 strand braids, but that's about it so far. Quote Share this post Link to post Share on other sites
DoubleC Report post Posted February 18, 2012 Well, eat and get to bed, woman! I did woman, LOL. dog just got me up Quote Share this post Link to post Share on other sites
DoubleC Report post Posted February 18, 2012 Glad the fid is working out for you. Just be careful, if you get too enthusiastic, it gives you enough of a grip you can overtighten and pucker your leather, pop the lace, or overstretch the holes (if you ask me how I know this, I'll tell you--experience! Usually followed by a lot of swearing). If you really want to get into knots, I suggest the Braiding subforum here, and also looking up the user "Knothead" here on this site. He does fantastic knots, and he and other people have some great tutorials and tips here on Leatherworker, and on Knot Heads World Wide (http://khww.net/news.php). Most knots are completely above my head for now. All I can manage right now is the 3-lead turksheads, with 4, 5, or 7 bights, and crown knots. I haven't figured out the "long" turksheads, or any of the 4 or 5 bight knots yet, let alone a pineapple knot. Most braids are still beyond me as well, I can do various 3 and 4 strand braids, but that's about it so far. I hear all that, especially the swearing part, LOL. I saw a video on the turk head at youtube and it look simple enough...but after whatever I ended up with on this curb leather, I first realized I was trying to do a round knot on a square holder and the turks head is NOT as easy as it looks anyway, LOL. I had first looked at that video because i want to do bosels with this rawhide I bought so I did learn the 4 strand round easy enough but doing a turks head on the end, PLUS trying to work with these small strands of wirey rawhide whipping around, that I'm wetting a little at a time to braid, then letting dry to keep the tension and diameter right, while my dog is trying to eat it, well I think I saw some truckers blush when they heard me, LOL. I did macreme' 'back in the day' and could do it watching TV, etc. But I'm not a 'visual' learner. Plus I have other things I really need to be doing but the round braiding I picked up and could probably do watching tv. if i had some place set up for it but I don't have room to do my other things either. But that gave me an idea, instead of a turks head, i could put a dyed round braid on the curb strap and then i could forget one thing, LOL. If I can keep my dog from eating it while i do it, LOL. Quote Share this post Link to post Share on other sites
WinterBear Report post Posted February 20, 2012 I'll have to look around, I should have a couple of instruction sheets on turksheads, maybe one of them will explain a step a little bit better and you'll get the hang of it? And maybe try a latigo lace or a bit of paracord first, until you get the weave down? It took me quite a few attempts, but can make 3lead5bight turkshead practically in my sleep after making a series of them as a demo for Boy Scouts. Quote Share this post Link to post Share on other sites
DoubleC Report post Posted February 20, 2012 I'll have to look around, I should have a couple of instruction sheets on turksheads, maybe one of them will explain a step a little bit better and you'll get the hang of it? And maybe try a latigo lace or a bit of paracord first, until you get the weave down? It took me quite a few attempts, but can make 3lead5bight turkshead practically in my sleep after making a series of them as a demo for Boy Scouts. Thanks WinterBear. But a friend of mine found a great book for me online called "How to make cowboy horse gear' that's about nothing but rawhide. I was too tired to work the other day and read the first chapter on different ways of making rawhide, got to the second and it was about!!!!! Turk's head knots, LOL. He has a bridle he made in here early on that is just gorgeous made all of rawhide. But of course the book was first published in 1956, LOL. I scanned a picture for you. I would recommend this book to anyone interested in knots, braiding, or horse tack. It was very inexpensive. The idea of using something easier on the hands and to work with than rawhide is excellent, LOL. Cheryl Quote Share this post Link to post Share on other sites
WinterBear Report post Posted February 21, 2012 Best thing about paracord is that it can be unknotted if you made a mistake. That and the dogs aren't much interested in it. Cats, on the other hand. They tend to not care so much for the rawhide (the "ew, ick" face when a cat grabs a wet rawhide string is hilarious), but I can't work with a piece of paracord without stopping to remove a passing hairball. They come out of the woodwork to pounce, even cats I've never seen before! I'll add that book to my wishlist, thanks! Quote Share this post Link to post Share on other sites
DoubleC Report post Posted February 21, 2012 Best thing about paracord is that it can be unknotted if you made a mistake. That and the dogs aren't much interested in it. Cats, on the other hand. They tend to not care so much for the rawhide (the "ew, ick" face when a cat grabs a wet rawhide string is hilarious), but I can't work with a piece of paracord without stopping to remove a passing hairball. They come out of the woodwork to pounce, even cats I've never seen before! I'll add that book to my wishlist, thanks! A friend of mine found it online since she knew I'd bought a whole cow's worth of rawhide. And I bought it in a split second.....then she wrote me back and found one used, the ORIGINAL from 1956. I'll see if I still have the url. Animals just crack me up. To say my dog is bored would be such an understatement. I'm either working or sleeping, neither of which she seems to find very interesting. Today I put my rythym beads on 'show off' and had to get a set out of what I call my 'barn bag,' insulated and square with a zipper, big enough for m y 2-litre diet colas, and numerous things I'm taking back and forth to the barn. We haven't been able to go because my driver found out Thursday he had a brain tumor, and CALLED me to let me know he couldn't take me to the barn Friday. Like i really cared after that news. ANYWAY, while i was scanning the rythym beads in here she was quite busy in there. When I took the set that needs to go to the barn back to the bag, the dog had put one of her bones in the bag. More than one of us missing some fresh air and exercise Anyway the book is about nothing but rawhide braiding and knots. Which you could do with any material of course. The one I got: My link The one I shoulda, LOL: My link Cheryl Quote Share this post Link to post Share on other sites
bootsmt Report post Posted February 21, 2012 (edited) The picture you call no.1 is used for rubbing finishing wax into the leather soles, heels and edges on shoes and boots. It is heated to the point it will melt the wax and you rub it over and over until the wax is no longer a liquid and is is now in the leather. You would then buff it with you finishing wheels. If you want to know more about the tools anf their purpose there is a book you can buy that has the information. The author last name is Solomon and the book is called Leather Tools from the 1700"s to 1950 ? Can't remember the exact name right now. Glue must be catching up with me. You can find it at your finders or at Hale and Company 805-680-8002. Can't tell what the other tool is because the picture is out of focus. Frank No that's not it. You can't see the separations from the other side, and the side they are on that blade end bevels upward. I tried AGAIN by holding it but my hand slipped. Anyway this is the other side and if you look really closely at the top you can see the squared off little indentions. Edited February 21, 2012 by bootsmt Quote Share this post Link to post Share on other sites
DoubleC Report post Posted February 22, 2012 The picture you call no.1 is used for rubbing finishing wax into the leather soles, heels and edges on shoes and boots. It is heated to the point it will melt the wax and you rub it over and over until the wax is no longer a liquid and is is now in the leather. You would then buff it with you finishing wheels. If you want to know more about the tools anf their purpose there is a book you can buy that has the information. The author last name is Solomon and the book is called Leather Tools from the 1700"s to 1950 ? Can't remember the exact name right now. Glue must be catching up with me. You can find it at your finders or at Hale and Company 805-680-8002. Can't tell what the other tool is because the picture is out of focus. Frank Thank you Frank. I'll just clean that puppy up and use it on my boots. And everyone elses around here. Can you buff them by hand? Finishing wax, guess my vanilla candle doesn't qualify? Just look for finishing wax at leather supply houses? Thanks, Cheryl Quote Share this post Link to post Share on other sites
DoubleC Report post Posted February 22, 2012 The picture you call no.1 is used for rubbing finishing wax into the leather soles, heels and edges on shoes and boots. It is heated to the point it will melt the wax and you rub it over and over until the wax is no longer a liquid and is is now in the leather. You would then buff it with you finishing wheels. If you want to know more about the tools anf their purpose there is a book you can buy that has the information. The author last name is Solomon and the book is called Leather Tools from the 1700"s to 1950 ? Can't remember the exact name right now. Glue must be catching up with me. You can find it at your finders or at Hale and Company 805-680-8002. Can't tell what the other tool is because the picture is out of focus. Frank Hey Boot? Can you tell what this says? Look a little different now doesn't it. Cheryl Quote Share this post Link to post Share on other sites
eLw Report post Posted February 25, 2012 Hi Cheryl Did you get all these figured out? Would the green one be a grapefruit segmenter? To it's left with the beech handle reminds me of a saw set. Hope this helps Quote Share this post Link to post Share on other sites
DoubleC Report post Posted February 25, 2012 Hi Cheryl Did you get all these figured out? Would the green one be a grapefruit segmenter? To it's left with the beech handle reminds me of a saw set. Hope this helps No, still figuring them out. I'm sorry, i don't mean to sound as dumb as I am but do you mean the fruit? Or is that the name of a leather tool? The one to it's left is a narrower width until the top and than it gets thicker which makes me think it's an edger or some sort, but i would swear to it. I will find some scrap leather and make marks on it with these and maybe that will help and also try and take a pic that isn't scanned. I can't find the bottom to the one that was loose, was a wooden screw instead of metal type? I'm really hoping my dog didn't chew it up.....sigh. Thanks for writing, Cheryl. Quote Share this post Link to post Share on other sites
Sylvia Report post Posted February 25, 2012 No, still figuring them out. I'm sorry, i don't mean to sound as dumb as I am but do you mean the fruit? Or is that the name of a leather tool? The one to it's left is a narrower width until the top and than it gets thicker which makes me think it's an edger or some sort, but i would swear to it. I will find some scrap leather and make marks on it with these and maybe that will help and also try and take a pic that isn't scanned. I can't find the bottom to the one that was loose, was a wooden screw instead of metal type? I'm really hoping my dog didn't chew it up.....sigh. Thanks for writing, Cheryl. Here's that book the one poster recommended. Dictionary of Leather-Working Tools, C.1700-1950: And the Tools of Allied Trades by R. A. Salaman http://www.amazon.com/Dictionary-Leather-Working-Tools-C-1700-1950/dp/1879335727 Quote Share this post Link to post Share on other sites