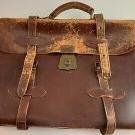
olenawills Report post Posted November 11, 2014 This is my beginners handbags. Project No3 and No2 Two previous ones weren't as good. Size 8" x 6" x 2.5" Goat skin leather. Lining is goat or cow. I made some mistakes, but trying to improve in order avoid them in a future. Also I don't have anyone knowledgable around to help me with choice of materials for a specific parts, so I am just trying and guessing. These are the pictures of my bags: Quote Share this post Link to post Share on other sites
olenawills Report post Posted November 11, 2014 Quote Share this post Link to post Share on other sites
MonicaJacobson Report post Posted November 11, 2014 Those look pretty near perfect to me. Great job! Is your piping empty, or do you fill it with small mm round cord? Just asking because I've been meaning to learn how to use piping. Quote Share this post Link to post Share on other sites
olenawills Report post Posted November 11, 2014 I am using 4/32" Poly foam Welt Cord and 5/32" welting foot for a sewing machine when stitching. Working very well together, but my leather is very thin. Strips of leather for piping about 1" wide. Finished piping (welt cord is already pre-glued inside ) glued to a side of the bag. Piping leather connection seam is in the middle, but welt cord inside of the piping I am connecting about 1" away from that seam. Ends of the weld cord trimmed to an angle and glued together. So I glue the welt cord inside of the leather strip, leaving two ends unfinished, then after positioning piping on the details of the bag, I am connecting a welt cord first, then finishing a leather wrapping on the piping. Quote Share this post Link to post Share on other sites
MonicaJacobson Report post Posted November 11, 2014 Thank you for the detailed reply! That helps a lot. Quote Share this post Link to post Share on other sites
jessmead Report post Posted November 11, 2014 These look great to me! Are you using a leather sewing machine? Quote Share this post Link to post Share on other sites
olenawills Report post Posted November 11, 2014 Yes, I bought a second hand cylinder base Juki. Quote Share this post Link to post Share on other sites
DS STRAPS Report post Posted November 11, 2014 Awesome and beautiful work! Quote Share this post Link to post Share on other sites
GrampaJoel Report post Posted November 11, 2014 Matching the quilting lines, on both purses, is a high quality sign. Good job on the detail. Nice job! Joel Quote Share this post Link to post Share on other sites
Northmount Report post Posted November 11, 2014 WOW!!! Tom Quote Share this post Link to post Share on other sites
DuaneS Report post Posted November 16, 2014 (edited) Personally, I would not consider those beginners bags... Quality looks Way Too Good for a beginner!!!! Edited November 16, 2014 by DuaneS Quote Share this post Link to post Share on other sites
DavidL Report post Posted November 16, 2014 Looks great. Can you explain the steps on the last picture? How many layers are in there, what type of material is the white pieces around the perimeter. How do you get the corners in that same pic to fold that way Quote Share this post Link to post Share on other sites
olenawills Report post Posted November 16, 2014 Thank you very much for all of your comments. I am practicing, but its very difficult without a proper guidance. About last picture. This is a front pocket flap. Top part (with the flower) glued to a thicker piece of leather (yellow color - and it acts as a stiffener). White material - just a piece of paper, everyday printer paper. I saw this trick online. You cut a piece of paper for the corner or for the rounded edges of the bag and glue it to the edge. It doesn't add a thickness or any hardness, but it works as a guide for a folding line. Then you can fold all of the edges easy and straight. Then I made 2 stitches on top , turned this piece inside out and glued together. I used a sewing ironing pad to keep slightly curved shape of the flap while glue was drying. Left it to dry like this overnight. Quote Share this post Link to post Share on other sites
billybopp Report post Posted November 16, 2014 Your unguided practice pieces are better than many experienced folk could do. I really love the embossed rose! I'm guessing that is your "signature" look? Keep up the good work, and thank you for sharing information on welting and turning edges. If I had any criticism at all, it would be the multiple straps on the red bag. They look beautiful, but I can see somebody trying to put it over their shoulder and getting an arm caught up between the strap strands. Just a thought! Bill Quote Share this post Link to post Share on other sites
olenawills Report post Posted November 16, 2014 (edited) I really love the embossed rose! I'm guessing that is your "signature" look? I think so. Really like it too. My criticism - it's a magnet in a wrong place. I didn't think it will be visible though the layers of leather, but I can see it in the front. Flower should be slightly lower and the magnet covered with the bottom petals. Now I know for the next time. Straps are fine , you can turn whole handle inside out couple of times and it will be like a thick rope. No problem at all. As I said before, Chanel is a main source of inspiration, so I am taking from this brand interesting ideas. This is the original bag (lots of good pictures and size measurements you can find on Ebay) : Edited November 16, 2014 by olenawills Quote Share this post Link to post Share on other sites