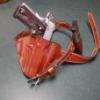
Lobo Report post Posted October 24, 2008 (edited) Howdy again. Another passably good week here at Lobo Gun Leather, making serious equipment for serious business. Pancake style holsters have been very popular since the early 1970's, and I imagine that you have all seen (just like I have) some very good examples and some lesser specimens. In my opinion, fitting the holster to the weapon it is to carry is one of the more critical requirements. I make my patterns carefully for cutting the leather and marking the stitching lines, taking careful measurements of the thickness of the pistol as well, which allows for a stitching pattern that will allow very close fitting. I then wet-form the sewn holster to the pistol, boning the leather carefully to mold it exactly. Then I allow the piece to sit for about one hour (here in very dry Colorado), then take the pistol out and allow the holster to dry fully (usually overnight). Attached are a couple of examples of recent work. One is for a Kahr P40, shown upside down with a fully-loaded magazine with the holster fully retaining the pistol. The other is for a Glock 19/23, shown upside down with a weighted 'blue gun' fully retained. This design allows for a correct 'shooting grip' to be taken when drawing the weapon, and the weapon can be easily drawn without any interference. But the very tight molding of the holster retains the pistol very well, even when running, jumping, climbing, rolling around on the ground, and all the other activities an armed combatant can be expected to engage in. I also make holsters with thumb-breaks and other retention devices, as specified by the customer. But I have no qualms about recommending my open-top pancakes for regular concealed carry without having to worry about losing your piece. As usual, my opinions are absolutely free and worth every penny! Hope you all have a great day. Edited October 24, 2008 by Lobo Quote Share this post Link to post Share on other sites
Lobo Report post Posted October 24, 2008 Sorry, all the photos didn't attach. Trying again. Quote Share this post Link to post Share on other sites
gavingear Report post Posted October 24, 2008 Thanks for the information lobo, can you please elaborate about the wet forming process, specifically: 1. Do you just dip the whole holster in water after stitching? If so, for how long? Do you dry excess water off with a towell? 2. Where does dying fit into your process? (After the overnight drying?) Quote Share this post Link to post Share on other sites
WaG35 Report post Posted October 25, 2008 Very nice Lobo. Until I started making my own holsters, I would have never bought a holster that didn't have a thumbreak. But now I know just how much retention you can get from carefully fitting to the gun. Being that I am a Glock guy(and if you don't want to answer you will not hurt my feelings) How much do you allow for the stitch lines on the 19/23 holster from the actual outline of the gun? And how much does this change with different weights of leather? Again very nice holsters. Quote Share this post Link to post Share on other sites
okie44 Report post Posted October 25, 2008 Very nice looking holsters. Your process is similar to the way I make belt holsters. I usually make the holster a little small for the gun, the stretch it during the wet molding process. I like to take as much stretch out of the leather as possible, so that it is less likely to get loose after it has been worn for awhile. I use rubbing alcohol to wet mine, then I don't have to worry about rusting the gun while drying. Thanks for the photos, and the description of your process. Quote Share this post Link to post Share on other sites
Lobo Report post Posted October 25, 2008 Thanks for the information lobo, can you please elaborate about the wet forming process, specifically:1. Do you just dip the whole holster in water after stitching? If so, for how long? Do you dry excess water off with a towell? 2. Where does dying fit into your process? (After the overnight drying?) Thanks for the note. I wet the stitched holster with luke-warm water until it has absorbed as much water as it will hold, then set it aside. Excess water will evaporate in a few minutes (here in southern Colorado where we are in nearly desert conditions). Then the fitting and boning process is done, as described. Dying is usually done prior to the wet-forming process, but will require touch-up afterwards. I only do oiled-tan and black finishes, so I don't have the headaches some of you folks have with elaborate dyed finishes (all of my production is for concealed-carry use, so I don't do any fancy finishes or tooling). Final finish for all of my holsters involves a liberal application of neatsfoot oil compound (allowed to settle for about 24 hours) followed by surface treatment of Fiebing's Bag Kote, leaving a nice egg-shell luster with excellent protection of the finished product. Note that I apply neatsfoot oil compound to all finished products, whether dyed or left natural. The long-term protection provided is well worth the effort, and it provides a finish that no dye can match on undyed leather. The Bag Kote is an excellent product, easy to use, and the resulting finish is superb. Over-application of neatsfoot oil is to be avoided, as it will leave any leather product limp and useless. One moderate to heavy application, then seal the surfaces completely with the Bag Kote. Be careful with the Bag Kote, it must be applied at room temperature or it will streak and blotch with no remedy known. Keep on doing it! Lobo Quote Share this post Link to post Share on other sites
Lobo Report post Posted October 25, 2008 Very nice Lobo. Until I started making my own holsters, I would have never bought a holster that didn't have a thumbreak. But now I know just how much retention you can get from carefully fitting to the gun. Being that I am a Glock guy(and if you don't want to answer you will not hurt my feelings) How much do you allow for the stitch lines on the 19/23 holster from the actual outline of the gun? And how much does this change with different weights of leather? Again very nice holsters. Thanks for your comments. I allow exactly the amount needed to fully encase the pistol into the leather, relying upon the natural stretching of the leather during the forming or "boning" process. For a pancake-style holster this means that I outline the stitching exactly one-half the thickness of the pistol around the outline of the pattern. All of my holsters are made with 8-9 oz. shoulders, so there should be little difference if you are using lighter weight materials. I am selling 12 to 15 holsters per week, all concealment oriented models, mostly to cops and other professionals that not only need to carry, but want to keep it truly concealed. The pancake design is one of the best and most popular. Properly fitted, this style can provide excellent retention qualities without additional features like the thumb-break. Best regards, Lobo Quote Share this post Link to post Share on other sites
Lobo Report post Posted October 25, 2008 Very nice looking holsters. Your process is similar to the way I make belt holsters. I usually make the holster a little small for the gun, the stretch it during the wet molding process. I like to take as much stretch out of the leather as possible, so that it is less likely to get loose after it has been worn for awhile. I use rubbing alcohol to wet mine, then I don't have to worry about rusting the gun while drying. Thanks for the photos, and the description of your process. Thank you, sir. My process appears to be very similar to yours. Stretching is very much a part of the wet molding process. I have not tried the rubbing alcohol treatment, but I imagine it would work quite well (I live in an area where the average humidity is just above desert conditions, so water works well for me). Close forming definitely eliminates the concerns of loosening with wear. I have customers still using holsters that I made in the mid-1970's. Best regards. Quote Share this post Link to post Share on other sites