LeatherNuebie
-
Content Count
38 -
Joined
-
Last visited
-
Sleeve length preview
LeatherNuebie commented on LeatherNuebie's gallery image in Tutorials and Lessons
 Hey Thanks! I had to delay this project until I get my hands on a sewing machine or one of those forks for leather stitching. Even banged up used forks cost a pretty penny. It stinks because I know I could finish this in a day or two or three with the proper tools. With just my hands, it would take me a long while and my fingers would get chewed up pushing the needle through new holes I have to make. I'll post pics once I start up again. Take care!
 -
This sounds interesting. Do you have any pictures of what this collar looks like on your jacket? I would love to see it. Ride Safe!
-
Thanks Tom!
-
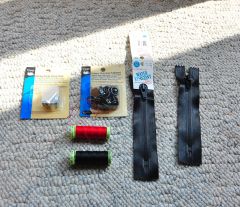
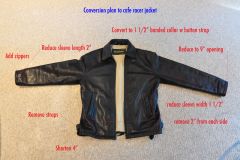
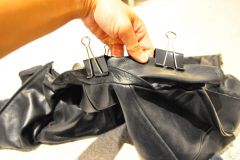
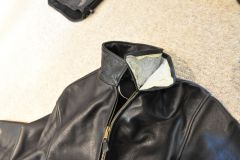
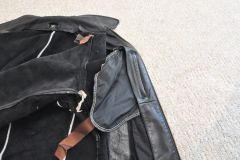
UPDATE: So I've finally documented what I wanted to do to this jacket. Basically, I want to convert this jacket to a more fitted cafe racer style jacket which is pretty extreme alteration-wise. Basting I've laid down some stitches to help me get a sense of the fit I want. Here you can see several red stitches I've made along the sleeve and along the body. Boy, these were tough to put in. I broke a needle trying to push it through. Putting these stitches in was slow going. I can't wait until my tools arrive to make this job easier. Sleeve Preview Here is one side of the jacket with fitted sleeves and the other side unmolested. The jacket looks worse than it really looked when I wore it. Since there is no lining and I'm only wearing a tee shirt (typically wore a sweater with this jacket, it looks really bad. However, the sleeves were longer than they should have been. The fitted sleeves should look much better and less wrinkled when the are fully stitched. Note: the body has already been taken in. Length Preview Here is the jacket with the bottom folded up and under. It's starting to look worlds better. Supplies I've purchased some supplies that I'll need to keep this project moving along. The thread is polyester. I've learned from this site that Poly thread is very strong. The red thread is too see if I like the contrasting stitch color. Am I that brazen to use a high contrast thread on hand stitched parts?! I've been known to do dumber things but we'll see. I also learned that using contrasting colors are great for basting stitches. The zippers I found were pretty cool. They are very stealthy and will look great if I choose to leave the zipper slits raw or if I finish them. The black snap buttons are for the collar strap which I intend to put on. I wish I could find a black matching main zipper that isn't plastic. Collar The collar was made up of 2 pieces of leather. Since I am basically folding over the collar to make it a band collar I didn't need the second layer as it would have made the collar too thick. The part not seen (back side of collar/shown removed) was made of a thinner grade of leather perfect for use as the pieces under the wrist zippers. Collar work Here, I've used binder clips to temporarily hold the collar in place. It was all I had that was handy. This looks to be the most difficult part for me as I'll have to make the stitch holes which need to line up to the opposite stitch holes when they are connected. The curved leather piece in the last pictured would look cool stitched with contrasting red thread. It could break up the black monotony back there. It should look pretty nice when it's finished. Next Steps Once I've confirmed the sizing, I'll lay down the body and sleeve stitching. I will then finish the sleeves installing the zippers. My fingers have taken a beating over the past few days so I'll be taking a short break. I can't really do much until my stitching wheel arrives next week. I do have a question, when I begin stitching what would be the best type of stitch to make. I was thinking of using the double needle method? Is that good? Also, it's almost impossible to see any pilot holes I make in the unfinished side of the leather, are there any tricks to help me see the holes better when I start to use the stitching wheel? Thanks!
-
How to take apart a leather jacket
-
-
Thanks Tom! Mystery of the brown stitch solved! That's good to know. The stapler trick is also a good tip. I'm sure I'll be using that one quite a bit.
-
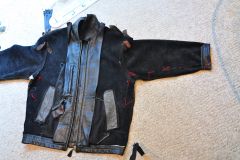
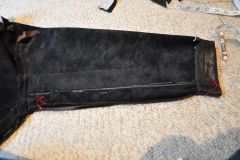
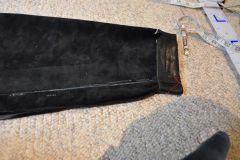
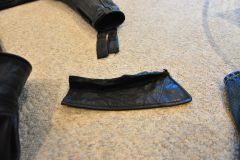
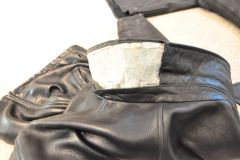
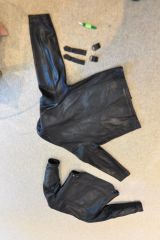
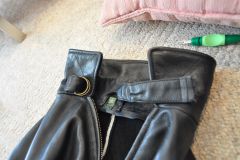
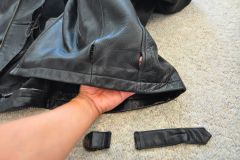
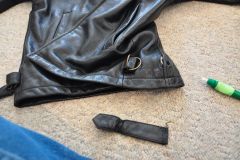
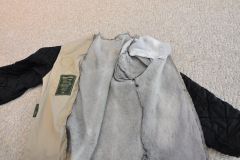
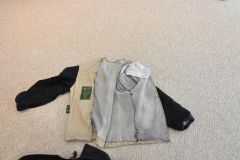
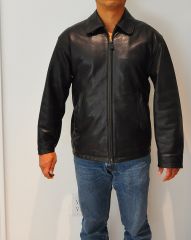
Leather Jacket Autopsy For those interested in how a leather jacket is constructed (or how to take one apart) look no further. This is step one in a project I've undertaken to transform a plain boring leather jacket into a stylish, modern casual jacket. Dockers Leather Jacket Aside from it's boring nature, the jacket itself is well made (china). It is roughly 12 years old. Physically, there is nothing wrong with it, all stitching is intact and solid. I estimate it is 1mm leather. It is heavy but not as heavy as the reference jacket pictured at the end, which is 1.2-.14mm thick leather. Functionally, it was a poor jacket. It wasn't that warm in the winter and it's loose fitting nature allowed cold air to circulate around inside. I was thinking about selling it but the leather was so nice, I couldn't part with it. Poly Lining I like the quilted sleeve liner. I was thinking of replacing the brown material with quilted material. Maybe I'll save that for another day. Seam Ripper This little gal has ripped many a seams. She made short work of removing the lining. Once I got the seam to unravel, I carefully rocked the ripper closer to the leather side so I wouldn't damage the lining. Also, becareful of the pointy end of the ripper. If you're not careful, you can easily put a hole in the leather. Sometimes if the stitching is very tight, I would work it from the back side. There's no turning back now Attachment Points At various points throughout the jacket, the lining was attached to the leather with small pieces of cloth. I left them attached to the jacket, rather than the lining. End of Sleeve This photo shows the end of a sleeve (where your hand comes out) and how it's attached to the liner. It's basically a tube. The second photo shows where I started to undo the stitching. Lining Removed I worked all the way around the lining making sure I didn't undo any leather stitching. The last two photos are of the slash pocket and inside breast pocket Liner Here is the liner, inside out. The off white is some sort of polyester material. This material was right up against the unfinished black leather making it off white. I would love to know what this material is called. The white material on the shoulder is not padding but thin poly material probably put there to give the shoulder more shape. They are different types of material. Strap and hardward Aside from the bad fit, this was probably the thing that annoyed me the most about this jacket. No matter how hard I tighten them, they would always work their way lose. I'm glad to see them go. These holes can easily be stitched shut and no one would be the wiser. However, I'm not going to stitch them close until I have thought things through. I may convert these straps to button straps which should be fairly easy to do. Or I may leave them off completely. I was also thinking about using the strap on the collar when I convert it to the short style. At this point, I haven't finalized my design so I'm still kicking around ideas. One thing is for sure, I intend to reuse all the material I can. Reference Jacket Pictured next to the project jacket is my favorite leather jacket. It is the icon Motorhead jacket. It is heavy (1.2-1.4mm leather) and keeps me toasty warm in 30 degree weather wearing only a long sleeve tee shirt underneath. It is form fitting and body hugging which allows it to retain body heat better than most jackets I own. The lack of collar allows excess heat to escape easily. Surprisingly, my neck never gets cold and I never wear a scarf. I'll be using it to gather measurements, compare and contrast manufacturing process and styling cues for my project jacket. What I learned It was fun taking this jacket apart. I have always been curious as to how a leather jacket was made. The jacket was stitched together with 2 types of thread. A thinner black thread which was used and is used anywhere any materials are stitched together (leather to leather or leather to liner). Then there is a thicker brown thread that seems to be used to reinforce the stitching throughout (leather to liner). It appears less, maybe 1 brown stitch for every 5 black stitches. There doesn't seem to be any glue holding any of leather. Everything seems to be stitched. I understand that glue is commonly used in the manufacturing of leather goods. Thankfully, I don't see any here. Next Steps I need to finalize my design elements, getting it out of my head and get it on paper. Hopefully I'll be able to update this thread with my progress.
-
Thanks Dwight! This is very helpful. The only thing I had on hand is a seam ripper, a rotary cutter, box cutting blades and some large sewing needles. To start, I just purchased a stitching wheel, poly thread and the book "Art of Leather Stitching" (in case I have to make wallets LOL) I did spend this AM deconstructing the jacket. Pics to follow. This is going to be a fun project.
-
Thanks Dwight. I thought about that ...hell, I might as well buy the damn jacket and skip this nonsense altogether however, I wouldn't learn one thing about working with leather. I don't expect what I make from this to be perfect and things aren't usually perfect in the first pass but it would be a start. I'm not afraid to make mistakes or to try new things (nothing ventured nothing gained). Besides, what's the worse that can happen...I wind up with material for a dozen wallets? LOL.
-
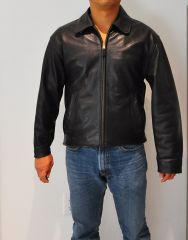
Hello folks. I'm happy to say this is my first post here! This looks like a great place to learn all about leather working. So here goes... I've owned this plain black leather jacket for years, the sleeves are a little long on me so it spent most of it's life in the closet. Recently, I've gotten the itch to buy another leather jacket. I pulled the old jacket out and was thinking about selling it. I wouldn't get much for it. So, I got this crazy idea to modify this jacket into the jacket I want. The leather is in great condition, it is heavy weight and it is a plain design so taking in seams here or there won't be so hard. For measuring and reference, I have 2 other leather jackets I can lift measurements from. I'm sure I'll run into technical issues later on down the line but they won't be anything this forum can't help me solve. The problem is, I don't have money for a sewing machine, only basic hand tools at this point in time. Can what I want to attempt be done with hand tools? It doesn't matter to me if it takes me months to rebuild by hand as long as the stitching looks straight and professional. If it can be done with hand tools, what are the minimum tools I will need to pull this off? Thanks in advance for your help. EDIT: It would be helpful to let you all know what I plan on doing. 1. Shorten the length of the jacket 2. Add zippers to the wrist areas 3. Tighten up the sleeves so they hug my arms more 4. Shorten the sleeves 5. Tighten up the body of the jacket, making it more form fitting