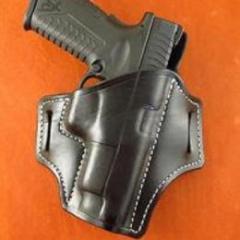
SooperJake Report post Posted June 21, 2012 I am working on my fourth leather project/ holster and I am wondering what I am doing to cause some of my stitches to look zig-zag, while the others look nice and linear. I sewed the reinforcement on first, then sewed the left side, then the right. I was trying to put the needle through on the same side of the other thread every time, and not pull too tight, which I note crinkles up the leather. Back to front then front to back, following the Stohlman book on hand sewing. The right side looks awesome. I don't see anything covering this in the book. Help, please! Jake Quote Share this post Link to post Share on other sites
markush Report post Posted June 21, 2012 (edited) Others will be along to give you more insightfull info I'm sure, but I might suggest going to more SPI (stitches per inch). I'm taking a guess in saying it looks like your doing something like 4 1/2-5 SPI. A higher SPI should smooth out the appearance, especially on tighter radiuses. I've always liked the look of 6 SPI myself. I'm curious why your leather is crinkling if you pull the stitches tight....are you sewing wet leather? Edited June 21, 2012 by markush Quote Share this post Link to post Share on other sites
Ferg Report post Posted June 21, 2012 I believe your holes are too large. What type of thread are you using? ferg Others will be along to give you more insightfull info I'm sure, but I might suggest going to more SPI (stitches per inch). I'm taking a guess in saying it looks like your doing something like 4 1/2-5 SPI. A higher SPI should smooth out the appearance, especially on tighter radiuses. I've always liked the look of 6 SPI myself. I'm curious why your leather is crinkling if you pull the stitches tight....are you sewing wet leather? Quote Share this post Link to post Share on other sites
katsass Report post Posted June 21, 2012 FWIW from the grump: Both of these guys are right IMO. Ferg has been at it a long time and Markush does some pretty good stitching. Holes are too big --- If you can pull the needle through the hole with your fingers, they're "too damned big" --- that is exactly what I was told (and taught) over 50 years ago, and I still use a small pair of smooth jawed pliers to stitch with. If not using harness needles (I generally use a #1 size, but no larger than a #0) you may be splitting the first strand through. And, about 6 SPI is a good, all around stitch size. It almost looks as though you are using synthetic sinew for thread --- tain't that good an idea for holsters, again, IMO. I have always used waxed linen threads. Nyltex is also a good thread. Remember, always start each stitch from the same side of your project, then go either over, or under, that one with your second needle, BUT, ALWAYS do each succeeding stitch in EXACTLY the same way, either over, or under, but don't mix them.. Mike Quote Share this post Link to post Share on other sites
SooperJake Report post Posted June 21, 2012 Actually, it may be a combination of all three of the above answers, gentlemen. I'm using the Craftool 4 mm stitching punches, and the spikes on the 2 prong are thicker than the spikes on the 4 prong, by a third at least, increasing the diagonal impression. That, and I think I pried the 4 prong out to the side rather than straight out, in some cases. I know, it is cheating. I bought the punches after my first holster, because the stitching looked so bad. At first I thought it was a clockwise, anticlockwise thing. So, I did a test strip last night which didn't reveal anything, other than that wasn't the problem. But, after thinking real hard about what I did, and staring at a closeup of my photos, I remembered my four prong punch was missing for a time ( left in shirt pocket in laundry the day before) , so I had used the 2 prong to punch the reinforcement piece, and then used it on account of the curvature on the left side. Carefully punched holes in scrap reveal a significant difference in hole size between the two. The thread is a waxed nylon from Tandy (Professional saddle stitching thread coated with pure beeswax. 25 lb. breaking point. 25 yard spool ), and I couldn't tell you what size that is, or what size the needles are that I bought. Thanks for your help! Jake Quote Share this post Link to post Share on other sites
SooperJake Report post Posted June 21, 2012 Others will be along to give you more insightfull info I'm sure, but I might suggest going to more SPI (stitches per inch). I'm taking a guess in saying it looks like your doing something like 4 1/2-5 SPI. A higher SPI should smooth out the appearance, especially on tighter radiuses. I've always liked the look of 6 SPI myself. I'm curious why your leather is crinkling if you pull the stitches tight....are you sewing wet leather? Markush, Crinkling (to me) is the bumpy texture I see running parallel to the stitching. It seems more pronounced when I pull the threads Sooper tight. Picture a Gorilla in a glass shop and you'll get an image of me sewing. My manual dexterity isn't what can be classified as 'graceful' . I am, however, shooting for consistency, be it the stitch sequence or the tension pulled. It seems logical that the tpi has an effect on this too, pinching less leather over a shorter span ? If I understand correctly. The items I am using where suggested by the clerk at Tandy, for the most part, and he admittedly didn't make holsters. Dry leather. Jake Quote Share this post Link to post Share on other sites
katsass Report post Posted June 21, 2012 (edited) Actually, it may be a combination of all three of the above answers, gentlemen. I'm using the Craftool 4 mm stitching punches, and the spikes on the 2 prong are thicker than the spikes on the 4 prong, by a third at least, increasing the diagonal impression. That, and I think I pried the 4 prong out to the side rather than straight out, in some cases. I know, it is cheating. I bought the punches after my first holster, because the stitching looked so bad. At first I thought it was a clockwise, anticlockwise thing. So, I did a test strip last night which didn't reveal anything, other than that wasn't the problem. But, after thinking real hard about what I did, and staring at a closeup of my photos, I remembered my four prong punch was missing for a time ( left in shirt pocket in laundry the day before) , so I had used the 2 prong to punch the reinforcement piece, and then used it on account of the curvature on the left side. Carefully punched holes in scrap reveal a significant difference in hole size between the two. The thread is a waxed nylon from Tandy (Professional saddle stitching thread coated with pure beeswax. 25 lb. breaking point. 25 yard spool ), and I couldn't tell you what size that is, or what size the needles are that I bought. Thanks for your help! Jake From the grump --- again: First off I despise those 'stitching' punches. Pick up a decent (narrow) diamond (shaped) awl to poke holes with, and a #6 overstitch wheel to mark and --- go over your stitches when done (hence the name --over-stitch) then practice a bit with both. Second (maybe first) IMO Tandy was pretty good --- 40 or more years ago. Today they are more suited for the Cub Scout group activity stuff --- again IMO. I generally tell anyone starting out making holsters to get Al Stohlman's book "How to Make Holsters", it's well worth the $12 or so, and most all makers I know have their copy --- and even refer to it now and then. If purchased from Tandy, your needles are most likely 00 or even 000 in size -- too damned big --- again IMO. I have nothing to do with Springfield Leather except for being a satisfied customer, but you might call them (they advertise on this forum and have an 800 number) and get their catalog -- it has a pot-load of informational tidbits mixed in the pages. You can talk with the very knowledgeable folks about awls, needles etc.and get straight info from them, and see what a very good leathercraft dealer has to offer. Mike Edited June 21, 2012 by katsass Quote Share this post Link to post Share on other sites
SooperJake Report post Posted June 21, 2012 From the grump --- again: First off I despise those 'stitching' punches. Pick up a decent (narrow) diamond (shaped) awl to poke holes with, and a #6 overstitch wheel to mark and --- go over your stitches when done (hence the name --over-stitch) then practice a bit with both. Second (maybe first) IMO Tandy was pretty good --- 40 or more years ago. Today they are more suited for the Cub Scout group activity stuff --- again IMO. I generally tell anyone starting out making holsters to get Al Stohlman's book "How to Make Holsters", it's well worth the $12 or so, and most all makers I know have their copy --- and even refer to it now and then. If purchased from Tandy, your needles are most likely 00 or even 000 in size -- too damned big --- again IMO. I have nothing to do with Springfield Leather except for being a satisfied customer, but you might call them (they advertise on this forum and have an 800 number) and get their catalog -- it has a pot-load of informational tidbits mixed in the pages. You can talk with the very knowledgeable folks about awls, needles etc.and get straight info from them, and see what a very good leathercraft dealer has to offer. Mike Mike, your wisdom is noted, very well. I am not enamored with Tandy, already. I did practice with a small bladed awl, then did my first holster, which didn't come out too good. I thought the punches would clean things up a bit, giving me some consistency. I do have 3 Stohlman books, including holsters and hand stitching, which I was referencing while I worked. Of course, the awl came from Tandy, too, and I spent a couple hours sharpening it, which weakened the blade since so much material had to be removed to get a decent edge on all 4 planes. I bent the tip, which spurred me on to get the punches. Calling Springfield's now. Thanks, Jake Quote Share this post Link to post Share on other sites
katsass Report post Posted June 21, 2012 Mike, your wisdom is noted, very well. I am not enamored with Tandy, already. I did practice with a small bladed awl, then did my first holster, which didn't come out too good. I thought the punches would clean things up a bit, giving me some consistency. I do have 3 Stohlman books, including holsters and hand stitching, which I was referencing while I worked. Of course, the awl came from Tandy, too, and I spent a couple hours sharpening it, which weakened the blade since so much material had to be removed to get a decent edge on all 4 planes. I bent the tip, which spurred me on to get the punches. Calling Springfield's now. Thanks, Jake Well, with the risk of being labeled a heretic, one thing that I have done to assist someone in learning to use the awl is to allow the use of a Dremel type tool -- with a 3/64" bit. Nothing larger than that.You can carefully drill them, and then set your piece in a stitching pony (or not) and open each with the awl -- just a bit. As you go, you'll learn how to hold the thing and about how much pressure is needed. If you mark the spacing with your overstitch, drill out a dozen or so, open them up a little --- pretty soon you'll be able to just keep going without stopping to drill more holes. It may take a while before the use of the awl becomes normal and easy, but remember this --- stitches CAN be pulled through the leather with pliers and not being opened up with the awl. To many this is just a terrible idea, but I think you'll find a hell of a lot more 'closet drillers' than will admit to it in public. Just a suggestion. Mike Quote Share this post Link to post Share on other sites
mlapaglia Report post Posted June 21, 2012 (edited) Blasphemy!!!!!! But a darn good idea. Are you using the eazy thread needles from Tandy? They have the Eye you could drive a camel through? Get a #0 harness needle to start. You over sharpened the awl. Get the small one only. Then only sharpen the front 1/4 to 1/2 inch. You want it to spread the wider part of the hole so it closes. If you cut the entire hole it doesn't close as well. Also if you haven't tried it yet put a cork behind the leather and push through into the cork with the awl. It saves fingers and makes it easier. Edited June 21, 2012 by mlapaglia Quote Share this post Link to post Share on other sites
SooperJake Report post Posted June 21, 2012 Blasphemy!!!!!! But a darn good idea. Are you using the eazy thread needles from Tandy? They have the Eye you could drive a camel through? Get a #0 harness needle to start. You over sharpened the awl. Get the small one only. Then only sharpen the front 1/4 to 1/2 inch. You want it to spread the wider part of the hole so it closes. If you cut the entire hole it doesn't close as well. Also if you haven't tried it yet put a cork behind the leather and push through into the cork with the awl. It saves fingers and makes it easier. Tandy Part number 1195-00....I assume the 00 suffix = camel gate. and 11210 waxed braided cord ( anchor rope, apparently). Flat sided awl (3318-01)with small diamond awl blade 1 5/8"( 3319-05) ...which I sharpened to a dagger's edge. Can you hear me gritting my teeth? By the way, the awl slips clean through 2 pieces of 8oz leather without any effort. . Gee..I wonder why.. I just ran a practice piece using #1 needles sold at my local hardware store ( huge craft section), using said anchor rope for thread. I get straight line on one side ( backside or awl exit side) and zig zag / angled stitches on the awl entry side. Are you pushing the awl clean through or just enough to break into the groove on the back side? From the drawings it look like Stohlman goes about half way. Quote Share this post Link to post Share on other sites
katsass Report post Posted June 21, 2012 (edited) Blasphemy!!!!!! But a darn good idea. Are you using the eazy thread needles from Tandy? They have the Eye you could drive a camel through? Get a #0 harness needle to start. You over sharpened the awl. Get the small one only. Then only sharpen the front 1/4 to 1/2 inch. You want it to spread the wider part of the hole so it closes. If you cut the entire hole it doesn't close as well. Also if you haven't tried it yet put a cork behind the leather and push through into the cork with the awl. It saves fingers and makes it easier. From the grump: Thank Michael. What drilling (as I described and IMO) does, is allow someone new to stitching, and that is getting really frustrated, to put something together with somewhat more decent stitching than could be done before. Gives them a little pick-me-up rather than letting them go into the dumps from abject failure. JMHO Mike Edited June 22, 2012 by katsass Quote Share this post Link to post Share on other sites
katsass Report post Posted June 22, 2012 (edited) Tandy Part number 1195-00....I assume the 00 suffix = camel gate. and 11210 waxed braided cord ( anchor rope, apparently). Flat sided awl (3318-01)with small diamond awl blade 1 5/8"( 3319-05) ...which I sharpened to a dagger's edge. Can you hear me gritting my teeth? By the way, the awl slips clean through 2 pieces of 8oz leather without any effort. . Gee..I wonder why.. I just ran a practice piece using #1 needles sold at my local hardware store ( huge craft section), using said anchor rope for thread. I get straight line on one side ( backside or awl exit side) and zig zag / angled stitches on the awl entry side. Are you pushing the awl clean through or just enough to break into the groove on the back side? From the drawings it look like Stohlman goes about half way. OK Jake, Give this a try. Stick your first needle through and snug up the thread. Pull the loose end of that thread back towards yourself some, and insert the second needle through that hole. Snug up that loose end 'til you have a small loop of loose thread. NOW look at where your first thread is laying. It will either be inside that loop -- or outside. It really doesn't matter which you choose -- as long as you do all successive stitches that SAME way. With the thread through the loop, the second thread is on top of the first and vicey-vercy. I personally always keep the second thread outside of the loop. Make your decision and snug up your stitch and keep going. Remember, all stitches are to be done in EXACTLY the same manner -- every time and in every way. Mike Edited June 22, 2012 by katsass Quote Share this post Link to post Share on other sites
SooperJake Report post Posted June 22, 2012 Kats, I did that already. Made sure I didn't go through a loop or under or over haphazard. In fact, you just described how I have been stitching. Pulling the back hread toward me, except i back pulled it per Stohlman to halp the second needle slide through without piercing the thread of the first. Both needles above the short loops left, pull up tight. I will get this. Staring at my third picture for another 10 minutes and it occur to me that some of the angling of the stitch is being cause by the fact that the hole is angled. For instance, the stitch is anchored high on one hole, and low on the next hole. The awl and the punch both make a hole that has an angle to the stitching groove. Maybe I don't pull tight enough... None of this makes any sense I am sure, to anyone who has mastered the hand sewing method. Wouldn't a round hole eliminate the angling? Could the problem be because my awl is so damn sharp? I guess I'll put all this to rest until I get proper thread and another awl blade, and start over. Jake Quote Share this post Link to post Share on other sites
mlapaglia Report post Posted June 22, 2012 Kats, I did that already. Made sure I didn't go through a loop or under or over haphazard. In fact, you just described how I have been stitching. Pulling the back hread toward me, except i back pulled it per Stohlman to halp the second needle slide through without piercing the thread of the first. Both needles above the short loops left, pull up tight. I will get this. Staring at my third picture for another 10 minutes and it occur to me that some of the angling of the stitch is being cause by the fact that the hole is angled. For instance, the stitch is anchored high on one hole, and low on the next hole. The awl and the punch both make a hole that has an angle to the stitching groove. Maybe I don't pull tight enough... None of this makes any sense I am sure, to anyone who has mastered the hand sewing method. Wouldn't a round hole eliminate the angling? Could the problem be because my awl is so damn sharp? I guess I'll put all this to rest until I get proper thread and another awl blade, and start over. Jake 1195-00 is the camel gate needle and a good part of your problem. Make sure the #1 you got was a harness needle. Not all #1 needles are the same. There are people that use a drill bit all the time and are happy with it. The issue is that drilled holes will not close up. It all depends on the look you want. The angle of the awl is critical as you go around curves. Its something you have to work on. Once the awl gets half way through the leather the hole is as big as its going to get. There is no reason to go all the way to the hilt. However most people do because of the pressure as it goes through. Remember the stull in Al Stohlmans book is shown as a teaching aid and my not always be exactly how it happens. Most of the time it is and Im sure that Al could stop before it went all the way through. Part of the issue is your awl was sharpened to far down and you cut the hole the whole way. A proper awl will make a small cut then push the rest of the leather out of the way. once you over stitch it and hammer it down it will close up somewhat and look better. hang in there. It takes practice. I made many many practice pieces just to learn it. You can do it. Quote Share this post Link to post Share on other sites
SooperJake Report post Posted June 22, 2012 What is the overall assessment of the stitching I have in the pictures? Be blunt, please. Jake Quote Share this post Link to post Share on other sites
katsass Report post Posted June 22, 2012 What is the overall assessment of the stitching I have in the pictures? Be blunt, please. Jake Well, I'm not an expert, (was told once, that many a self proclaimed expert is first, an EX -- a has-been, and second, a 'SPURT' -- a drip under pressure) but, after we have kicked this dead horse around a bit, your stitching doesn't look that bad at all, especially when compared to so much that I have seen. After you pick up a few proper needles and make your holes a bit smaller (back to the start of things) and use a shorter stitch --- I think you are off and running. You'll do good. Mike. Quote Share this post Link to post Share on other sites
DoubleC Report post Posted June 22, 2012 I haven't had anything to add as I'm just starting with SS myself but have followed this thread really closely and learned a lot. I'm glad you asked about your stitching on this part because I thought it looked pretty darn good myself. Cheryl Quote Share this post Link to post Share on other sites
JWGlover Report post Posted June 23, 2012 To keep your awl from going all the way through you can put some leather washers through your blade to get the depth you want. It also keeps the awl from marring the leather. Quote Share this post Link to post Share on other sites
katsass Report post Posted June 23, 2012 To keep your awl from going all the way through you can put some leather washers through your blade to get the depth you want. It also keeps the awl from marring the leather. From the grump --- VERY good point. Mike Quote Share this post Link to post Share on other sites
SooperJake Report post Posted June 23, 2012 From the grump --- VERY good point. Mike Yes, I thought so, too. Figured I'd dull the back half of the blade I have now and stack on some washers. Mike, I don't see sized 1 needles at Springfield's online, just 0 and 000 I think. Thanks for the tip and comments all! Jake Quote Share this post Link to post Share on other sites
katsass Report post Posted June 23, 2012 Yes, I thought so, too. Figured I'd dull the back half of the blade I have now and stack on some washers. Mike, I don't see sized 1 needles at Springfield's online, just 0 and 000 I think. Thanks for the tip and comments all! Jake Jake, call Springfield Leather, they just may not be in the catalog. If they don't, call ST Leather @ 1-800-381-5965 or Google them for their website. They have them. Mike Quote Share this post Link to post Share on other sites
SooperJake Report post Posted June 29, 2012 (edited) What a difference~~Smaller needle, smaller thread, 6spi and a shorter, duller awl. Of course it has twice as many stitches so it takes me twice as long..... There's a difference because of the leather, too. I'm using a heavier, better quality piece. The grain is much tighter and the edges much smoother than my original practice pieces. How much pressure do you use when overstitching the completed thread line? Jake Edited June 30, 2012 by SooperJake Quote Share this post Link to post Share on other sites
katsass Report post Posted June 30, 2012 What a difference~~Smaller needle, smaller thread, 6spi and a shorter, duller awl. Of course it has twice as many stitches so it takes me twice as long..... There's a difference because of the leather, too. I'm using a heavier, better quality piece. The grain is much tighter and the edges much smoother than my original practice pieces. How much pressure do you use when overstitching the completed thread line? Jake I dampen the stitches very slightly (the moisture eases into the leather a bit) and just apply slight pressure to give a final smooth, even appearance to the stitching. Mike Quote Share this post Link to post Share on other sites
SooperJake Report post Posted June 30, 2012 I need to get a good camera but here is a shot of my second practice piece from today. Jake Quote Share this post Link to post Share on other sites