switzforge
-
Content Count
25 -
Joined
-
Last visited


-
Looks like you've got a good tool there
-
Check this out
-
Glue and pin the handle scales to the blade
switzforge commented on switzforge's gallery image in Tutorials and Lessons
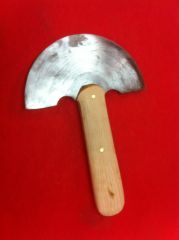
 This was a fun project and the only way the only way this little saw blade was ever going to see any use. It actually cuts pretty well after a quick shapening. I will know better once I take the time to put a proper edge on it.
 -
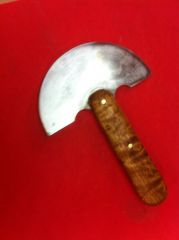
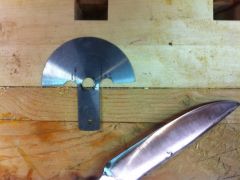
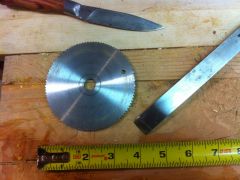
The little round knife is complete and appears to be a functional tool. It cuts and skives. And I haven't even finished putting the edge on it yet. So as a test project to confirm that you can in fact make a tool with common tools and no heat treatment. It still remains to pit the final edge on it and give it a good test run to see if it's a good tool or just so so. After removing the clamps the handle is shaped by sanding, filing or carving. What ever technique you want will work for the wood and any epoxie squeeze out. A file or belt snder will help when you get doen to the tang portion of the blade. Sand as fine as you like 220 or 340 grit. This handle is curly maple and is stained with feric nitrate to bring out the figure. The final finish is hand rubbed tongue oil. Now for the critical analisis. This is a bit light and delicate feeling for my taste. The handle is only 3/8" thick, 3/4" - 1" wide and 4" long. Just making the handle thicker would do wonders for how the tool feels in use. The blade is 3 1/2" tip to tip and about 0.03 thick. So it is a delicate and precise tool. I'll report back after giving it some more serious work. There was some concern about saw blades not being hardened though out. This blade tests with a sharp file the same on the edge and on the parts cut from the center, so I am confident it is fully hardened. I guess I'll try to make a second one from a larged blade and of course at some point I will forge one from tools steel bar stock
-
Here is the process I used to make a simple head knife from materials I had on hand
-
-
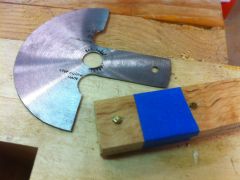
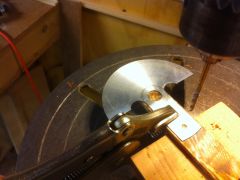
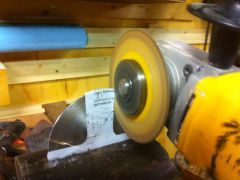
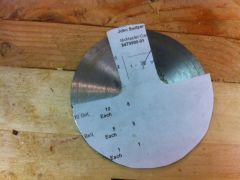
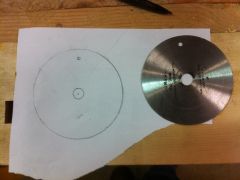
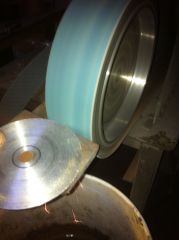
Since the original poster wanted to know about making a head knife, I assume he is not a knife maker and probably isn't looking to learn about metallurgy. SO, if you're still paying attention, here is the way I decided to approach the problem in a way most home crafts people could do, with no heat treating. I selected a little 4" saw blade from a box of garage sale tools. I will not get the blade hot enought to require any additional heat treating. Start by grinding the teeth off, go slow and keep the blade cool so you don't overheat it and ruin the temper. You also don't want the teeth to wear grooves in your grinder. I did this on a belt grinder (made for this type of work) but you could use a wheel grinder, angle grinder, belt sander. You could even use a sharp file, but filing will be very slow going on the already hardened steel Once the teeth were removed, I made a paper pattern of the blade. I folded the paper in half first, drew half of the knife blade shape, and cut it out with scissors. When the paper was unfolded, I had a full blade shape with both sides matching. Then I glued pattern is then glued to the blade. Following the paper pattern, I cut the shape using a cutoff wheel on an angle grinder. This could be done with a hacksaw and a new very fine blade, but it may wear through several blades. Remember, this is already hardened steel. You could also use a carbide rod saw that fits in a hacksaw frame. The carbide rod saw is meant for cutting ceramic tile and is usually in the tile section of the home store. The blade is now cut to shape and ready to polish if you choose to do so. Use progressively finer grits of abrasive - 220, 320, 400, 600 - until you get the finish you desire. The easiest way is to lay a flat sheet of sandpaper on a very flat surface (glass is an ideal surface) and just rub the blade back and forth. This will be the loneliest, most boring part of the job. The higher the polish the less likely the blade will rust. Decide if you need (or want) to drill holes in the blade for pins, to pin it to the handle. My blade had one little hole (a balance hole perhaps) plus the arbor hole. I used these holes since they were already there. Alternatively, you could skip the pins that go through the holes and just rely on epoxy to hold everything together. If you want to pin your blade into the handle but have no existing holes, then you must drill them. Heat the TANG PORTION ONLY with a torch. Don't let the color change move to the cutting edge or you will lose your edge holding ability. Then you can drill the pin holes. Cut your handle material close to size but leave it a little oversize. Clamp one side to the knife and drill through the hole, then do the same for the other side. Temporarily pin the two sides together and fasten them however you like. I used tape. Shape-sand and smooth the end where it goes over the blade. It will never be any easier than it is now! This will guarantee that both sides of the handle line up in the finished knife. I am not using a bolster on this knife. To attach the handle, I used a slow-setting epoxy. Glue and pin one side then the other. The pins guarantee alignment. The arbor hole I chose to use is a little oversized for its pin. Because of that, there is room for the whole thing to shift in the hole. Therefore I needed to make sure the handle is where I want it. Once dry, the epoxy filling the hole will be more than strong enough to keep everything in place once. Clamp it up tight and let it harden. Due to the size of the blade, the tang doesn't reach clear to the end of the handle. The ideal would be to fit the handle so it clamped up tight around the tang and still came together at the end. I chose to simply insert a fiber spacer that was the same thickness as the tang. These spacers are sold in multiple colors by knife suppliers. You could also use some of the cut of blade bits or a thin leather spacer. That's it for now. The glue I'm using must set for 24 hours. With any luck, I will take the clamps off and finish the handle tomorrow. So far I have spent about 1 1/2 hours with no heat treating to deal with. This method should be well within the grasp of most home shops.
-
I have used Evapo Rust with good results http://www.theruststore.com/Evapo-Rust-P1C21.aspx?gclid=CKKRxo2xo7YCFRCmPAodqQcACg This place has lots of rust removal options
-
Those are great. I hope more folks post pics of theirs as well. So many options
-
Actually it looks like this isn't the first time steel choices have been discused http://leatherworker.net/forum/index.php?showtopic=44196 Every one has an opinion and none are wrong, just a matter of personal preference. Flint knives and bone awls used to work just fine and I'm sure are still used by some to do good work.
-
Actually I was thinking along the lines of the original thread which has to do with head knives. So the question is what are the old Rose or Gomph knives made from and what are the new Dixon or Osborne knives made from. There are probably a lot more makers out there. It would be great to here from the better users on what knives work the best and whether they are carbon or stainless. We will probably never know the exact steel as most manufactures of comercial products like to keeo that to themselves.
-
Boy you guys must live in a wet part of the world. I have made several knives from these old saw blades with good results and no rust. But then again Colorado is pretty dry. I am pretty sure that all of the great old tools people are seeking out were made before steels got high tech and that means basically simple 10XX tupe carbon steels. I'm not a metalurgical historian, but thats my guess. The band saw blades may not actually be L6, but other knife makers speculate that they are. And that is the reason it is always important to do hardening and tempering tests on scrap before trying to make a good tool. All part of the fun of using junk yard steels. As for 440C, I personally avoid stainless, I have always thought it made an inferior cutting edge. If you can't avoid moisture or simply don't tend to care for your tools, then it is a good choice. Personally I am more concerned with a good sharp edge that tends to stay sharp but is easy to sharpen when needed. I find that 10XX, 5160, W1 & O1 are all good knife steels as is the old sawmill blade stock (whatever it may be) for thinner knives. Anyone know what the top brands of new knives are using for their steel?
-
Well, I would aggree tempering is easy. But proper heat treating - annealing, hardening and tempering all for a specific but unkown steel - may be a bit more than most home craftsmen are willing tackle. A round knife seems like a fairly easy shape to warp or heat unevenly with the tools available to most folks. But I think I will take on the chalange in the next few weeks. I will try one cut and ground out of a circualr saw blade with no change in the existing heat treat. I will make another from a saw mill size band saw blade (I have a bunch of that 0.10 thick L6?). This second knife I will try to get back on the proccess of testing for propper heat treating parameters and then how the two compare. Sounds like fun.
-
OK I found this interesting tool in a box at an antique store. The box had some coblers lasts in it, so I think it may be a cobblers tool of some sort. I can't find anything like it online no matter how I search. So the question is wether or not thisa is actually leather related or if I'm way out in left field somewhere.
-
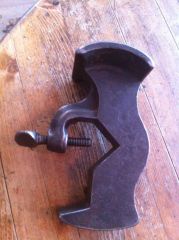 Any ideas what this is?
 -
While I am not the most experienced leatherworker around and have never actually used a head knife. It is also on my list of tolls to make. I have however been maiking knives and other tools for quite some time. Old saw blades with out the added carbide teeth should be excelent blade steel As would be the 0.90% - 1.03% steel mentioned by the last poster. The issue with any home made cutting tool is that you must either make it from already hardened and tempered steel or you must be able to do the herdening and tempering yourself. Cutting and shaping hardened steel isn't very easy and if you get it to hot while grinding you will remove some of the temper resulting in a softer area. I think making a head knife sounds like a great project. But it is the perfect example of investing $200 in labor for a $50 item.