Jump to content
SooperJake

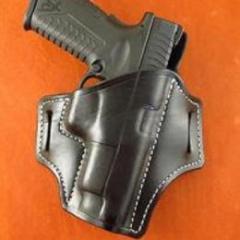
How Long To Make A Holster..start To Finish

Recommended Posts

I'm curious as to how long the average person takes to make a holster?

Let's say a pancake holster, one color, no tooling or reinforcement/ decoration, or an Avenger with a reinforcement sans tooling or exotics.

I'm not talking about actual hands-on working time, but inclusive time of drying of dyes and finishes and the like- ready to ship.

Share this post


Link to post
Share on other sites

a pancake from start to finish, no tooling 4 to 5 hours but I hand stitch everything. give or take 8 hours for the wet molding to completely dry but that time is not added into the labor.

someone with a sewing machine could probably cut my labor time in half.

the more elaborate the design and stitching requires more time.

Share this post


Link to post
Share on other sites

I made this set yesterday from scratch. Dying leather, cutting, sewing (machine), shaping, polishing, taking photos, eating and drinking coffe in the meantime... so all of it... started 9:15 and finished around 15:00... did some smaller things along the way... 250$... considering it was monday I think that's ok ;)

edit:

it's for a smith&wesson 686, 4 inch, 357 magnum revolver, little pouch holds 6 bullets and the leather belt is 2 ply of premium vege tanned leather (same as the holster and the pouch), solid brass buckle and screws, waxed thread and what not...

8552043628_9bae7a49c9_b.jpg

Edited by silkfatblues

Share this post


Link to post
Share on other sites

i started yesterday on a pancake for an xd-9.from scratch...7-8pm pattern made and cut...8-830 edged single edges and glued...830 to 9, sewed and finish edged...10-11, wetmolded and baked...11pm last night til today at 4pm, drying...4-410 agelus dip, 410-6 am tomorrow, drying...deliver to customer tomorrow at 9am...so 4 hours labor, 36 hours or so of dry time...$70 Law enforcement pricing...non LE, $90...using drum dyed leather, no embellishments

Share this post


Link to post
Share on other sites

With drying time for molding, oil, dye and finish total time is 3 days. Billable time 2-4 hours depending on the style.

Share this post


Link to post
Share on other sites

Usually, . . . make pattern, cut leather, and generally "create" the holster all in the same day, . . . finish up with wet molding.

No less than 24 hours later, . . . burnish edges, . . . do some nit picking adjustments, . . . finish up with dyeing the product.

No less than 24 hours later, . . . re-burnish as needed, . . . nit pick as needed, . . . apply first coat of final finish.

Depending on final finish, . . . re-coat if necessary, . . . something between 12 and 24 hours.

Final inspection, nit picking, . . . package it up, . . . out the door.

May God bless,

Dwight

Share this post


Link to post
Share on other sites

I can start on a pancake in the morning...have it in the mail the next day.

Share this post


Link to post
Share on other sites

Straight through, on a no frills holster, 3-4 hours from start to drying. After drying, 15-30 min final polish and QC.

Share this post


Link to post
Share on other sites

about two to three days depending on speed of drying

Tony

Share this post


Link to post
Share on other sites

why dont you guys use hair dryer or calorifer to dry holsters? why wait?

the leather tends to shrink a bit while drying so it needs to be tooled a little after drying, but just enough to stretch it so the gun fits easy...

try that... but dont burn it!!

;)

S

Share this post


Link to post
Share on other sites

The MOLDING can be sped up, but things like conditioning shouldn't be rushed.

Share this post


Link to post
Share on other sites

if by speeding up molding you meen using rubber moulds (two big rubber peices and a holster with a gun mould in the middle being pressed by a big 5 ton press) or something like that, my experience tells me that is wrong way and the holster just doesnt hold the gun as much as it should, plus it looks like crap... the shaping and moulding is best handmade... but if you guys spend hours on waiting for the leather to dry by itself, that is just apsurd... so, dont be afraid of helping it dry... just my 5 cents... then again, it does depend on the leather quality too...

cheers,

Silk

Share this post


Link to post
Share on other sites

Here's my dry helper....small space heater, only $8 at Lowe's going on 3 years now.....other stuff I found laying around the house, the wife didn't even miss it.

post-4803-0-29639900-1363178889_thumb.jp

Share this post


Link to post
Share on other sites

I've started a holster Saturday morning, and shipped it out on Monday. It really just depends on how fast you want to rush it. You don't really want to soak the holster in water too soon after dying. You don't want to mount your reinforcement piece too quickly if the edges have been dyed & burnished if you're using Barges cement because the solvents can wet the dye, and the dye can rub onto the holster body leaving little black dye streaks sporadically around the perimeter of the reinforcement (happened to me several times...). I think best case, cut, edge, groove & dye the pieces first thing in the morning. Let it sit for maybe an hour, then sand & burnish the reinforcement edges with a little water and dye the edges (in the areas that won't be glued together). If I'm rushing it, I'll dye the edges with a black wide-tip sharpie. Glue and assemble, burnishing & dying the glued edges after you've sewn them. Wet form after lunch, then dry in an oven for about 45 minutes at low heat, then immediately oil the grain surfaces and let sit in front of a fan till that evening. Burnish the interior with gum trag and touch up & burnish the edges again if necessary. Turn the fan back on and continue to let it dry overnight. The following morning, apply your finish and let it hang to dry, which probably leaves enough time to slip it in a zip-top back, box it up and leave it on the porch for the mail man.

Share this post


Link to post
Share on other sites

Here's my dry helper....small space heater, only $8 at Lowe's going on 3 years now.....other stuff I found laying around the house, the wife didn't even miss it.

that's it my friend, simple but does the trick!! :)

Share this post


Link to post
Share on other sites

I made this set yesterday from scratch. Dying leather, cutting, sewing (machine), shaping, polishing, taking photos, eating and drinking coffe in the meantime... so all of it... started 9:15 and finished around 15:00... did some smaller things along the way... 250$... considering it was monday I think that's ok ;)

edit:

it's for a smith&wesson 686, 4 inch, 357 magnum revolver, little pouch holds 6 bullets and the leather belt is 2 ply of premium vege tanned leather (same as the holster and the pouch), solid brass buckle and screws, waxed thread and what not...

8552043628_9bae7a49c9_b.jpg

Nice rig!

Share this post


Link to post
Share on other sites

Great Comments all. Thanks, and keep them coming.

Share this post


Link to post
Share on other sites

I've started a holster Saturday morning, and shipped it out on Monday. It really just depends on how fast you want to rush it. You don't really want to soak the holster in water too soon after dying. You don't want to mount your reinforcement piece too quickly if the edges have been dyed & burnished if you're using Barges cement because the solvents can wet the dye, and the dye can rub onto the holster body leaving little black dye streaks sporadically around the perimeter of the reinforcement (happened to me several times...). I think best case, cut, edge, groove & dye the pieces first thing in the morning. Let it sit for maybe an hour, then sand & burnish the reinforcement edges with a little water and dye the edges (in the areas that won't be glued together). If I'm rushing it, I'll dye the edges with a black wide-tip sharpie. Glue and assemble, burnishing & dying the glued edges after you've sewn them. Wet form after lunch, then dry in an oven for about 45 minutes at low heat, then immediately oil the grain surfaces and let sit in front of a fan till that evening. Burnish the interior with gum trag and touch up & burnish the edges again if necessary. Turn the fan back on and continue to let it dry overnight. The following morning, apply your finish and let it hang to dry, which probably leaves enough time to slip it in a zip-top back, box it up and leave it on the porch for the mail man.

Hey Eric, ive started waxing my edges right after i dye them...i usually dye the edge, then burnish it, then immediately wax it with 50/50 paraffin/beeswax...no dye transfer after that..

Edited by renegadelizard

Share this post


Link to post
Share on other sites

I guess I didn't really mention it in my previous post, but I have also been following my edge dye with a wax/burnish. I usually just use paraffin though. This is my basic process:

  1. Dampen and edge
  2. Sand the edge with 220 grit sandpaper
  3. Rub the edge with my burnishing stick
  4. Let the edge dry, then dye with a dauber - Or, if I don't have time to let the edge dry, I'll dye the edge with my black sharpie
  5. Dampen the edge, then rub paraffin over the edge
  6. Burnish with my burnishing stick
  7. Buff the edge with canvas cloth
  8. Check the edge and re-dye if necessary, then re-wax and burnish/buff again

I haven't had any problems with the dye transfer since I've been using this process, but I also stopped using Barges cement - I'm now using a water-based contact cement.

Share this post


Link to post
Share on other sites

I have found the best thing in the world for edge coatting without using wax and makes the edges slicker than owl shit and requires very little burnishing and is great for finishing of the whole project. I even use it for background inlay, truly an all purpose finish IMO

you have to try the eco flo antiquing gel I use it religiously then apply a WBPU for a protective top coat

FYI the ECO FLO Super Sheen is basically the same thing as Min wax Polycrylic that you can pick up a whole quart can at Walmart for the same price as a four OZ bottle of super sheen from Tandy..

Just thought some of you might like to know.

Share this post


Link to post
Share on other sites

I made this set yesterday from scratch. Dying leather, cutting, sewing (machine), shaping, polishing, taking photos, eating and drinking coffe in the meantime... so all of it... started 9:15 and finished around 15:00... did some smaller things along the way... 250$... considering it was monday I think that's ok ;)

edit:

it's for a smith&wesson 686, 4 inch, 357 magnum revolver, little pouch holds 6 bullets and the leather belt is 2 ply of premium vege tanned leather (same as the holster and the pouch), solid brass buckle and screws, waxed thread and what not...

8552043628_9bae7a49c9_b.jpg

The whole rig is Very nice I especially like the paddle holster and the bullet holder.

Share this post


Link to post
Share on other sites

Nice rig!

The whole rig is Very nice I especially like the paddle holster and the bullet holder.

Thanx guys! more stuff soon... and about the speed, today I only managed to make 2 tooled belts, basket weave style, so, I guess it has something to do with moisture, pressure and other meteorocozmic stuff :))

Share this post


Link to post
Share on other sites

I guess I didn't really mention it in my previous post, but I have also been following my edge dye with a wax/burnish. I usually just use paraffin though. This is my basic process:

  1. Dampen and edge
  2. Sand the edge with 220 grit sandpaper
  3. Rub the edge with my burnishing stick
  4. Let the edge dry, then dye with a dauber - Or, if I don't have time to let the edge dry, I'll dye the edge with my black sharpie
  5. Dampen the edge, then rub paraffin over the edge
  6. Burnish with my burnishing stick
  7. Buff the edge with canvas cloth
  8. Check the edge and re-dye if necessary, then re-wax and burnish/buff again

I haven't had any problems with the dye transfer since I've been using this process, but I also stopped using Barges cement - I'm now using a water-based contact cement.

Give this a whorl on some scrap, Eric: sand, dye, burnish with canvas or a piece of scrap leather gran-side. I burnish now with canvas wrapped on a rod of steel on a buffing machine, but it works by hand too.

A wet dyed edge burnishes almost effortlessly on good leather. Worth a try.

Share this post


Link to post
Share on other sites

This entire listing is a very good read and thanks for the Min wax Polycrylic tip. That holster rig not only has a nice look, I can see practicality all over, good leather should be put to good use. One process I use for some controled but fast drying is a Hair-Dryer. Thanks.

Edited by leatherworm

Share this post


Link to post
Share on other sites

Join the conversation

You can post now and register later. If you have an account, sign in now to post with your account.
Note: Your post will require moderator approval before it will be visible.

Guest
Reply to this topic...

×   Pasted as rich text.   Paste as plain text instead

  Only 75 emoji are allowed.

×   Your link has been automatically embedded.   Display as a link instead

×   Your previous content has been restored.   Clear editor

×   You cannot paste images directly. Upload or insert images from URL.


×
×
  • Create New...