


jrmz
-
Content Count
34 -
Joined
-
Last visited
Recent Profile Visitors
1,714 profile views
-
thanks for the reply, it really got me curious. the work looks really nice as in "tradition meets hi-tech" looking forward to the rest of the pieces
-
what material did you use for the inlay in the bottom piece? or is it just stamped to look like a mesh???
-
I've been wanting to make a minimalist wallet like that for a while now. thank you for the pattern. Just a quick question, if I were to print it, what size would give me a full pattern to cut?
-
Thanks for the help man, I really appreciate it. I'll give it a shot.
-
And how would you attach the elastic? Rivets? Saddle stitch? The liner is pigskin if that makes a difference. I don't want the elastic to tear up when I stretch it. Thanks for the help
-
Thanks for the suggestion 25b. I might just use the elastic idea on the other liner of the sporran and that would work great with the smaller items I want to keep in the sporran like a pen, lip balm and a swiss army knife, but I want something to hold my wallet in place. For some unknown reason I found myself constantly reaching for it at the last festival I went to. I just don't want to fish for it when I need it.
-
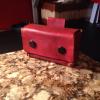
Hello everyone. I'm currently trying to make a sporran but I would like to have some inner organization in lieu of a black hole. the idea that I have in my head is to make a pocket similar in shape and size to that of regular t-shirts. So far, the best I've come up with is the design in the attached pictures but I'm still not too happy with it. Wondering if anyone can give me some pointers as to how improve the pattern and get rid of the exposed edges or if anyone already has a pattern they are willing to share with me. Thank you in advance
-
First major blunder I'm guessing the coat of resist wasn't thick/even enough so when I got the antiquing on it penetrated too much and made it look blotched. When trying to fix it by adding more antique, the saturation erased some of the details in the carving. Oh we'll, I guess ill chalk it up to lessons learned. I wonder if using undiluted resolene as resist would give me a more consistent coat
-
Treasure Map Card Wallet
jrmz replied to JoeSnuffie's topic in Purses, Wallets, Belts and Miscellaneous Pocket Items
That's pretty clever. I would've never thought about stamps. Thank you for sharing. Niece piece by the way -
Thank you Ray and Monica. I appreciate it. Really learning a lot from this place. This is the wallet for my other brother. When I first painted it, the colors were way too bright and vivid so instead of letting the resist dry over night I only gave it a couple of hours. The antiquing penetrated just enough to give the whole helmet a somber look
-
More presents My two younger brother are really into video games so I wanted to use their favorite characters What I like: the warm colors, the stitching on the outside and my edges are looking a tiny bit better. Paraffin definitely makes a difference but I need to get some sandpaper What I don't like: inner stitching! I guess I didn't measure the liner correctly and the leather ended up being a fraction of a inch to big. Chewed up the edges in some parts
-
Thank you tom and thank you wild bill. If I have improved is because I found this place. So much information, tips, examples, critiques and so on and on, just trying to absorb as much as I can
-
Christmas is coming up and i started thinking about what to give my brother in law. He is a bit of a cowboy so i thought a western belt might be appropiate. Besides it gave me an excuse to try something different. I think both my tooling and stitching are getting slightly better but im still struggling with the edges. Definitely have to try hidepounder's tutorial I'll post my projects as i finish them.
-
I got a belly dancing sword for my girlfriend but it came with no way to carry it around so it got me into my next project. Still struggling with the stitching and the overall shape is not right. Cut too much on some places when trying to even all 3 layers I decided to go back and make another flask holster I got a craftaid from tandy and it gave me more confidence with the toolling. Almost like painting with numbers
-
Next project First time wet molding leather, first time hand stitching and first time slicking the edges and first time using a swivel knife.