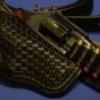
Eaglestroker Report post Posted February 27, 2011 I tried some new thread designs and a new dye this weekend, how can I improve the design? Quote Share this post Link to post Share on other sites
Big O Report post Posted February 28, 2011 More clearance for the grip. Make the belt slots a little wider. Stitching looks GREAT, especially on the left side. Got that whole symmetric thing going on.... Quote Share this post Link to post Share on other sites
shakygreg Report post Posted February 28, 2011 First off... Great job overall! On the belt slots you could've made the straight lines flow into the hole punches better. Also. just curious what type of dye you used? Again, good job. Quote Share this post Link to post Share on other sites
Rayban Report post Posted February 28, 2011 Your basket weave pattern seems to be off.....or maybe it's just me, I've had a couple refreshments today.......but there doesn't seem to be uniformity to it....again, it could be me. Also at the top and bottom of the pouch, I like to see a clean border whereas you stamped the scallops right to the edge...... You meant for the stitching pattern to be different on opposite sides, correct? I favor the one on the left ( no, I'm not a Lib.) Do the slots on the right give you a noticeable change in cant? Doesn't seem like they would. I like the idea of stamping on the pouch area, don't see much of that and I believe you can get away with it on a pancake. Keep working at it.... Quote Share this post Link to post Share on other sites
marine mp Report post Posted February 28, 2011 (edited) Eaglestroker, Nice job and sewing looks spot-on. Just a few things I would change, beside whats already been suggested...bevel the outside of the holster on both front and back and also bevel the holster slots on the sides where the belt passes through on the front and back. Makes for an thinner cross-section that isn't pulling against your waist. Also, look on the "how do I do it" section and read "Hidepounders" (Bob Park) post on "Finishing Edges". I use his suggested method and the edges really do make a great difference on the overall appearance of the holster. Good job. Semper-fi Mike Edited February 28, 2011 by marine mp Quote Share this post Link to post Share on other sites
Eaglestroker Report post Posted February 28, 2011 More clearance for the grip. Make the belt slots a little wider. Stitching looks GREAT, especially on the left side. Got that whole symmetric thing going on.... Would you simply scallop some off the top left hand corner? I don't have an issue drawing but I understand where your coming from. What is considered 'standard size' for belt loops? I was told 3/8" and it just seems massive! First off... Great job overall! On the belt slots you could've made the straight lines flow into the hole punches better. Also. just curious what type of dye you used? Again, good job. How would you recommend making the flow better? The chisel still gets the better of me, can never seem to line it up in the same place every time. The dye is Fiebings Professional 'Light Tan' cut 1:1 with alcohol, with a hearty application of neatsfoot oil before an application of acrylic resolene mixed 1:1 with water. This dye has the potential to be my new favorite! Your basket weave pattern seems to be off.....or maybe it's just me, I've had a couple refreshments today.......but there doesn't seem to be uniformity to it....again, it could be me. Also at the top and bottom of the pouch, I like to see a clean border whereas you stamped the scallops right to the edge...... You meant for the stitching pattern to be different on opposite sides, correct? I favor the one on the left ( no, I'm not a Lib.) Do the slots on the right give you a noticeable change in cant? Doesn't seem like they would. I like the idea of stamping on the pouch area, don't see much of that and I believe you can get away with it on a pancake. Keep working at it.... My weave isn't perfect, maybe not as bad as you think but I need to slow down. It was a whim to double stitch it and I will adjust the size of the holster to accommodate next time.I was thinking for a cleaner border next time (funny you should mention it) that before I glue the two sides I will sew in between where either side would meet, then back a quarter inch or so off that line for to tool for a nice and less busy look. The reason my stitching is different is I use the same blank for about every semi auto hand gun and simply adjust the stitching layout and length if needed, works out ok. The different slots give it enough to be comfortable wearing at a cant. The very first holster I made I basically did a carbon copy of an original Roy pancake holster which had both. My friends like them so much they wanted ones exactly like them, so that's why they are there. I would rather design a holster at any given cant and leave it where I want it! Thanks for the compliments though, I have some work to go still but I like how the tooling looks on the pancake style holsters. Eaglestroker, Nice job and sewing looks spot-on. Just a few things I would change, beside whats already been suggested...bevel the outside of the holster on both front and back and also bevel the holster slots on the sides where the belt passes through on the front and back. Makes for an thinner cross-section that isn't pulling against your waist. Also, look on the "how do I do it" section and read "Hidepounders" (Bob Park) post on "Finishing Edges". I use his suggested method and the edges really do make a great difference on the overall appearance of the holster. Good job. Semper-fi Mike Thanks Mike, I do bevel the backside already. I need a better edge bevel before I do the front side - it always looks butchered using the one I have now. I'd like to get a nice bisonette #2, after using one I think it would vastly improve my overall finish. Thank you for the suggestions it is much appreciated. I have looked time and time again at the edge finishing thread. I've only been doing leather work for about two months and I simply can't afford to spend anymore on it right now. I have gotten some great ideas from that thread to help me as my funds allow though! -Robert Quote Share this post Link to post Share on other sites
Big O Report post Posted February 28, 2011 Would you simply scallop some off the top left hand corner? I don't have an issue drawing but I understand where your coming from. What is considered 'standard size' for belt loops? I was told 3/8" and it just seems massive! Tough to change it once it's sewn. The cut I'd make would extend beyond the stitch line. This is something that pretty much has to be done in the design stage. Here's an example: 3/8 actually sounds about right for belt slots. I have a tendency to "wing it" and just use whatever size punch looks right. I punch out holes at the top and bottom, and then take a 1" wood chisel and put it just inside the edge of one hole, line it up with (toward) the edge of the other, and cut that slot. Then I slide the chisel down that slot and line it up with the edge of the other hole, and finish the cut. Repeat on the other side, and you've got a near-perfect slot. Quote Share this post Link to post Share on other sites
Eaglestroker Report post Posted February 28, 2011 Tough to change it once it's sewn. The cut I'd make would extend beyond the stitch line. This is something that pretty much has to be done in the design stage. Here's an example: 3/8 actually sounds about right for belt slots. I have a tendency to "wing it" and just use whatever size punch looks right. I punch out holes at the top and bottom, and then take a 1" wood chisel and put it just inside the edge of one hole, line it up with (toward) the edge of the other, and cut that slot. Then I slide the chisel down that slot and line it up with the edge of the other hole, and finish the cut. Repeat on the other side, and you've got a near-perfect slot. That's how I have drawn mine out as well, thanks for the visual though. So it is more beneficial to leave the grip of the pistol as exposed as possible? My worry is someone getting there hands on one who isn't using a proper belt, but I guess that shouldn't be my worry. I use a 1 1/4" chisel for the space between the punch as well. The chisel never seems to fall in the same place for me though. Guess practice will make perfect - it is the most frustrating part of the building process for me. Quote Share this post Link to post Share on other sites
marine mp Report post Posted February 28, 2011 Eaglestroker, Understand on the shortage of "dead presidents'!!!!! !)Canning Wax..$5.00, 2)Can Saddle Soap $4.00 3)Glycerin Bar $5.00. The canning wax and saddle soap is available at most any store and the Feibings Glyceryn bar (saddle soap) at a western or feed store. Plus a old pair of jeans for burnishing as I only hand burnish. I use1/4 inch leather punch for the belt slots. For myself, I find 3/8 gets to wide after the wet molding and forming. !/4 inch ends up stretching wide enough to accomodate a c/c heavy duty belt. Again, I also bevel the front and back side of the belt slots with a hobby knife so they almost come to a point. This makes for a smooth belt transition. Semper-fi Mike Quote Share this post Link to post Share on other sites
Eaglestroker Report post Posted February 28, 2011 Hey Mike, The main reason I picked up leather work, besides a family members influence, is for the simple fact I can't afford to buy a lot of good leather pieces. For the price of a few nice holsters I've set myself up in such a way that I can make many many more and have made up my cost in materials do some for friends and family members as well. Did I mention I'm in college as well? Those dead presidents were never so beautiful to me when I do stumble across some. Thank you for the list - I will try to pick some of those things up at a local western store this weekend! -Robert Quote Share this post Link to post Share on other sites
katsass Report post Posted March 2, 2011 I tried some new thread designs and a new dye this weekend, how can I improve the design? Robert, My suggestion is, when marking out your stitch lines, mark out another line inside of that to make a 'frame' around your basket weave. You might pick up a copy of Al Stohlman's book, "How to Make Holsters" (about $12). It gives you an awful lot of good info, and it has a section on how to align and work the basket stamp well. Mike Quote Share this post Link to post Share on other sites
shakygreg Report post Posted March 2, 2011 You asked how to make the belt loops flow better into the hole punches. What I do: 1. Punch the holes. 2. Use a straight edge to mark the cut line. 3. Use a razor knife and start at one hole and cut on the line halfway on both sides, turn the project around, and cut the remainder of the line on both sides. 4. Use a dremel sanding bit to smooth out the inside of the slot. 5. Use a burnisher with water, then a burnisher with gum tragacanth. Quote Share this post Link to post Share on other sites
Eaglestroker Report post Posted March 7, 2011 (edited) You asked how to make the belt loops flow better into the hole punches. What I do: 1. Punch the holes. 2. Use a straight edge to mark the cut line. 3. Use a razor knife and start at one hole and cut on the line halfway on both sides, turn the project around, and cut the remainder of the line on both sides. 4. Use a dremel sanding bit to smooth out the inside of the slot. 5. Use a burnisher with water, then a burnisher with gum tragacanth. Thanks Greg, I found my biggest issue was not the method but the cutting surface itself. Per recommendation I snagged an old plastic cutting board from the goodwill and the results improved ten fold! I won't have pictures of the holster I made to match this until tomorrow but I did this using Mike's burnishing method. My results will only get better, I think I should have been a bit more aggressive with my sanding after seeing the finished product. I will continue to get better though and I think from now on I will be hand burnishing! Edited March 7, 2011 by Eaglestroker Quote Share this post Link to post Share on other sites
dirtclod Report post Posted March 7, 2011 You strap is faceing the wrong way it needs to be behind you. If you walk through some brush the way it is now theirs a good chance it will get snaged and come undone and you may lose your knife. Quote Share this post Link to post Share on other sites
Eaglestroker Report post Posted March 7, 2011 Thank you for that tip, I had never heard or read that. My pistol sits on my right side so this is on my left, and it will work out following your rule. Should I make others though I know something to ask about! You strap is faceing the wrong way it needs to be behind you. If you walk through some brush the way it is now theirs a good chance it will get snaged and come undone and you may lose your knife. Quote Share this post Link to post Share on other sites
Eaglestroker Report post Posted March 7, 2011 Holster hasn't been sealed yet but otherwise it is ready to rock. Have to get the bulk work done before the week starts and I get busy again, any and all criticism welcome! Please don't be gentle guys Quote Share this post Link to post Share on other sites