tclaridge
-
Content Count
62 -
Joined
-
Last visited
1 Follower

Recent Profile Visitors
2,499 profile views


-
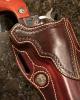
Here's a fun one I just finished up... My first Avenger style for a revolver. I'm pleased with it-- the finish brought some good character out in the leather. Light brown and dark brown Fiebing's pro oil dye, Ritza 25 1.0mm cream thread. 8/9 oz Hermann Oak veg tan on all pieces. Critiques are welcome, thanks for looking! God bless, Tanner Claridge
-
Glad you like it! I wish I had a CNC mill and lathe in the garage so I could send one down to you! Only leather tools now, though...
-
I also punch two holes and join them with a wood chisel, but if you're using a knife to join them (which I have) I might recommend stopping shy of reaching the second hole, then cutting backward from the second hole to meet the cut from the first (so you don't overshoot it). Then I sometimes tape some sandpaper around a drill bit and run it around in there to smooth it up before burnishing. Just some thoughts! Looks like a great sheath-- probably rides really tight. Keep it up!
-
where are in montana
-
A new holster with rubberized nylon straps and pull-the-dot snaps. Black pro oil dye, space gray Ritza thread. Thanks for looking!
-
I think there must have been some website re-vamping-- It looks like they disappeared for a while but are now up again. Let me know if you can't see them!
-
Thanks a lot! Here are a couple pics of the board-- unfortunately those are "out of print", as I am not a machinist anymore! Made a few for friends one Christmas... Cheers!
-
Once again, thanks to JLS Leather for the initial inspiration to get into this. You can see that this pattern is an extrapolation of his "look," which I find hard to top. Also, I didn't mention that the final finishes are Sno-Seal beeswax water-proofer, then another coat of carnauba cream to polish (I don't prefer Resolene, etc.).
-
Here's a new holster with a lizard inlay (from the Springfield Leather scrap bag). It's Fiebing's mahogany oil dye, Ritza 1.0mm cream thread. I was especially trying to keep clean edges and stitching on this one. Always something to improve! All the best, Tanner @claridge_leather (Instagram)
-
I made an aluminum cribbage board for a friend back in machinist days. Now, in my "leatherworker" days he asked for a case Fun project! All 8/9 oz veg tan with briar brown EcoFlo antique gel, cream Ritza 1.0mm thread, carnauba cream finish. All the best, Tanner @claridge_leather (Instagram)
-
Leatherman Wave Pancake Sheath
tclaridge replied to tclaridge's topic in Gun Holsters, Rifle Slings and Knife Sheathes
Thanks! Post one when you make it! I have seen some cool cross-draw pancake sheaths for fixed blades, which would be neat to try. This one just has a mild forward cant. Have fun! Tanner -
Here's my latest little project-- this makes it pretty nice to carry that half pound brick of a multitool. Plus, I can't resist making a sheath or holster for every knife and gun I own (probably like many of you)! Cheers! Tanner
-
Oblong Holster Holes
tclaridge replied to tardis86's topic in Gun Holsters, Rifle Slings and Knife Sheathes
I do this as well, punching two round holes (5/16" diameter) 1.5" apart on center. Then a 1.5" sharp wood chisel connects the two holes, hitting each hole tangent to the edge. Done carefully, this can make a pretty smooth, almost-finished slot. I then wrap a pen in fine grit sandpaper and give it a couple laps around the inside of the slot to smooth it up before burnishing. Like Fredo said, this is what I had laying around, so I skipped buying an oval slot punch. Good luck! -
Buck Knife Sheath
tclaridge replied to tclaridge's topic in Gun Holsters, Rifle Slings and Knife Sheathes
You are correct-- it is sandwiched between those layers. It was skived down quite thin, glued in the proper spot, then fastened with one rivet through the back layer (pretty much in line with where the snap is on the front piece). Have a good one!