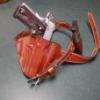
Lobo Report post Posted February 16, 2009 Wife had to work through the weekend, so I settled in to complete last week's special orders (7 holsters, in addition to my regular production). While doing those I decided to add another holster that I have been thinking about for quite some time, see how it works out. Last year I started making a variation on the basic pancake style which, instead of belt slots, secures to the belt with a leather loop and snap. This eliminates the need to unfasten the belt and thread the belt loops when putting the holster on or taking it off. That design has been well received and sales have been consistently good. The modification I envisioned was a different way to build the snap-loop that should reduce bulk at the belt line a little bit and provide a cleaner look to the finished product. So, here's how it went: 1. Patterning (one-time effort, as the pattern can be re-used). 2. Cutting the pieces (8 minutes). 3. Assembly and sewing (9 minutes). 4. Wet-forming and molding (15 minutes). 5. Hardware attachment (6 minutes). 6. Dying, oiling, and finishing (7 minutes). Total time (less patterning time): 45 minutes. (Bear in mind that I'm doing several at a time; single units require more time). Total materials: about 1/2 sq. ft. 8-oz. shoulder, 4 snaps. Estimated cost: $4. Photos: 1. Older modification of pancake with snap loop up, over, behind belt, up to snap. 2. Cut pattern for new modification (note cuts to become belt loop). 3. Forming belt loops over 1/4" X 1.5" wooden mandrel (makes sure belt will clear easily). 4. Holster, formed, dyed, hardware attached (awaiting final finish of neatsfoot oil and Bag Kote). 5. Detail of belt loops. 6. Retention test (will the formed holster retain the handgun when inverted?). 7. Photo taken in mirror of new holster on the hip (also showing old Grampa Lobo's slender figure). OK, product development appears to be a success. The bulk at the belt-line where the attachments are is reduced by one layer of leather, and the new down-turned stap can be cut to the contour of the holster and stitch-line, with a pleasant finished look. Room for two snaps fore and aft, a little added security in the event one snap ever fails. Production time is within my target of less than one hour per production holster. Costs are minimal. These can go out the door at $49 or so and I'll feel good about it. I think I'll add this one to the production line-up! Quote Share this post Link to post Share on other sites
Twosons Report post Posted February 17, 2009 Nice looking holster. That style is my favorite for belt carry. I do prefer the look of the single snap version though. Quote Share this post Link to post Share on other sites
Lobo Report post Posted February 17, 2009 Nice looking holster. That style is my favorite for belt carry. I do prefer the look of the single snap version though. Thanks for the input. I like them both, but you are looking at photos of a fully finished holster (ready to deliver to the customer) as opposed to a holster ready to finish. I think they both look pretty good, but I'm a little bit prejudiced maybe? Thanks for your opinion. I appreciate your input. Quote Share this post Link to post Share on other sites
Dually Report post Posted February 17, 2009 Very nice explanation of your process. I decided to offer mine if it were coming from my shop. 1. Pattern…1 hour of head scratching and coffee drinking 2.Cutting the pieces ( 45 minutes cause my dang knife is dull) 3.Cutting pieces again cause I slipped on the last cut and ruined it 45 minutes 4.Assembly and sewing…aw crap……..couple hours or so 5. Wet forming and molding…2 hours cause I got it too wet 6. Hardware attachment…30 minutes 7.Dying, oiling, and finishing …more coffee please…2 hours Total time: 9 hours ( bear in mind I took time out for band aids) Total materials: 3 sq feet of what ever I had laying around, 8 snaps cause I never get them set right the first time, Gas to run to Tandy for more snaps $20.00 Estimated cost $100.00 Production?? Are you kidding? Should go out the door at about $30.00 Total profit: -$70.00 I think I’ll just buy yours LOL Quote Share this post Link to post Share on other sites
philw Report post Posted February 18, 2009 nice looking design but I too prefer the single snap model. I can't believe how quick you can put one together, as a noobie I'm even slower than Dually! How come your edges look orange on the some of the photos? Is the leather still damp? thanks Phil Quote Share this post Link to post Share on other sites
Lobo Report post Posted February 18, 2009 nice looking design but I too prefer the single snap model.I can't believe how quick you can put one together, as a noobie I'm even slower than Dually! How come your edges look orange on the some of the photos? Is the leather still damp? thanks Phil Yes, photos were taken while still damp and final finish had not been applied. Thanks for your comments. I routinely do anywhere from 6 or 8 to 20 pieces at a time, cutting down on the time considerably by not having to set up every operation separately. I budget no more than an hour per piece, including all processes. My retail prices start at $39 and go up to about $69 for regular production items, so I can't dawdle around at any stage. A typical week yields 20 to 25 pieces out the door at a cost of about $100 for materials, total labor of about 20 hours, and total revenue of about $900 to about $1200. Call me anything you like (vain, villainous, money hungry, or just plain old Capitalist pig), I'm not too good to work for $40 or $50 per hour WHEN I HAVE TO! Special orders, that is another matter. I price those out on a time and materials basis. Customer wants to design the piece? No problem, is Mr. Customer ready to pay for the time and materials? I do approx. 80 to 120 units per month. I also have another business, so I can only commit a few hours per day, a few days per week, to the leather work. Not to sound terribly crass, but what the heck: if there ain't no profit there, old Lobo ain't wasting his time on it! Over the past 37 years I have made a lot of holsters for practice, and thrown quite a few into the trash. Now, I make them only for profit. Always ready to try something new, always up for a new challenge, but I'm not about to give it away. I realize that we have a new administration in Washington, DC, and my business plan might not be politically correct (I know that I won't get any "stimulus funding"), but the word "profit" has not become a dirty word around my house yet! Many of the posts you will see on this forum are from serious artists that create fabulous works, many for their own edification and gratification. That is all well and good, and I will not try to compete with those fine folks (even if I had the skills they display regularly to the rest of us). For me, this has always been a business, and unless there is a profit to be made, all we have is a hobby. Please don't misunderstand; I am not denigrating those who take their art very seriously, I respect that and appreciate it. I try to be productive every day. I appreciate every opportunity presented to me. But I don't want to go to bed any night without knowing that I have been productive that day. Money isn't everything, but it is how we keep score in this life! Thanks again for your comments. Glad that I had the opportunity to get that nonsense off my chest. Best regards, Quote Share this post Link to post Share on other sites
Lobo Report post Posted February 18, 2009 Very nice explanation of your process. I decided to offer mine if it were coming from my shop.1. Pattern…1 hour of head scratching and coffee drinking 2.Cutting the pieces ( 45 minutes cause my dang knife is dull) 3.Cutting pieces again cause I slipped on the last cut and ruined it 45 minutes 4.Assembly and sewing…aw crap……..couple hours or so 5. Wet forming and molding…2 hours cause I got it too wet 6. Hardware attachment…30 minutes 7.Dying, oiling, and finishing …more coffee please…2 hours Total time: 9 hours ( bear in mind I took time out for band aids) Total materials: 3 sq feet of what ever I had laying around, 8 snaps cause I never get them set right the first time, Gas to run to Tandy for more snaps $20.00 Estimated cost $100.00 Production?? Are you kidding? Should go out the door at about $30.00 Total profit: -$70.00 I think I'll just buy yours LOL Thanks for your very humorous comments. I enjoyed reading this very much. I hope to see your postings again in the future. Best regards, Quote Share this post Link to post Share on other sites
BruceGibson Report post Posted February 27, 2009 Very nice explanation of your process. I decided to offer mine if it were coming from my shop.1. Pattern…1 hour of head scratching and coffee drinking 2.Cutting the pieces ( 45 minutes cause my dang knife is dull) 3.Cutting pieces again cause I slipped on the last cut and ruined it 45 minutes 4.Assembly and sewing…aw crap……..couple hours or so 5. Wet forming and molding…2 hours cause I got it too wet 6. Hardware attachment…30 minutes 7.Dying, oiling, and finishing …more coffee please…2 hours Total time: 9 hours ( bear in mind I took time out for band aids) Total materials: 3 sq feet of what ever I had laying around, 8 snaps cause I never get them set right the first time, Gas to run to Tandy for more snaps $20.00 Estimated cost $100.00 Production?? Are you kidding? Should go out the door at about $30.00 Total profit: -$70.00 I think I’ll just buy yours LOL Too funny, Randy! If I didn't know better I'd think you'd been watching me work! Quote Share this post Link to post Share on other sites