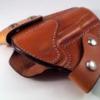
redhat4201 Report post Posted August 28, 2011 Here is a Snap Removable Pancake for a Sig Sauer TacOps. Let me know what you guys think. Quote Share this post Link to post Share on other sites
Shooter McGavin Report post Posted August 29, 2011 Looks good. Do the snap straps for the belt tunnel on the backside? Quote Share this post Link to post Share on other sites
Nooj Report post Posted August 29, 2011 Looks outstanding! How are the loops done on the backside? (it is OWB, right?) Excellent job. I can't tell if there is a sweat shield or not; That would be the only thing I would do different... I like something there to 'pad' the slide/hammer/safety a bit- just my preference. Thanks for sharing :-) Nooj Quote Share this post Link to post Share on other sites
Big O Report post Posted August 29, 2011 That is one gorgeous hunk of leather right there. If it's not perfect, it's the next best thing. I, too, would like to see the back. Quote Share this post Link to post Share on other sites
redhat4201 Report post Posted August 29, 2011 It has what I would call a short sweat shiled. A guy emailed me asking if I could make a snap removable pancake similar to a Milt Sparks Axiom because Sparks doesn't make them for railed 1911's at the moment. I liked it so much that I'm making myself one for my Les Baer. I will post some more pics this afternoon. Quote Share this post Link to post Share on other sites
redhat4201 Report post Posted August 30, 2011 Here are a couple more pictures of another one I finished tonight. This one is in cordovan for my Les Baer Ultimate Tactical Carry. Every once in awhile you have to make something nice for yourself. Quote Share this post Link to post Share on other sites
particle Report post Posted August 30, 2011 Looks great! Can you show/give a little more detail about the snap attachment method? Why does the back have two different looking attachment methods - what is the round topped piece of hardware on the back? Quote Share this post Link to post Share on other sites
wizard of tragacanth Report post Posted September 1, 2011 Hmmm, yeah, how does that attachment system work? I will be finishing up a removable strap, flat-back holster in the next couple of days or so. I certainly went about it a different way... kind of a round-a-bout, stupid way... but I think it will work. Your approach gave me some better ideas than what I came up with. Well, it's only my second holster, so I'm not kicking myself too hard! Nice work... thanks for the inspiration. Nick Quote Share this post Link to post Share on other sites
Haystacker Report post Posted September 1, 2011 Looks loike a winner. I think you may start something here. This looks like the most secure snap system I've seen. Great idea. Quote Share this post Link to post Share on other sites
woodandsteel Report post Posted September 1, 2011 Nice work! I'd like to see details on the attachment method as well. Quote Share this post Link to post Share on other sites
markush Report post Posted September 27, 2011 I've been trying to figure out the fastening system on the axiom myself...I'll start another thread with my thoughts on that. But I was also hoping redhat4201 would share his method in this thread. Quote Share this post Link to post Share on other sites
SpecialKaye Report post Posted September 28, 2011 I think it's beautiful and I look forward to the day I can make something that nice for my kids. And yes, I'm also interested in the mounting system just because it looks so damn cool. Quote Share this post Link to post Share on other sites
redhat4201 Report post Posted September 28, 2011 I think it's beautiful and I look forward to the day I can make something that nice for my kids. And yes, I'm also interested in the mounting system just because it looks so damn cool. Sorry. I had planned on showing more of how I made this holster but life got busy. Wife had a baby on the 16th. First off. I didn't come up with this design. Tony at Milt Sparks did. I had a customer request an Axiom style holster for a railed 1911. Sparks currently won't make one so he came to me. I have never actually had an Axiom in my hands before so the best help was pictures. Actually the most helpful pictures I found were of one for sale on Ebay. There is three holes that need to be punched (for each side of the holster). Two on the top piece and two on the bottom. The lower hole on the outer piece and the upper hole on the inside piece need to line up. The through hole is the lower snap location. The upper hole uses a 8-24 size T-nut and a small screw to secure a female side of the snap. The lowest hole on the backside uses a T-nut and secures the wrap over belt loop. All of this sounds confusing but hopefully the pictures help. This is a half finished test piece that was my second attempt. It doesn't have the outer reinforcement piece. Here you can see how the middle hole goes through both pieces. A small screw goes through the male side of a snap and into the female side of a post screw. (check out the bruise on my left index finger from hand stitching Here is a picture of one I'm currently working on. It shows the T-screws coming through the outer piece. And the backside with the T-screws coming out of the lower holes. Here are a couple pictures of my pattern. oh...and the reason this one has different mounting hardware is because I ran out of large T-nuts and had to use small ones. The male screw post screw was too large so I had to use a small screw and a finishing washer. That is the only one I will ever do that way. This style was a headache to figure out but actually pretty easy to make. It's like making a regular pancake with a few extra steps. I used my existing pancake pattern and modified it a little. The wrap over belt slots were probably the hardest to get right. Be prepared for multiple trips to the hardware store to get screws that are just right. The original customer wanted Pull-the Dot snaps on the upper snaps like the Axiom uses. I don't know if that is actually necessary. The Cordovan one for my Les Baer doesn't have them and I have never had it come undone. I would have to say this is THE most comfortable OWB holster I have ever made. It does not move and has what I would call a medium ride height. I have carried my Baer concealed with a longer shirt with no problem. It will definitely see a ton of use this winter. I hope this helps. If anyone has questions let me know. Quote Share this post Link to post Share on other sites
woodandsteel Report post Posted September 29, 2011 Thanks for posting the detailed pictures! I've been thinking of making a holster like this. Quote Share this post Link to post Share on other sites
SpecialKaye Report post Posted September 30, 2011 Thank you for the details. But now my wife will hate you. I just bought two guns and want to make holsters for them. Now, I have another style holster to make and have to buy a gun for it. I'm thinking a shiny Ruger SR9. Didn't know you put the stiffener on before the wet molding. I wondered how that was done. So, I assume when tooled, the stiffener is tooled, sew into place, and THEN the holster is wet molded? And for me, part of my confusion came because I kept thinking the bottom back snap was really a snap instead of a decorative, but solid, structural mounting point. Very good job. Again, thank you. BTW, nobody mentioned it but, CONGRATS on the baby! There goes your gun money. Quote Share this post Link to post Share on other sites
markush Report post Posted September 30, 2011 Congratulations on the new baby! Thank you for sharing all the details on the holster! I was just hoping for a description of the hardware used...all those photos was a huge and very helpful bonus! Thank you again! Quote Share this post Link to post Share on other sites
redhat4201 Report post Posted September 30, 2011 The hardware used are just 1/4" chicago screws from Tandy's, Line 24 snaps and some 8-24 size screws. I had to grind off a little of the head of the screws so they fit into the male side of the snap. When I get further into the one I'm currently making I will post some more pictures. Quote Share this post Link to post Share on other sites
markush Report post Posted October 2, 2011 (edited) I have a couple questions for you. I saw you made one of these for a Glock 19 on your facebook page. Since I would like to make one for an M&P my questions are...how does the holster work with the thicker Glock? Is it as comfortable? Does it sit on the belt the same as a 1911? I was thinking I would have to extend the wings out a little to allow them to flex back to the belt easier...what are your thoughts on that? Edited October 2, 2011 by markush Quote Share this post Link to post Share on other sites
redhat4201 Report post Posted October 3, 2011 I have a couple questions for you. I saw you made one of these for a Glock 19 on your facebook page. Since I would like to make one for an M&P my questions are...how does the holster work with the thicker Glock? Is it as comfortable? Does it sit on the belt the same as a 1911? I was thinking I would have to extend the wings out a little to allow them to flex back to the belt easier...what are your thoughts on that? I kept the ride height pretty much the same for the Glock 19. It is still a very comfortable holster. I will probably change the pattern a little to make the outer piece come up a little more over the trigger guard. With the Glock being a shorter barrel length I think it would be a little more concealable with just a T-shirt on. Quote Share this post Link to post Share on other sites
2ndAmVA Report post Posted January 9, 2012 Redhat, I'm working on a holster similar to what you showed. An OWB that snaps on and off. Can you please share more detailed info on the type of screws, snaps (i.e. all the hardware) that you used to make this holster>=? I don't even know what to ask for at the hardware store. Thanks for our help. 2ndAmVA It has what I would call a short sweat shiled. A guy emailed me asking if I could make a snap removable pancake similar to a Milt Sparks Axiom because Sparks doesn't make them for railed 1911's at the moment. I liked it so much that I'm making myself one for my Les Baer. I will post some more pics this afternoon. Redhat, That is a sharp-looking holster that you made! Deserving of the high end pistol it will be used for. 2ndAmVA Redhat, I'm working on a holster similar to what you showed. An OWB that snaps on and off. Can you please share more detailed info on the type of screws, snaps (i.e. all the hardware) that you used to make this holster>=? I don't even know what to ask for at the hardware store. Thanks for our help. 2ndAmVA Quote Share this post Link to post Share on other sites