


Icertainlywas
-
Content Count
2 -
Joined
-
Last visited
Recent Profile Visitors

-
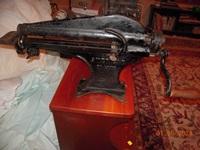
Just an update on the cutting wheel for the American St Louis SC320 machine we've been restoring. The original wheel that came off would comfortably thread onto a 1/2" bolt from the hardware store, with 20 threads per inch (fine threaded). Mine was so chunked up I was not able to successfully sharpen it, or at least not sharp enough to do the job I wanted... the leather would twist downward and cut badly, or would not cut all the way through the full thickness, no matter how I adjusted the gap between the lower cutting wheel and the upper feed wheel. .
I ended up in contact with Jim Knabl at the New York office for Landis USA inc.
His phone: 800-354-6278, and email contact jim@landisUSA.com
He sent out a cutting wheel- #A2110 for us to try, and it would not quite thread onto the shaft of the machine, though it was very close, like it would go on about 1 1/4 turns but then jam up and proceed no further, even though the old cutting wheel came off easily and the threads were not buggered up in any way.
We decided that the thread pitch on the shaft must be slightly different as both the old and the new wheels appeared to be 20 threads per inch. Rather than rethreading the bore on the wheel, we opted to use a conventional Die for a half inch fine thread 20TPI. It was not difficult to run this onto the existing threads on the shaft (removed and taken out to the vise) to clean the threads up to this different pitch.
After that the new wheel fits perfectly, and cuts wonderfully, both thin leather and heavy sole leather.
To reiterate, that wheel is not reverse threaded or counter threaded, it screws on just like you'd expect a conventional nut to screw onto a bolt. The new wheel does not have the little hole in it that was originally used (where a punch and hammer were needed to remove the wheel). Instead the new wheel has a segment with two nice flat sides, so can be easily tightened or loosened with a crescent wrench.
If someone were very much disinclined to rethread the shaft themselves, pretty much any machine shop would do the job. It took only a couple minutes to rethread, because its so close already, and you're not taking off much metal.
To remove the shaft was a matter of only taking off the one bolt that holds the handle on, plus loosening the two set screws on the collet, and sliding that off the shaft. That collet allows you to adjust how close the cutting wheel will ride to the feed wheel on the business end of the shaft. Lastly the little gear in there has a keyway that slides over a pin on the shaft, and that little gear does not thread off it slides straight off. If it is stiff, use a block of wood and tap the handle end of the shaft, which will pop it loose. If your shaft has seen a lot of hard knocks, the handle may have been tightened down with enough force to make bumps and dents on the shaft that the collet doesn't like to slide over. You can clean up the high spots with gentle use of a file or fine sandpaper, to smooth the shaft enough the collet will slide off.
Hopes this helps to encourage someone else to salvage and restore one of these sturdy old machines. The shaft has a couple oil ports that just look like holes, one near the cutting wheels, one nearer to the other end, and once the shaft is out, if it is gummy or rusty, a little fine steel wool will make quick work of cleaning it up so it turns real smoothly. Pad the jaws of the vice before you clamp in the shaft for retreading.The wheel is costly, a little more than a hundred bucks in 2023, but worth it.... the leather feeds in easily now, without twisting over, and cuts cleanly all the way through.
-
I've been trying to restore an American St Louis SC320. My only comment is that simply finding info on whether the cutter is counter-threaded has been rather a fruitless endeavor. I've found a lovely video on removing wheels on the Landis 5-in-1 machine, but the cutting wheel on my machine is located on the lower shaft while the cutting wheel of the Landis is on the upper shaft, so I was left with some confusion. For any who stumble on this post, the cutting wheel for the American St Louis SC320 is Not counter threaded. You want to look for the little hole in the wheel and use a drive punch at a steep angle to dislodge it so it will unscrew, and mine was terribly stuck... like some 20 blows later it was held fast. To prevent damages, I had taken off the handle that drives the shaft, and put a large crescent wrench on the shaft there instead, to hold it while pounding. I finally soaked the wheel in a bit of PB blaster a couple times over the next few hours, and tried again. Very begrudgingly it edged itself off, allowing me then to withdraw the shaft and get the rust and grime off the shaft. I'm currently seeking more info on the correct replacement cutting wheel.
-
Attached is a document with Notes on Timing a Consew 229 post base industrial sewing machine, including details about what goes wrong when the thread piles up above the needle, or when there's looping below the fabric that can't be solved by ordinary tension adjustments. It's my version of notes about what is not already in the manual for the machine, and what a novice might want to know when venturing into this job. This is written for an absolute beginner, in what I hope will be viewed as very simple language. If any person has this machine and cannot locate the manual, try sending me a note at radavich at moscow.com, and I'll try to locate my source or will copy and mail to you. Roberta Timing Consew 229.doc
-
Here's the story of a Singer 29-4 sewing machine repair, for a machine that is skipping stitches. I'm writing it for someone who follows after me that may not have much background in repairs, and may have a machine as worn out as mine, so descriptions are as simple as I can make them. I've been trying to figure out why the Singer 29-4 machine skips stitches. I was given this lovely old industrial treadle machine, and except that it moved a little stiffly, it mostly sewed ok. It only rarely skipped stitches, until the day I oiled it. No kidding... the old gunky oil must have been all that was holding some of these parts in alignment, as after oiling it moved really smoothly, but began skipping stitches like mad! What a shock! I didn't even know this was possible! Now this machine has seen a lot of wear, the insignias are completely worn off it, and it's been used to sew leather most of it's life. It dates at 1907 I discovered when I checked in with it's Singer serial number on their site. I wanted it to sew right. I messed with tension hoping that might help, but no help was had there. I verified that the needle was right for the machine, and the thread weight was right for the needle, the needle positioning was correct and then in frustration started the search for the manuals, the repair books, support forums, blogs, any place I could glean information. (many thanks to Wizcrafts for his postings on this machine) I got one good lead that the almost invisible black T shaped flat spring on the left side of the needle bar just below where it enters the body of the machine, was likely to cause skipped stitches if it was loose. Mine was loose, and with high hopes and a gentle hand, hoping against hope that I wouldn't break that little guy, I remedied that problem... but no... still a lot of skipping, big areas of an inch or longer would be left un-stitched. Feeling frustrated, I searched more. This led me to examine the timing, and after a lot of work with it, I realized that there are not more variations in how it can be set up... you simply cannot move the teeth on the rack to one side or the other without the rack either hitting the stops on the metal gear below the bobbin case, or failing to engage the second gear properly, if you move them even one tooth in either direction. Someone suggested that this placement of the timing rack could be changed, but on my machine, there appears to me to be only one way to set it up. If that gear below the bobbin case went all the way round in a circle with it's teeth, you could maybe move the rack over or back a tooth, but since it has only 3 teeth, when you slide the rack over, it either hits metal at one end of it's travel, or the second rack hits metal on the other end of it's travel. I took photos of the correct positioning, and will save them... not sure how to include them on this forum, but will try to imbed them into this message. For an inquisitive person, the timing racks and gears don't want to be looked at unless you first remove the machine from it's base and tip it back flat, before taking off that cover under there. Otherwise, all pieces will be on the floor, and you won't have clue where they went. So next I looked for slop in the bobbin action, and there was plenty there, nearly 1/8 inch of slop. I thought I might have to deal with new parts underneath, the gears and the racks that drive the bobbin shuttle, however I was hoping that it might not require this. So after more reading I also thought to check the amount of play in the needle bar. It had some side to side play of about 1 millimeter at the tip of the needle. I discovered that the second screw on the bottom of the needle bar, actually detaches a chunk off the bottom of the needle bar that holds the needle. All my newer machines were one solid piece down there, but this guy is made in two pieces,and the screw that doesn't hold the needle but is right near there on the needle bar, will allow you to position the needle side to side in relation to the bobbin shuttle. You can get it close enough to rub the bobbin shuttle case, which is too close, and then back it off just a hair and tighten it down. When adjusted properly, it appeared to send the eye of the needle right down beside the hook, ... but still the machine skipped stitches. Drat! Back to the homework of searching and reading. The real kicker for me turned out to be when I found the tip to examine how much up and down play was in the needle bar. I had a friend hold the hand wheel steady, and found that when I pushed up firmly on the needle bar, it went up maybe about 3/16ths of an inch, clearly way more than it should. I reasoned that when the needle hit a stiff piece of leather, instead of coming through, that slop would cause a serious delay in the downward progress of the needle, and the thread going through the eye of the needle would come down too late to catch on the passing bobbin shuttle hook during sewing. Even though it looked good in terms of placement when just moving it through it's paces without any leather in the machine, once the leather was there it would throw off the timing .... hence the skipping of stitches would only show when under load. Some information about the little silver guide wheel that travels in the track on the inside of the hand wheel led me to examine that, but it didn't seem overly loose, just a little bit worn. Upon closer examination I found that the big knuckle with it's attached pin which is at the top of the needle bar, and which fits into the end of the long rocking arm which comes across the top of the machine, had worn an oblong hole, and that pin was very, very loose in that hole. (I think the name of that part is Needle bar piston joint, and I am certain it is part number 8588 on plate 1032 of the old parts list.) I considered replacing the part, but what if the problem lay in the hole that the part rides in? A close look revealed that all the years of pounding through leather had caused excessive wear on the top of the hole where that pin slid in and out. I noticed the pin movement in and out was only about half an inch so I thought I'd try a shim in there to take up the slack, experimentally. I made a shim of brass, using brass shim stock that was .005 inch thick. Shim stock metal can be bought at most good hardware stores, and mine came in a little sheet of 4x6 metal. This shim I just cut with scissors about 3/8 inch wide and a couple inches long. I curved it a little bit so it would follow the curvature of the sliding pin, then with some futzing, I worked it into the gap at the top of the pin, (right there below the take up lever that guides your thread), sliding it gradually into the gullied out hole along the top of the pin until it was in there about 3/4 of an inch deep. I tried gently turning the hand wheel to see if it would stay in place, and it was somewhat daunting because the movement of the arm on the pin was a little stiff, however I put some pressure on it and after a moment it seemed to slide ok. The in and out movement had to be repeated a few times, and I also had to use a little screw driver tip to try to smooth the shim out over the top of the pin right up to the knuckle and make a sharp 90 degree bend upward in it to get the excess length out of the way. I eventually found I could fold it back over the top of the big black rocker arm, and actually tape the excess onto the rocker arm, so it was held in place, while the pin slid in and out below it. Being as my machine is black, I used black electrical tape, just for appearances sake. I'd hate to admit to anyone that my machine was held together by duct tape!... though to be sure that would have worked perfectly. Here's a photo of the shim folded back and taped in place... if it comes through on this forum. The movement of the arm was stiff for about three or 4 turns of the hand wheel as it flattened out the shim stock inside the hole against the pin, then it settled into a smooth movement, and I tested the needle bar up and down movement again. Almost no movement now... oh boy, let's try to sew something! I rethreaded the machine, took up the leather again, a double thickness of 1/8 inch leather, and started stitching, first by hand gently with the hand wheel, then got my courage up and used the treadle. It was catching properly! Nothing I could do would make it Not catch properly. I sewed little circles, I went all over the place! I adjusted the top and bottom tension... perfect! So even though there still is the side to side slop of about 1mm in the needle bar, and even though there is still a lot of slop in the shuttle movement, that one shim has completely set this old machine to rights, and I can sew again! I can't say how long that will last, and as I am only an occasional leather worker, making my own sandals and work boots, I hope it will last well enough to keep me going. What was significant to me was that this One shim was the real area where it was important to take up the slop. No doubt more could be done with further parts replacement, but for those on a sensitive budget, it's nice to know that it might be possible to resuscitate an old machine with just this one very inexpensive fix. This success made me really happy!! I'd be happy to send photos to any who might find it helpful. Roberta (in Northern Idaho) as i reach the end of this post i notice there is a place to add photos. Both the timing photos are correct, one is just at a different position in the shuttle rotation. the other photo of the completed shim job.