drphil Report post Posted August 30, 2011 I am thinking of investing in a tool rack. It seem that what is available for sale is not quite what I am looking for. I thought we should start a topic about custom tool racks. I would love to see what you all are using to hold your tools! That will help to inspire me to decide what I should look for when designing and making my custom tool rack. I have run into a few questions myself. Should it be slanted, what type of material, what size of holes, include a few bigger holes to hold my mauls, how about leather lining or maybe a nice carving on the outside? I am just looking for some creative ideas and am curious as to how you all store your tools. Thanks for sharing! Quote Share this post Link to post Share on other sites
bruce johnson Report post Posted August 30, 2011 I have gone through a few ways and this works the best for me. The backboard is a free standing display rack for beef jerky. I bent up the hooks for the pegboard and drilled a small hole in the bottom of green pill vials for the stamps. Originally I used clear plastic juice cups but the stamps and cup color kind of blended together. The green cups are an easier background to look against. The stamps sit at an angle and the heads easy to pick out. I have the sorted by type and so I can got through pretty quick to pick the ones I need. I have a small block wih holes I have on the stamping bench for the stamps pulled for a particular project. The mauls all hang right there, along with any handled tools like push bearders, creasers, or ticklers in use. The swivel knives hang on a pegboard gang hook and are all in one place. What I like about this set up is the flexibility. If I get a new stamp I can just drop into whatever cup it belongs to. I don't have to do the 'right shift/left shift" to make a spot in the organized one-to-a-hole rack I used to use. I can add a cup and break them down further is need be too. I try not have more than 10 to a cup anymore or 5 of the big blocks. The downside is that a certain maker's short stamps seem to be shaded by other stamps and are not standing right up there to see sometimes. I have been thinking about sorting those stamps into their own little corner of the world. Quote Share this post Link to post Share on other sites
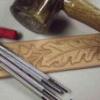
King's X Report post Posted August 30, 2011 This is a block that I made last year to store my tools. I also had Dale at Grandpa's Past Time make me a specially design tool holder for the tools that I need for a particular project. The big block that measure almost 3 feet in length is for permanent store. I just pull the tools I need and place them in my project rack which you can see at the bottom of the picture on my stone. I know that it looks rather basic, but for now it works. I will be moving in about 30 days and I have been designing a new tooling bench, which will have a tool storage built in. This is not professional by any means, but for this hobbyist it does the job just fine! Quote Share this post Link to post Share on other sites
gtwister09 Report post Posted August 30, 2011 (edited) I have been all over the board in the last 17 years. I have had tools stored in saddlemakers rolls, toolboxes, racks with numbers, plastic pipe/tubes, envelopes, separated and combined. One of the better ideas for single holed tools was an old Leather Craftsman article on using a Sears Craftsman toolbox. You can see it in the background of "The From Montage". The only problem is that it was outgrown as you can see. I also made a large block that had single holes that ran across my entire workstation but you had to move tools around all the time as you added them. It was a lot like Kings-X design and had an individual project design that was like Dale's design that Kings X shared above. In fact on another forum many years ago I asked members how many tools were normally used on each project and it was between 10-15 tools used for over 95% of the people polled. So I made my individual one with 15 slanted tool positions (this presented the tools much like a saddlemakers tool roll) as well as a place for a pencil to lay and a swivel knife on each end. I even went so far as one time to build a modular rack of various exotic woods (about 25 or 30 various woods) that had a mahogany base where you could swap the modular tool holder around. Each one of the individual holders were made in similar sizes so that you could arrange them in a modular fashion (1/2", ¾" and 1" squares). I can't find a picture of it and have since given it away. It held about 500 tools and took up a fairly significant amount of real estate (it covered a large portion of my workstation's width – it was about 16" wide by 50" long)) but it was a different idea that allowed you to rearrange as you gathered new tools and still have the groups as you saw fit. However as I said it was big and cumbersome and really not one of my better ideas. The right-left shift with a lot of tools is a never-ending task with new purchases. Like Bruce said the cup or large hole versus right-left shift thing is a big positive. So I went on a mission to consolidate and immediately thought of saddlemakers rolls in being able to keep the tools together yet viewable and reduce the amount of real estate. I had started making some pine ones from 6 X 6's that were cut at an angle so that you could see the heads of the tools. I also used a number of larger holes rather than individual tool holes and then I saw an idea that another forum shared. So I expanded upon it. Likewise one of the major requirements was that the rack(s) had to be put up and out of the way since the workstation was in the living room. So a carrying option had to be planned for. Now I use four racks that hold my stamping tools and swivel knifes. These four fit perfectly on a shelf in my tooling workstation. Most of them are arranged by groups but I do have ones that I use the most in one in a specific rack. I also have one rack that was mainly Craft tool duplicates that we put together for my son (You will notice in "The To Montage" that there is a smaller rack on the far right…This was the leftover of making the 4 racks so we made a smaller version for him). You will notice that these can be toted quite easily and they are tiltable so that you can see the heads of the tool. It has two different settings for the tilt as well as the carrying or upright position. I also placed tools like punches, edgers, stitching wheels, overstitching wheels, mauls, awls and such on pegboard so that they can also slide in/out on my workstation. The one major caveat is that these were taken about 7 years ago and like any good tool-a-holic there have been many additions to them. Enjoy…. Here are some other threads on the subject. Thread #1 Thread #2 Regards, Ben Edited August 30, 2011 by gtwister09 Quote Share this post Link to post Share on other sites
hidepounder Report post Posted August 31, 2011 This is how I set mine up and it's worked pretty well for a number of years. The holes that hold my tools are 3/4" and there was a lot of room for expansion, however, I'm going to have to add more space soon. You can't tell from the photo, but the area below the stamping tools is open and so my leather can extend over the back of the bench if it needs to and I don't have to move any tools out of the way. I have a tendency to use my tools in sets, i.e., when I bevel I have several sizes out, or when I background I have several sizes out, and I place them on a leather "coaster" and then return them all as I finish with them. I really wouldn't change much of anything on the next one except that I might make the "block" narrower and taller....but not much either way. The only inconvenience for me is when I go and teach somewhere and need to haul tools with me. I'm considering just using leather tool rolls and stacking them on a shelf designed to hold them. It would be easier to take them with me and then replace them when I got home, but I haven't completely thought that through yet....there are some downsides to that idea. I took some photos and tried to "stitch" them together to create a panorama but Canon made downloading the software impossible so I gave up.....here is just a regular photo.... Bobby Quote Share this post Link to post Share on other sites
MarkB Report post Posted August 31, 2011 This is my tool rack. works well for me right now but hope to make a larger one this winter. Quote Share this post Link to post Share on other sites
drphil Report post Posted September 8, 2011 Looks great! A lot of good ideas here. Such clean shops you all have, some nice tools too! Thanks for the replies. I am considering getting an old end table and converting it into a tool rack. Although it looks like a peg board might be easier. Those are so useful for so many things. Quote Share this post Link to post Share on other sites
resqman Report post Posted December 8, 2011 (edited) Well I had a spare hour today and got around to building a tool rack. 1.5 inch diameter PVC pipe, 1/2 inch plywood, and a handfull of screws. I cut 1.5 inch diameter PVC pipe into 3.75 inch lengths using a chop saw and stop block. Ripped some scrap plywood into a strip 3.75 inches wide. Arranged the PVC tubes into a rectangle. Cut the plywood strip into 4 lengths that formed a 4 sided box around the tubes. Cut a piece of 1/2" plywood and screwed to the box to make a bottom. Propped up the box until I found an angle I liked. Cut some plywood into triangles and screwed to the side of the box to form supports. Stained the whole mess since the plywood was left over from several other projects and the stain helped to blend it all together. Turns out the angle I liked is 45 degrees. You can turn the tool rack over and it is the same since both angles are 45 degrees. You could join the triangle supports and the short side of the box into a single 5 side house shape and save some lumber and screws. You could also make the "roof" of the house shaped piece have different angles, 45 and 60 degrees?, so you could have the box lay down or sit up more depending on which "roof" was being used. All the tools have reflective orange tape for identication and retrevial. I teach stamping to Boy Scouts, often in the woods, on a picnic table, over leaves and other debris. The orange tape makes it easier to find any dropped tools. The reflective nature also helps for a second check at night. Shine a flashlight under the table and sift through the leaves. The tape reflects the light back aiding in recovery. Overall, maybe not the prettiest but it is functional. There is room to add many more tools. I can change the sorting of the tools easily. Cost to me was zero since it was made from leftover materials in the garage from other projects. Edited December 8, 2011 by resqman Quote Share this post Link to post Share on other sites
jdwintx Report post Posted January 9, 2012 Here's mine, it's a vertical step design. I'm not thrilled with it after using it for a year or so. Tools tend to get lost in the maze and I'm always having to stand up and look through them to find what I want as they are hard to group together. I'm in the process of redoing my bench so I'm going to go with a horizontal rack similar to what Bruce and Bob have shown, I think that is what will work best for me. John Quote Share this post Link to post Share on other sites