Spinner
-
Content Count
1,371 -
Joined
-
Last visited
Everything posted by Spinner
-
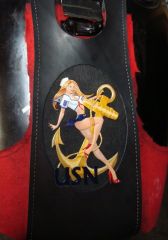
one I finished today
Spinner replied to Spinner's topic in Purses, Wallets, Belts and Miscellaneous Pocket Items
Thanks Jay and Bob -
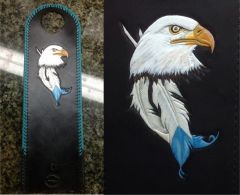
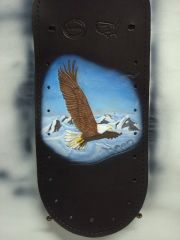
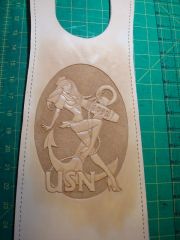
one I finished today
Spinner posted a topic in Purses, Wallets, Belts and Miscellaneous Pocket Items
A little bit of laser, hand tooling and airbrushing together for a retired Submariner. -
anything that helps a pup is a good thing in my book! Good on you Hags!
-
Black Acetal works great for making stamps. You can buy it in sheets and rods of various thicknesses. US Plastics, ePlastics and others sell it online, cut to size/length.
-
Thanks Chuck. When the client purchased the car, they got documentation allowing for the logo replication as long as the serial number is included in some way. It was originally meant for the owners (limited edition run) to be able to get shirts, hats, etc. done for shows but had no exclusions. After the first show the car was in, I got an email from the builder saying how they loved the bag so I think I'm good.
-
Thanks. I laser engrave my own stamps.
-
Black toolbag designed and made for a Dave MacDonald 289 Shelby Seabring Cobra 2017 Model 8" x 8" x 15" modeled after the toolbag that came with the original Shelby. Custom made stamps to match the car numbers and logo with serial number. Accented with hand stitched black & yellow waxed french linen thread. Natural calf skin lining.
-
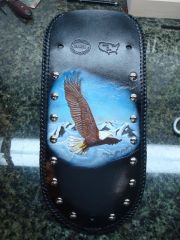
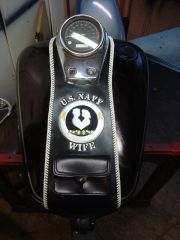
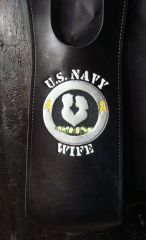
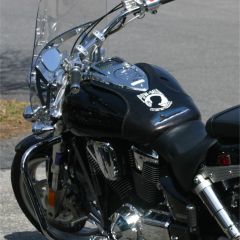
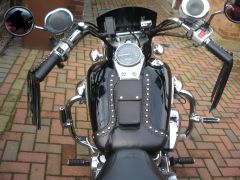
2001 Harley-Davidson Heritage Softail Tank & Fender Bib
Spinner replied to Spinner's topic in Motorcycles and Biker Gear
Hey Joel, The colored areas receive two light coats of satin varnish to lock in the color and help with UV protection. This is followed up by applying 2-3 coats of Resolene over the entire piece with the last coats 24 hrs apart to create a hard finish. Next is buffing Pecards motorcycle leather dressing over the piece for that extra water resistance. Using this method I have had guys accidentally let gasoline run over a bib, as well as getting caught in the rain, with no ill effects if dabbed off quickly. The client then just needs to reapply the leather dressing when they get home. -
Help Needed: Picking Cylinder Arm Walking Foot
Spinner replied to Blanket's topic in Leather Sewing Machines
Thanks Blanket, appreciate the compliment. -
Help Needed: Picking Cylinder Arm Walking Foot
Spinner replied to Blanket's topic in Leather Sewing Machines
Some additional/real life info on the Techsew 2700...I'm a happy owner/user, not employee or paid. Sewing Capacity: 3/8' or 9.5mm maximum. You can fit more in there but it really doesn't like it. Foot Lift: Lever, 1/2" Bobbin Winder: standard, integrates inline with belt. Cylinder length: 270mm, clearance 225mm, diameter: 65mm Lubrication: manual Presser Feet: Singer 111 I can confirm it will run 207/210 thread using the correct size bladed leather needles. The attached pic is of a recent stitch it ran 138/92 t/b thread using a Tri-Point needle through 13-14 ounces of veg & chrome tanned stacked (center island) . It runs nice & true and controls easily with a servo motor. -
For the majority of my orders SLC does pretty well. Only issue I have ever had is with their Bomber Brown leather. They have one clear picture on the website but the lots vary so widely on the product that I had to stop ordering it. At first I thought they had screwed up an order but after trying to get the same leather as I received the first time, 4 subsequent orders were all filled with slightly difference color/grain pattern yet the customer service said it was the same. Can't have inconsistency like that so I source it elsewhere now but still order from them for stuff I know will be the same like 'roo lace and pre-dyed HO.
-
2001 Harley-Davidson Heritage Softail Tank & Fender Bib
Spinner replied to Spinner's topic in Motorcycles and Biker Gear
Thanks guys -
2001 Harley-Davidson Heritage Softail Tank & Fender Bib
Spinner replied to Spinner's topic in Motorcycles and Biker Gear
Thanks Odin. -
Back in September I posted the raw toolings of these two bibs to share. Here they are all colored and mounted on the client's 2001 Harley-Davidson Heritage Softail. Also attached is the finished "no Evil" set ready for delivery.
-
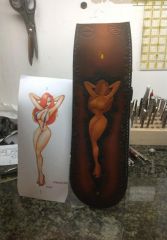
For the painting I use a variety of paints, all depends on the colors and coverage I am looking for. My favorites are Games Works Citadel acrylics for general brush work, very durable and the come in a ton of colors. For airbrushing base colors I like Golden Fluid Acrylics and Golden High Flow acrylics. The High flow are amazing for airbrushing, work right out of the bottle and cover very well. I also custom mix colors to get what I want. There is not a good flesh tone on the market so I generally hand mix those.
-
Thanks everyone. Just finished painting the sugar skull and dragon/skull bibs yesterday, will post pictures of them tomorrow when I have some natural light.
-
Leather Hide Storage/organization
Spinner replied to Silverctack's topic in Leatherwork Conversation
Head down to the local home improvement store and buy some 6' sections of 6"-8" ABS or PVC pipe. Some thin wire or chain and a box of threaded eyelets. Screw the eyelets to the ceiling at 5' intervals, loop the chain into them and slide the pipe in, instant hide hanging system. Just slip the rolled hides into the pvc pipes. If you own the place and can be more serious about hanging them, get pipe clamps and screws instead of the chain and eye hooks. The chain method simply allows you to hang them lower like a florescent light if you want to. -
Thanks folks, appreciate the comments. gotta follow the money! I use the Leatherwranglers SK knives, one with a 3/8" angled blade for general work and one with a 1/8" angled blade for details/deep cuts. Yes sir, The details and tight areas were done with an Iwata Eclipse HP-CS and the big fades were done with an Iwata Neo.
-
This is likely the root of the problem Asbandr, most finishes will soak too far in and dilute if your dyes and oils haven't cured/dried well. Let the piece sit for 24 hours after dying and oiling, buff with a rag until it has a slight burnish to it and then apply the finish. The new Super Sheen is garbage but the old version of it (the changed formulas about 3 years ago) was awesome. Resolene, as mentioned is better. For either finish, use a soft cloth and apply a coat that has been cut 50/50 with water. Wait until the surface looks dry (it isn't yet) and apply a second coat. This is the penetrating coat that will close up the pores. Wait a few hours/overnight and apply another thin coat or two. Just like furniture finishes, each time you let it dry overnight it seals the pores a bit more allowing the finish to build. The build up of layers is what will give you the shine, and will last longer than one fast thick coat.
-
Looks good, nice even color too.
-
How To Calculate Amount Of Paint Needed For Acrylic Dye?
Spinner replied to HC009's topic in How Do I Do That?
Keep in mind, acrylic paints will not penetrate the leather and can not be tooled through so painting should be the last step, not the first. If you paint it and then cut the parts out a) you will have a ton of waste the edges of the cuts are likely to crack and possibly peel at the cut lines as it will have no adherance at the sides. Simply spraying another coat to the side edges after will not correct this. Coloring in this method is be faster, more cost effective and have better longevity if you cut the parts out first then airbrush them separately. -
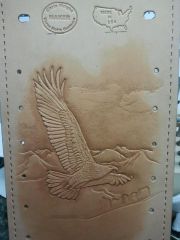
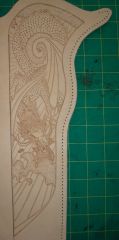
And a few pics of one I just finished last night that was very fun but lengthy to carve.
-
As usual, just swinging by to share a couple of pieces, make some comments and say hello. Hope everyone is doing well. If you have Instagram, I finally started an account and have been working into posting progress pics, bike pics, etc. there since it is so fast and easy. #threemuttscustoms
-
very cool, you don't see the two color lacing often and it looks so slick when done correctly. Nice work.
-
finished and in progress pics of pieces I'm working on/have finished. -Chris
-