ClayB
-
Content Count
2,063 -
Joined
-
Last visited
Everything posted by ClayB
-
I have always gotten uneven results when using dyes, stains or antiques over a texture created with a hair blade. I've found the best way to color something with a hair texture is by using acrylic paints (watered down, layered on to build up colors).
-
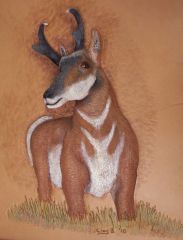
To make it look like the hoof is on the ground, double bevel the area where the hoof meets the ground.
-
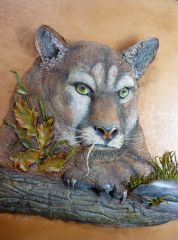
I'm glad you liked the mountain lion project and are interested in trying the technique. As has been pointed out, there are some free tutorials I've done here on the forum and also on my website. There are also detailed instructions for several different projects for sale on my website. To start a project like this, it is carved just as any regular flat carving. All the cutting, beveling, shading, etc is done. On this project, all the hair was cut with a multi blade knife (5 exacto blades in a handle) and a scalpel to create more lifelike hair. To get the amount of lift that was achieved in this picture, certain parts of the lion were cut loose from the background leather. This is started before the project is stretched. I use a Pro Petal tool to start cutting these areas loose (some people use a scalpel). I made shallow cuts around the ears, lip, right side of the nose, and the paw and claws. These cuts are at a shallow angle so they slice into but not through the leather and go about 1/8th inch deep at this time. By making these initial cuts now, it will be easier to cut those parts loose after the leather has been stretched. If you turn the project over, you should be able to see a dark line from your beveling. Darken that line with a marker or pen. You will not want to stretch beyond that line. Then wet the leather on the back side, inside that line. You don't want to soak the leather, just get it wet. While wetting the leather on the back, watch the front. As soon as moisture starts to show on the front, you've got enough moisture in the leather. Begin stretching the leather by placing a marble on your bench. Put the leather over the marble, place a finger on each side of the marble and push the leather around, rolling it over the marble to begin stretching the leather. Continue rolling and stretching to get the areas you want to stand out. The cavity created by stretching the leather is then filled with a putty made of ground up leather and rubber cement. If you want a lot of stretch (more than 1/2 an inch) it is probably best to fill the cavity in layers so that the putty will dry. Once the putty has dried, you can do more stretching by rolling over the marble again. Continue stretching and filling until you get the desired shape. Once the basic shape is achieved, you can cut parts loose like I did on the lion project. There ears have been completely cut loose from the background leather. They are then shaped and stiffened by adding putty to the back sides of them. The paw and claws were also cut loose and shaped with putty on the back side. The log underneath the lion's paw and the rocks and grass are separate pieces of leather, shaped and added to the picture. I hope you can get a basic idea of what I've done here. It makes a lot more sense when you can see it being done. Once you learn the basic techniques and what you can do with them, you can have a lot of fun making your projects 3 dimensional.
-
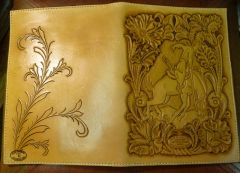
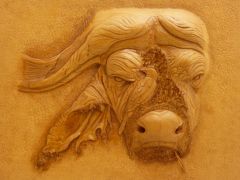
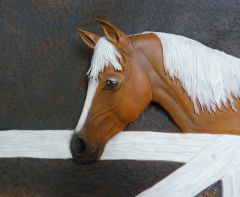
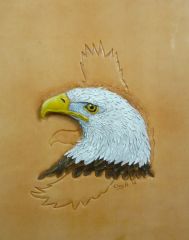
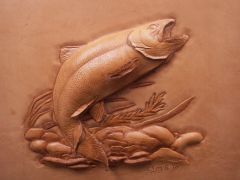
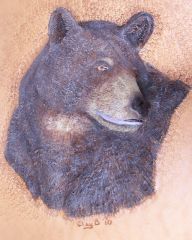
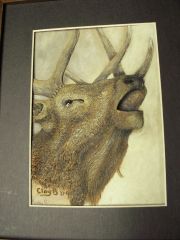
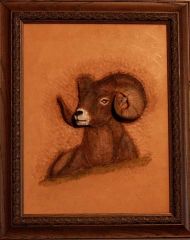
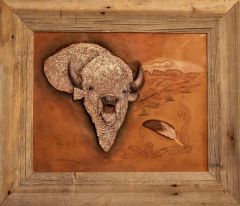
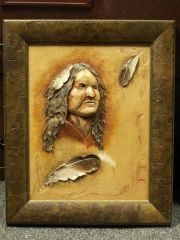
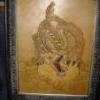
Some work by ClayB
-
-
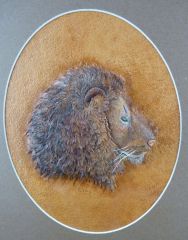
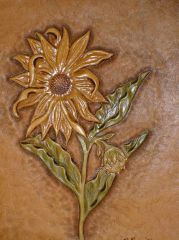
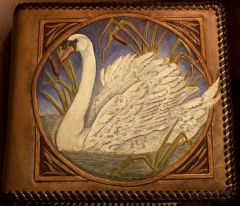
From the album: Badlands Leather Art
Another picture done from one of Lora Irish's tattoo book.© Badlands Leather Art
-
Paul Burnett
- Show previous comments 1 more
-
Another great loss in leatherland. He will be missed.
-
Shock and sadness here. May he rest in peace.
-
He had so much he wanted to do, but just wasn't up to the task. Pain free at last.
-
How to make a hair hair blade
-
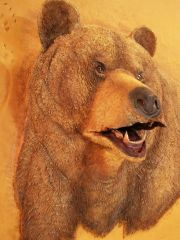
I received a phone call from Alice Schoonover, wife of Jan Schoonover this afternoon. Alice informed me that Jan passed away Friday afternoon of a probable heart attack. He was 78 years old. I had talked to Jan a couple times in the last couple weeks. We were planning on working on a new leather carving lesson last week, but postponed it because of predictions of bad weather. When I last talked to Jan, he was in good spirits and said he had been feeling pretty good. He had been working on some leather carvings and was looking forward to starting on another lesson. I first met Jan in 2003 the first time I attended the Rocky Mountain Leather Trade show in Sheridan, Wy. The following year I took my first extreme embossing class with Jan in Mandan, ND. Over the next several years I took classes with Jan every opportunity I had and we became good friends. A couple years ago, Jan invited me to spend a couple weeks with him in Billings. Jan told me that nobody else knew how he had created his award winning grizzly bear picture and he wanted to share the techniques with someone while he still could. I felt honored that Jan chose me to share this with and it's an experience I will never forget. While I was there for those two weeks, Jan shared a lot of stories about his life with me. He lived a very interesting life, working at a variety of different jobs. Over the years he had gone from testing scuba diving equipment to building and racing boats. He held 7 world speed records in his early years. He had worked in a plant where guided missiles were built, built neon signs, and eventually ended up in Wyoming where he owned a guest ranch and guided hunters. After that, he worked for the National Motor Club as a sales manager. He and his wife Alice traveled around the country and finally ended up in Texas where he went to work as a manager trainee for Tandy Leather. This was where he got his first introduction into leather carving in 1983. After seeing an embossed carving of a fish done by Robb Barr, Jan knew that was the kind of leather work he wanted to do. His experiences as a hunting guide helped when it came to creating lifelike wildlife carvings in leather. Jan loved to carve leather and enjoyed teaching others. Jan and I have been working for the past couple years on a series of lessons on extreme embossed leather carving. We completed 8 lessons up to this time and I have one more to finish up. It looks like that will be the end of the series, short of what Jan had hoped to provide, but we did get a variety of subjects covered. Jan was a fine artist and a good friend and I'll miss him! My condolences to his wife Alice and his family.
-
Try this link
-
 Way back when this forum was just getting started I did a demo on a few different coloring techniques. It was before the eco flow colors came out so obviously they aren't included in the samples. It would be fun to do a few more sample carvings and use some of the new colors on them. Here's a link to that topic. There are so many different things you can do with all the different colors and a lot of it just takes a lot of experimenting to see what you like and what works for you.
 -
There is a calendar at the bottom of the main page of the forum where we try to keep a list of upcoming events. You may have seen Jesse Smith's Chap Making in the Canyon class there. Here is a link that will get you more information on this event.
-
untilFriday 9am - 5pm, Saturday from 9am - 4pm at the Pendleton Convention Center, Pendleton OR. For more info contact Ferdco email or call toll free 800 645-0197
-
untilMake your own pair of chaps. Leather and hardware included. Instructor Jesse Smith of Jesse Smith Saddle Making School $695 per person or save by enrolling before May 23rd and pay only $545. Contact the Leather Crafters and Saddlers Journal for more information 715 362-5393
-
untilTrophy buckles and prize money. Categories include Boots, Braiding, Engraving, Hats, Leather Carving, Saddle, Spur, Youth, and new for this year, Chaps. Rules and applications can be found at this website For more information contact Casey Jordan 602 482-9758 or email
-
untilHeld in conjunction with the Rocky Mountain Leather Trade show in Sheridan, WY. Registration deadline is May 2, 2012. For more information contact the Journal 715 362-5393 or emailEmail me or visit the Journal's website
-
untilThe 19th Rocky Mountain Leather Trade show will be held at the Holiday Inn in Sheridan, Wy May 18th through the 20th. For more information, contact the Leather Crafters and Saddlers Journal 715 362-5393 or visit their website
-
untilSponsored by the Calumet Area Leather Crafters Guild and held at the Clarion Hotel, Michigan City, Indiana. This show is open to the public and you do not have to be a member of a guild to enter. For more info, call 219 963-1648.
-
untilLearn embossing with sculptured plugs, modeling tool use, coloring with dyes, and assembling a pictorial from master leather artist, Peter Main. Class will be held at the Ft Worth Tandy store, November 19th and 20th from 9am to 5pm. Cost of the class is $225 and class size is limited to 10 people. For more info, contact Laura Gutowski email 8117 Camp Bowie West Fort Worth, TX 76116 USA Phone: 817-244-3432 Fax: 817-244-3475 Toll Free: 866-322-8965
-
Don't skive the lace down when using the perma lock needle, just taper it so you screw it into the needle. If you skive it down, it doesn't have the thickness it needs to hold tight in the threads. That's the only needles I use. I have good luck with them and cant imagine using the other ones. What works for one of us doesn't necessarily work for everyone, that doesn't mean they don't work.
-
Spinner gave you some good information. I'd recommend using a spray sealer. If you brush or wipe a sealer such as super sheen over acrylic paint, you will probably move some of the paint around. There are a lot of acrylic sealers out there, most of the companies that make acrylic paint also make a sealer. Feibings also makes one that is available at Tandy that I've started using and it seems to be good. Once you've sealed the paint, you can then add additional finishes to make your project more water resistant.
-
Pretty much any color mixed into the white will work. I usually use a drop or two of some shade of brown, but blue would work too. Anything to just cut the white a little bit. I'm not sure what happened with your finish. I use a spray acrylic finish, usually matte. Not sure if the gloss varnish would react differently. Acrylic paint should dry fairly quickly, but if you had used several heavy coats it might take longer to dry completely. Working with colors and finishes takes a lot of experimenting to find out what works for you and what doesn't. Keep at it!
-
The quick answer to your questions (in my opinion) is yes, yes, yes, and yes. I would just dye the background black, not the parts you want to be white. Paint the parts you want white with acrylic paint. I always thin down the paint (with water). It goes on smoother, and allows you to build up to the color you want. I'd like to be able to see a little of the leather through the paint, not have thick, heavy paint coverage. I've also been taught to never use straight white paint. Add a drop or two of some other color to the white to dull it just a bit. Straight white is just too "white". While it may seem strange when you really want white, the mix will still look white on the leather. Once the paint is dry, spray an acrylic sealer over the project.
-
This is a neat little piece of leather working history. It's cool that you found out a little about the notebook and a place where people that know something about the original owner of it hang out. I hope that if you decide to get rid of it, it goes to a good home where it will be appreciated and preserved. Thanks for sharing!!
-
The pebble backgrounders are a brand new item this fall and will probably be in the new catalog when it comes out. I don't see anything on the website either. There have been new things showing up in the stores every week that should be in the new catalog when it comes out. There are also a lot of items being discontinued.