


Eldorado
-
Content Count
85 -
Joined
-
Last visited
Everything posted by Eldorado
-
Saddle lac peeling
Eldorado replied to Eldorado's topic in Dyes, Antiques, Stains, Glues, Waxes, Finishes and Conditioners.
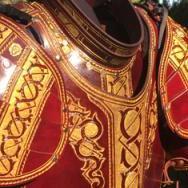
Hmmm, does it crack on things like belts and straps that flex. To be clear, the saddle lac didn't scrape off on the gold acrylic antiquing, just in the open flat bits of un-tooled black. The antiquing looks like this. -
Need some help from the experts. I've been having trouble with Saddlelac literally peeling off my work. It's happened on a couple of sporran flaps and it recently failed completely on a high dollar tooled pirate baldric. Anywhere the leather flexed it just came up like plastic wrap. I finished scraping the rest with my fingernail, polished-in some saddle soap, and then put on a very light coat of Fiebings Leathersheen. It didnt come off in the areas of the tooling, just the open spaces. The baldric is vegtan, fiebings USMC black alcohol dye, light coat of neetsfoot oil), coat of saddle lac as a resist, thinned gold acrylic paint as antiquing - wiped off, let dry, and then one more coat of saddle lac. I initially thought it was the neetsfoot oil fighting the saddlelac, but it happened even on spots where I didnt oil it. I've used Leathersheen for years and it failed like this on something about a year ago, so I switched to saddlelac. Makes me think something else is going on with the leather, the dye, or something. I'm just spraying it on out of the can. The saddlelac failed on both the attached pouches. I'm wondering if it might have to do with the Fiebings black. I buff it before spraying and didnt used to have this kind of trouble. Did they change the formula? I could use some insight as to why its happening and also perhaps some suggestions as to another sealer. I use resolene painted on the inside of the leather, but attempts at using it on the top (admittedly full strength) have resulted in quick flaking. I like a fairly shiny product since they seem to sell in the shop more quickly than flat simply-buffed finishes. Any help is appreciated. P. Coleman Tudor Rose Leather Workshop
-
So frequently in movies you see a kind of brown leather used for things like shoulder baldrics, belts, and straps. It looks like its about 8-9oz, which would lead me to think its veg tan. But, it appears to be an oily, because it seems fairy supple. Do you think they are using Vegtan, dying it, and then heavily neetsfooting it? Or, is there a specific leather that can be gotten that behaves this way? Maybe its brown latigo, but I dont think I've ever seen that dark a brown available. I could probably mimic it by sewing two layers of 3oz oily together, but these don't seem sewn. An example of what I'm talking about is attached. I'd like to figure out to reproduce this effect, since it is so common. Any help would be appreciated. Prescott Tudor Rose Leather Workshop www.Tudorroseleather,com
-
Many thanks folks. Turns out it was simply a burr on the needle tip. You've reminded me to change my needles more often. When they are as big as the ones on the Artisan, they seldom break, so you dont get the automatic prompting to change them that a common sewing machine would. I did clean out some gunk in the cylinder mechanism, which might also have been contributing. Prescott Tudor Rose Leather Workshop www.tudorroseleather.com
-
Thanks for these thoughts. I'll give it a look with these in mind. It occurs to me that I mistyped. Its an Artisan 3000. I may start by refilling the bobbin with new thread and change out the needle and see what happens. I'd upload a video but I can't see anything happening when it occurs. Maybe I'll get my wife to sew something while I get very close. Thanks again.
-
I've got an Artisan 4000 cylinder arm that has developed a loud click down in the cylinder during each stitch. It does it 8 out of 10 stitches. The stitches where it occurs it over pulls the top thread through. On those where it doesnt, the stitch is even. I cant see anything that would be making that sound and that behavior, except the bobbin itself. Any advice?
-
Artisan Servo Motor Caution Light
Eldorado replied to SkookumTack's topic in Leather Sewing Machines
Thanks Sewmum and SkookumTack, I got home and plugged it in and the caution light had stopped blinking. But it also started sewing on its own, very slowly. Would only stop when it was unplugged. This suggested to my buddy and me that the issue might be in the throttle lever arm that the foot pedal chain pulls down. My first test was to remove the rubber stop that keeps the throttle lever arm from going up too high when you let off the gas. When the throttle lever arm could go higher, the sewing stopped and the motor went dormant again. This told me the arm must be out of adjustment. So I popped the housing on the electronics box (which sits under the motor and into which the lever arm fits). Wasnt easy to get it off, but I got it happen. Apparently the "throttle" lever arm (when pulled down) slides a simple metal fin in between a thick black U-shaped piece of metal. The closer to the deepest point of the U, the faster the machine runs. I assume the U-shaped piece of metal is a magnet, but I dont really know. It looked like somehow the fin (which is just held in place by the tightness of a screw) had pivoted forward by about 1/8". So when I let off the gas, it was never fully coming out of radius of the U-shaped magnet and so it wasnt shutting off. This makes sense since the machine had to be on a trailer for a couple of hours (probably on some dirt roads) on its way to me a couple of weeks ago. I tightened the screw and shifted the fin back a bit. I suspect I over-adjusted it because the machine won't run at full speed right now. Probably, the fin doesnt go deep enough into the U-shaped magnet now, but tweaking that is for another day. I think there is something still wrong with the electronics. Apparently, the power switch had been replaced by the previous owner and either it was the wrong one or is incorrectly installed; or there was something else wrong that he was trying to fix. Right now, the power switch doesnt do anything. Its always on and pushing it doesnt start or stop anything. Thanks to everyone, we're still working the electronics angle, but I'm able to sew again (even if its slower than before). -
Artisan Servo Motor Caution Light
Eldorado replied to SkookumTack's topic in Leather Sewing Machines
Thanks for the thought. We'll see when I get home tonight, should be enough time. I tried to take the housing off last night and see what was going on (which is on the bottom), but it wouldnt budge. Undid the screws that would appear to be important and couldnt get it off. Looks like the previous owner did the same thing since there are some bent bits where a screw driver was used to pry. Not sure if they got it off successfully. The other strange thing about this is that from the time I got it delivered (not new) the power button has never turned anything on or off. Its always lit and nothing changes when I push it. its a toggle switch, so it just springs back to where it was after pushing it. The only way to shut the machine down was to unplug it. Its a Servo that is dead quiet, and I assume dormant, unless you are running it, so you can't tell what's going on with it. Not like my Singer 153 with the clutch, where powering up the motor almost dims the lights and it stays growling along until I shut it off. I knew to unplug it because I'd come down to the workshop in the morning and find it very slowly sewing on its own. I assumed it was the chain slack, but now I wonder if it was related to the issue I mention above. -
Artisan Servo Motor Caution Light
Eldorado replied to SkookumTack's topic in Leather Sewing Machines
I have exactly the same problem happen last night. SkookumTack, (or anyone) did you ever get this resolved? -
Thanks for the info. In the mean time, I did order from them and generally like what I got. The process was not easy, but I'll chalk it up to cultural and language differences. In the end, I felt a bit "tolerated" as a customer, but I suspect I'll order again. Though I've made some stuff that uses their conchos, I've not actually set their rivets yet. I like the look of them. But they do look a tiny bit different, so I'll be crossing my fingers when I give them a whack to set them.
-
Oh, quite nice. Very period-connected feel to whole piece. Strangely enough I'm drawn to how you connected the belt straps. That's a nice detail. Where did you get the concho ?
-
Thanks for the info. It would be very helpful to get a photo of the back.
-
DarkVault, I wonder if you'd answer a question or two. I'm guessing you like the quality of Antik, since you are using them. But, I'm wondering whether there is any trick to their rivet backed conchos? For example, do you need a special rivet setter? are they burr rivets? and do you need to buy rivet heads from Antik of any specific size? I can't see the back of any of their examples, so I'm not sure how they work and if they are different than what we'd see here in the States. Any help is appreciated.
-
Thanks for this, can't understand a word of it, but the pictures are quite nice. Am I correct that you are getting some of your fittings and conchos from Antik?
-
I suppose so. Not my first choice, but I'm sure much of what I think I buy from the US is actually made there. I don't need piles of them, just a source for a dozen or so. Maybe more later. The shipping from the Czech source for that many was going to be $78.50.
-
Hey all, Could use some help here. I've been looking all over the web for spectacle strap buckles. They are historically appropriate for several centuries in the mediaval & renaissance periods, and I'd love to find sizes from 3/4" to 1.5". Below is what I'm looking for, but I can't find it anywhere in the US. These pics are from Australian and Czech sources. The shipping from these countries is huge and I'd rather buy American anyhow. Anyone have a line on a supplier for these?
-
Hello all, I have an opportunity to change from a pre-WWII singer 135W to a Pfaff 335-6b-H2L (not sure the age). I'm attracted to the fact that it has a reverse, but can't find much else about it. Probably top of my list of questions is how thick will it sew? I can do up to 3/8" now (though it can be stubborn) and would like to stay being able to sew fairly thick stuff. Other more general questions are whether it gets me other capability that my old machine doesnt have and whether $600 without stand or motor (I'd swap it on to the mount of the old machine) is a good deal? Any input is appreciated.
-
Probably wise.
-
Top notch. And that's a technique I've never tried... for sure. How does the wax behave on a warm day?
-
From your note, I think I left you with the wrong perception of the tin foil and cardboard thing. I meant using them to make the patterns. I've found that using fabric is difficult because it drapes differently than leather will. Instead, on difficult to figure pieces, I'll take tin foil, make a 16"x16" piece of perhaps 4 thicknesses and mold it around the body part. Then you can take a sharpy and mark the bits to be cut off or notched or whatever. Then, when you lay it flat again and cut those bits off or tape some cardboard to certain points, you'll have translated a 3D shape to a 2D shape. Also, you can run a pencil around a shape made of tin foil in a way you can't around fabric. I've done the same thing with just card stock on less complicated body parts. Of course I wouldnt suggest that you'd be wearing the tin foil. Your question indicated a much higher level of Cos'ing than that. BTW, I agree with the segmentation approach you've mentioned. Unless you are independently wealthy, its very hard to get a single side that has few enough blemishes to cut a whole cuirass out. I've done it, but it took alot of time sorting through hides with the shape and size in mind.
-
I have a couple of thoughts I might offer. First, one way to start is with a doublet sewing pattern that fits you. Take note that the arm hole area on the doublet needs to be adjusted to be much larger in leather than on the pattern. Also take note that the armor shown is actually largely made up of segments. The top part seems to be a single piece, but below the bottom of the breast, those are separate smaller pieces, hence the rivets. The bits that start at the nipples and go up, appear to be holding a joint together. You could do the same thing, just larger to accomodate the female bust. I wouldnt be surprised if there isnt a cloth or thin leather backing to which the bottom segments are secured that holds it all together. Doing the segmented thing makes the armor more flexible and gives range of motion, but means you are working with alot more pieces. If you dont like the doublet pattern approach, then I'd recommend the aluminum foil and card stock approach. Second, you asked about weight. 9oz should work nicely for what you're planning. It could even be a little heavy. However, wet molding it should be just fine. If you dye it black with alcohol dye it will get even stiffer. Find a way to hang them to let them dry and the shaping should stay. The business of cooking them and hardening them seems to be more about using leather in SCA combat. I do it for leather masks, since it turns the leather wood like, but you shouldnt need it here in my experience. It will also make the armor very unforgiving to wear. Hope this helps.
-
Hey there old boy, nice work. I'm particularly impressed with the inset cuts. I'm impressed and always have difficulty with inside cuts like these. Not done with a laser cutter I assume?
-
I would say that it depends a good bit on how thick you want the leather. You mentioned, "fully legal" but for foam fighting. I'm not sure how heavy such leather would need to be. If you are using fairly thin weight, say 4 to 6 oz veg tan, you could use a form, built up with foam in the right places... then wet mold. However, I'd recommend heavier weight, like 8-10oz saddle skirting. Not for the protection, per se, but because it will hold its shape and feel more authentic. If you do that, a form won't be helpful, except to hang the piece on. Leather that thick won't ever notice the shape of the form. Rather, you'll draw out the design of muscle bumps on the back of the piece, then wet the leather in each area a great deal, then push it out from the inside. Its essentially embossing. You can use the handle end of your tooling hammer or anything that is sturdy for pushing. You'll probably use different tools for different parts. I once used the top of a bannister post that had the right shape. I also sometimes use a blunted awl (about the shape of a pencil eraser) to push small dots of embossing from the backside. Some folks use their swivel knife from the backside to help coax greater definition. If you were tooling the front side, you could also incorporate some swivel knife cuts in the right places. But I don't know that I'd do that if there won't be any other cuts. Could look amatuerish. The best news is that if you want this black, you can often get a fairly low grade side of saddle skirting from Tandy for cheap (either standard or the light weight kind)... maybe $99.00, sometimes less on sale. You'll need a whole side probably. At the minimum, you could make a prototype out of this as a tester. When you dye it all black, you'll never notice the quality issues. The Cuirboille approach would be very authentic and would probably look tremendous, but it might be overkill for what you are doing. If the leather is thick enough, you won't need to give it a stiffener. Let us know how it turns out.
-
Thanks everyone. You've all given me alot to think about, and thanks for the quick responses. It sounds like I need to get a tad more specific about inventory and tracking, but it also sounds like good estimates are good enough. I'll have to give the details of this some thought. Pretty much everything I do is custom and often for the first time. That makes knowing whether I have useable pieces in scrap a little more difficult. Interestingly, my primary job is as an auditor, so I have a bit of understanding of these things. However, its kind of interesting, fun, and frustrating (all at the same time) that doing this stuff at a corporate level doesnt seem to help me much at the small business level. Any additional insights are definitely welcome.
-
Folks, Not sure this is in the right forum location, so bear with me. I just finished my first walk through of my taxes, having completed my first year of my leatherworking side-business. Not unexpectedly, I ended up with a loss. Not alot of sales against a decent amount of buying leather, liquids, tools, etc. I don't mind the loss at this point. Here is the real question, Turbo Tax took me through a series of questions regarding inventory, cost of goods sold, and varous expenses. I found that in our business, the question of inventory seems a tricky one. Most of the finished goods I have on hand are prototypes -- for display online and so that customers can say, "I want that one in this color, with this design". So that leaves me with a mix of hides, double shoulders, a mess of different dyes, and such. I don't think any of us gets 100% use out of every hide, and the useable amount remaining after we cut into it is almost impossible to figure. Same is true of a 3/4 full jug of dye. So, how do you all value your materials inventory in a meaningful way? Do you just estimate it? It seems like a problem almost unique to our industry, since if we were cutting this stuff out of vinyl, we'd know how many useable yards were left. With leather, its hard to figure what's, "left on the roll", so to speak. Any thoughts are welcome. Thanks in advance.