
Goldshot Ron
-
Content Count
353 -
Joined
-
Last visited
Posts posted by Goldshot Ron
-
-
To fudge this, you move you stitch length handle up a little to adjust the stitch. There is a good tutorial on Youtube using a 205 clone. I am sorry that I cannot remember the name of the video, but it is very helpful.
-
Call Cobra on Monday.
-
Thanks for the info. Randy.
-
Hey Randy,
Your new saddle looks really good. I never heard of your tree maker, where are they out of? Aren't taps fun? How did you attach the lower string on the taps? My suggestion after making a new saddle is to use it, then sell it as used. You can feel what you did right or wrong, and use it as a learning tool. Also, I have found people will give you almost as much for a used saddle as a new one.
Take care, Ron
-
Check out Uwe Grosse video on Youtube. It sounds like your timing is off.
-
I have a Toro 3000 that I purchased in 2007. I have always used Weaver's bonded nylon thread without any problems. If the grease bothers you, cleaning it off will not hurt anything. I have always used sewing machine oil, so I have no experience with any other lubrication. The company was in Vernon, CA when I purchased the machine, and since then they have moved up to the Bay Area, and they have changed ownership. But, be advised, if you need parts they change a minimum fee for the parts. So, a $3 bobbin spring may be $30; or, in my case, a spring plus 6 bobbin spools for the same price. This machine takes many of the same parts as other 205 style machines. Happy sewing.
-
I do not say this to be a "smart arse", but is the condition of the saddle worth your time and effort? It is easy to fall into the trap of the challenge.
Not with the saddle here for me to look at, but from your photos, I would consider recovering the knee pads and tucking the new leather under the existing leather of the seat and front jockey. To repair the cantle: you either replace the whole seat cover or scab in leather to go over the cantle. Either way will require a lot of stitching. If the cantle is wood, you might be able to replace the triangular part of the seat and pull the edge over the back side of the cantle. Scallop the back edge of this new piece of leatheer, and tack it to the back of the cantle. This technique is used on western saddles and creates a vintage appearance.
Good luck
-
4 of us loaded the machine into the trailer, but I unloaded it alone. First, lower the table to it's lowest position and tighten the two knobs on the stand. There is a pistol within the stand that allows for machine height adjustment. If not secured, the table may spring upward when the head is removed. I cannot tell you the exact weight of the head, but it feels like about 175 pounds or more. I moved the head on a hand cart into my shop, and was able to lift it onto my work table. The stand is not light either, but manageable. Once inside the shop, I positioned the stand equal to my work bench, and slide the machine onto the stand. This all sounds simple, but I questioned my logic more than a couple of times during this operation. Good luck, and happy sewing.
-
@Uwe...yes, the problem that I was having with my 205 was exactly as shown in your video (nice camera also). To time it, I took off the presser foot cover and the feed dog. It sure made it easier to time, and see what was going on. I had to use 6 spacer rings to adjust for the 346 thread. I am still having some problems sewing in reverse, but that will have to wait for another day.
-
Amazing the work you do. Zippers scare me, but I have sewn them into cantle bags. Easy stuff compared to your boots. I use rubber cement when sewing them, and the clips like you used. The cement is just to hold the zipper in place while sewing.
-
Solution found. As Wiz mentioned, there are spacers that go in front of the bobbin. I installed extra spacers for a total of 6 spacers to accommodate the heavier thread and retimed the machine to make sure all was correct. It appears to have solved my problem.
-
Thanks for the reply. I have tried different combinations of spacers, and yet the problem keeps occuring. I received a call from John at Weaver, and we are still trying to figure out the problem. The top thread is binding between the shuttle hook and the rear race. It is probably something real simple, and I am learning.
-
I acquired an Adler 205 a couple of months ago. It was set up using 138 size thread. When I changed to heavier 346 the bobbin hook started catching the top thread and knotting up. I checked timing, tension, cleaned and oiled machine, removed the needle spacer, and watched "You Tube" videos umpteen times. After days of dismantling and trying different things, I have discovered that the top thread is getting caught between the bobbin shuttle hook and the back race. The hook catches the top thread and the loop is formed; however, the top thread cannot finish the loop because it becomes stuck between the bobbin shuttle and the rear race. The tension in this area appears too tight. I am waiting for a return call from Weaver, but decided to post here also. I have polished the bobbin hook and the race. And, I have checked the 4 springs that are behind the race. I am missing something, but I do not know what.
Grateful for any help.
Ron
-
Nice to know of a source for stirrup designed in the old styles. They look good, and I am impressed with the metal work.
-
PM sent
-
I agree with Jack. I recommend purchasing shoulders with pasted backs. However, another product you can use is Fiebing's Leather Balm with atom wax. I use it on the backside of stirrup fenders. Once in a great while, you may have to slick it with a glass slicker to lay the fibers down, but with a few coats it gives you a nice surface.
-
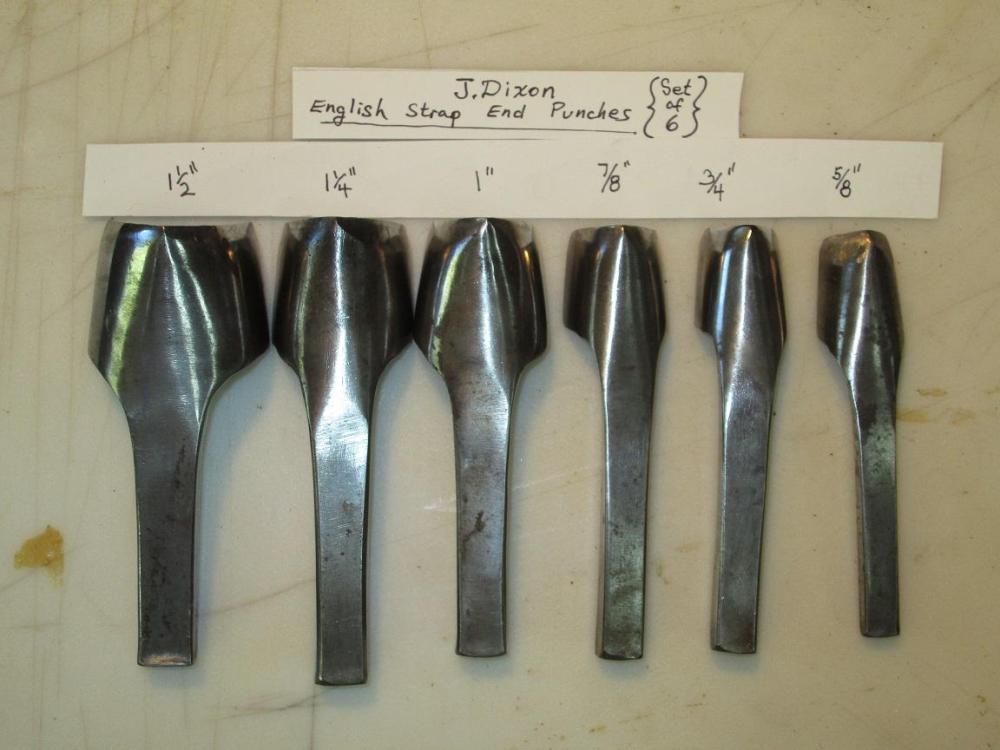
Let's take some more off of this set. I will take $275 (includes shipping within the US) for the set of 5 J.Dixon English Point strap end punches.
-
SOLD
-
REDUCTION IN PRICE FOR THE ABOVE PUNCHES: also the price includes shipping within the US.
1 1/2 " SOLD, 1 1/4" $65, 1" $70, 7/8" $65.00, 3/4" $65.00, and 5/8" $60. If you want more than one, prices are negotiable.
-
Up for consideration is a six punch set, J.Dixon English Strap End Punches. I am asking $370.00 (shipping included) for the set. I have buffed and tested each punch. Punches show some pitting, and a couple of the punches have slightly mushroomed striking ends. Their overall condition is good for vintage punches.
If purchased individually the price that I am asking (includes shipping): 1 1/2" $80.00, 1 1/4" $80.00, 1" $80.00, 7/8: $80.00, 3/4" $75.00, and 5/8" $75.00.
Thank you

-
SALE PENDING....I have some English point and round point punches that I will be listing shortly.
-
I use this style on skirting leather for saddles, and strap buckle holes. They are more handy to use than rotary punches or belt punches. However, each style of hole punch has it's own purpose. Study up on CS Osborne, and you will find that one of these punches may have collector's value.
-
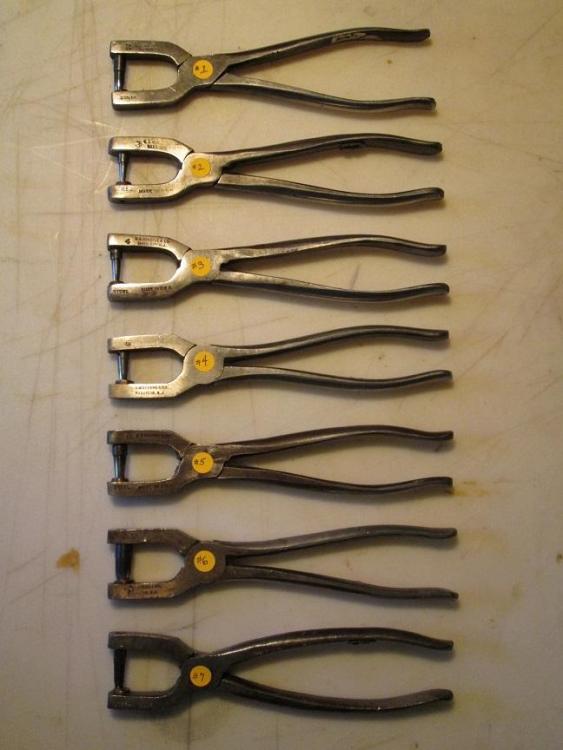
I acquired vintage handtools that belonged to a saddle maker who moved out of our area. Here are seven C.S. Osborne spring punches that I am offering for sale. I am asking $45 for each punch, and that includes shipping within the United States.
#1 is in good condition. The tool says size 2, but the tube size is a number 7. This punch is CS Osborne, Newark NJ.
#2 is in good condition, size 3.
#3 is tube size 4
#4 is in good condition, size 6
#5 is in good condition, size 8
#6 is in fair condition, size 9
#7 is in poor condition, tube size 6, but tool says 2.
I have buffed the cutting edges, and they all cut. The anvils are okay for light use, but you may want to change them out for heavy use. Replacement tubes can be purchased from Weaver, and the threaded tube ends are all the same.
-
If these are not client saddles, their value is basically as a learning experience on how to repair a saddle like this if you even have a customer that wants such a saddle repaired. I would not spend the money or time to repair them. Techniques in construction and design have changed since these saddles were built. It has been my experience that only a few people appreciate old saddles enough to buy one after you repair it. They were built for the showring, and not as a pleasure or ranch saddle.


Latest Wade Saddle Build
in Saddle & Tack Maker Gallery
Posted · Report reply
I think your saddle looks good. It appears that you worked on the rough out to get it smooth, and I find that hard to do correctly. What is the slope on the horn? I am trying to figure out what to order on my next tree. I don't what a charro looking horn, but, I don't want a flat woodpost either. Also, where did you pick up the rear flank cinch dee?
Ron