

MadMorbius
-
Content Count
129 -
Joined
-
Last visited
Posts posted by MadMorbius
-
-
The Tandy shoulder hoster kit is useless for any kind of real world carry, in my opinion. Shoulder holsters are difficult enough to draw and holster up under optimum conditions, let alone duress. YMMV, but I found their rig uncomfortable and ill-fitting. I'm also 6'2 and 260lbs...so that may have something to do with my experience

-
Although his may be of assistance for future applications, you're probably best using 277 thread with a size 200/25 needle.
http://www.tippmanni...leandthread.php
-
415 Thread with a Size 250 Needle: Commonly used in rated products like logging, mining, and military nylon webbing and strapping.
-
346 Thread with a Size 230/250 Needle: Commonly used for mule and other heavy duty tack. Also used in boot and shoe applications.
-
277 Thread with a Size 200 Needle: Is the most commonly used thread size in leather crafting from saddle and tack, boot and shoe, gun and knife, and all other kinds of craft and industrial applications.
-
207 Thread with a Size 180/200 Needle: A favorite size thread for saddle bags, purses, and other thin material crafting.
-
138 Thread with a 160 Needle: Used mostly in belts, billfolds, purses and other thin material crafting.
-
99 Thread with a 130 Needle and 69 Thread with a 110 Needle: Is seldom used in leather applications unless the stitch is not to be a major part of the final design. This combination is more commonly used in fabric, vinyl, and other thin material applications.
And this can be used to convert metric needle sizes:

-
415 Thread with a Size 250 Needle: Commonly used in rated products like logging, mining, and military nylon webbing and strapping.
-
-
lol I never thought of staples on the inside
-
No reason to double stitch in my opinion, unless it's something load bearing. For an oil-pulled leather, use some sandpaper on the edges to be glued before applying the cement. It'll stick just fine, and even if it's not a strong bond you only need it to hold long enough to stitch it. be careful not toput glue farther inside than your eventual stitch line or it may show when you flip it outside in...in other words, if you run a wing divider along the edge at 3/8 with the intention of stitching along it, don't glue (or sand the leather) beyond the line.
-
Round the corners on the bag panels (if you're not doing so already) and glue them in place prior to stitching. Contact cement is permanent and not for the faint of heart but will hold come hell or high water. Make sure you've given yourself enough seam allowance to get traction from the glue. Binder clips also help.
Depending on the rigidity of the leather, you may need to score the leather to allow it to fold cleanly and not bunch up on itself or crack.
If you don't want rounded corners, you'll need to notch the right angles and lap the triangles around the corner.
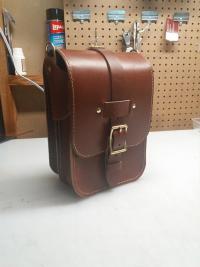
The bag in the attached photo was assembled inside out as described, with rounded corners and a 3/8" seam allowance.

-
Trouser belt or cowboy gun belt? Suede is great for lining gun belts for the same reason it sucks on pant belts...the belt stays where you put it.
-
Thanks Gregg. Simple question really, will the roller guide referenced above fit the LU-563?
-
OK, here's a short video I put together.
-
I'm now considering one....what options did you get?
-
The most recent price list I have shows it at 139₤ (about $230 USD) for the base model. It goes up from there...not that bad. Sorry, I was looking at the vice mount version previously.
Given my experience with the Dixon model, I'd say it's worth every penny.
(EDIT I'm sorry, I read UK lbs but it should be Euro's...so about $190/US)
-
Thanks, I've sent him an email.
-
Ok, it's been awhile since I posted here. I've had varying degrees of success, and while troubleshooting with Mike from Raphael, I think we've identified part of the problem. It appears that when the stirrup plate is on, the wedge that is supposed to open and close the primary tensioner (attached to the long black arm that attaches to the pedal lift mechanism) doesn't move out from between the disks. With the regular plate, it seems to move out of the way...so in other words, it makes no difference how much tension I put on the top thread because the wedge is always holding the discs open.
Note the placement of the wedge in the photo below - this is where it stays. It doesn't move under machine operation, and will only disengage when I step down on the lifter pedal or lower the manual lift lever:

Note that the earlier problem with the outer presser foot failing to descend all the way down has returned; I definitely believe these are related issues.
I opened up the side cover and took some video of the machine cycling. Please, someone tell me I'm not crazy and there's in fact something wrong here and not just a user failure...
Oh...did I mention the iron filings in the bottom of the compartment? Pretty sure that isn't supposed to be there...And those two little cams attached to the manual lifter bar and the lifter mechanism...I don't suppose those are supposed to move independantly of each other? Coz they are...
Videos are uploading, I'll post links once they're up.
-
Hello Ike, Is the screw that the lever pivots on loose?This can also happen when you take the end cover off to oil the internals & forget to line it up.
Dear God if this is similar to the Techsew 5100/441 clones I might have to send you a bottle... Any chance you've got a photo of the screw in question?
-
Hi folks, does anyone know where I can source a roller guide for use with a Juki LU-563? Ebay has yielded a couple of results but i'm not certain they're compatible. I'm wary of the effectiveness of these magnetic material guides commonly available.
Appreciate any sources that can be shared.
-
His work is beautiful, but quality of that type comes with a high price point. It's absolutely justifiable but still quite expensive.
-
Youtube is also a valuable resource. If you're visual-kinisthetic, it can be of enormous assistance.
-
When I build my holsters I plan for the keeper loop to ride right below the belt, effectively locking in place. Works well enough on the high ride model, but for the drop holsters I use t nuts to lock the holster onto the belt and prevent climb.
-
I use a large ruler to lay out the line with a scratch awl, but I haven't used a straight edge or a utility knife to cut in ages. The point of the utility knife is just too small to cut a straight line... basically the same thing that makes them great at detail work makes them hard to use for long straight cuts. Consider a good quality head knife or round knife, sharpen, polish and strope it. Tilting the blade forward as you cut will make it relatively easy to run a nice straight edge, while tilting it back on the point makes it more maneuverable for curves.
-
Thought I'd chime in here...I purchased one from Joseph Dixon earlier this summer. Believe it was about $150 by the time it got to me...in any case, I wanted to warn you that I'm not overly happy with it, as it's not hinged (difficult to get the work into the jaws) and to make matters worse it has warped on me and is essentially useless until I can repair it.
Dixon changed their manufacturer right before I ordered, so I expect what I've got is the result of a first batch of the new model. I will be looking for something better,
-
Thanks Ski, I think you're right about the type. Would love to confirm the weight however
-
It really is a neat product. I found it under a table at Tandy, at $100 for a 28sq/ft hide. I bought 'em out at that price and I've used most of it. Very flexible, and wth a brushed sueded finishalmost like a canvas or duck cloth, but yes it's leather.
-
In the attached he's using 4-5oz leather for the inside compartment and 7-8oz (probably) for the rest of the bag. So the two layers aren't that much bigger together than a single divider would be. If you're going to do something like this, note the extra inches required to sandwich something between the layers...Even more space if you use wool.
Lining the compartment with wool adds bulk and complexity that may not be required given the laptop section is already protected by the other compartments.
But if I were to do it, I'd glue/stitch the wool down to the two outer flaps, leaving 3/8" from the edge of the divider pieces (inset your wool 3/8" from the gusset edges) to avoid the extra thickness at the gusset seam.
OR, I'd run an accordian gusset on the inside (a second gusseted compartment inside the main bag).
-
I can't tell you how many times I've done that. Well, something like that anyway...like assembling the whole mess before realizing I hadn't stitched the lining to the main holster leather, just glued it

I have a box full of...um...."positive learning experiences" I suppose you could call 'em.
Dye - Feibings Vs Eco Flo
in How Do I Do That?
Posted · Report reply
Standard eco-flow stains; tried to use it once...it beaded on the leather and ######ed up my project. Threw it in the garbage. I now use the Professional Waterstain almost exclusively, the best stain product I've ever used.