

MrLentz
-
Content Count
118 -
Joined
-
Last visited
Posts posted by MrLentz
-
-
I have a huge sale of back issues for Leathercrafters and Saddlers Journal dating from 2002 to 2012. Truly massive collection with a ton of valuable advice for leatherworkers of all levels.
Available though an eBay auction ending on 11/15/22 in the evening: https://www.ebay.com/itm/255812414118
-
I have a few bundles of DVDs for sale through a couple of eBay auctions (Ending 11/15/22. in the evening):
- 6 DVDs on leather carving, Sheridan style and more: https://www.ebay.com/itm/255810778928
- 9 DVDs on how to make various knife sheaths : https://www.ebay.com/itm/255810991680
- 5 DVDs on bag making, carving and construction: https://www.ebay.com/itm/255812182660
- 6 DVDs on How to make Holsters including the John Bianchi set: https://www.ebay.com/itm/255812221084
- Full DVD set of Leather Holster Making by the American Gunsmithing Institute taught by the talented Chris Andre: https://www.ebay.com/itm/255812206122
- 5 DVDs on leather lacing, turks head, etc..: https://www.ebay.com/itm/255812236482
- 6 DVDs on Dyeing, Assembly, Tool care: https://www.ebay.com/itm/255810974935
-
Just a heads up I have a few Large Lots of hardware for sale in a few different Bay auctions. Below are the links:
Solid Brass rivets ( 17 pounds worth!! ) - https://www.ebay.com/itm/255807307824
Bag Hardware - Slides, clips, squares and spikes: https://www.ebay.com/itm/255807478499
Stainless Steel belt / strap loops - https://www.ebay.com/itm/255807382550
Large Belt Buckles for straps / belts. Lot of 50 ! - https://www.ebay.com/itm/255807550261
Solid Brass Belt buckles lot of 50 - https://www.ebay.com/itm/255807560899
Line 20 snaps and parts extremely large lot - https://www.ebay.com/itm/255807643227
Line 24 Snaps and parts Massive collection - https://www.ebay.com/itm/255807656974
Split rings of various sizes mostly stainless steel: https://www.ebay.com/itm/255807673280
Various collection of chains for use on bags, wallets etc - https://www.ebay.com/itm/255807694264
Stainless steel links, possible use in keychains 35 total - https://www.ebay.com/itm/255807704433
Hermes Collectors item Book - La Beaute en Voyage Rare item out of print - https://www.ebay.com/itm/255807718152
Shiny Nickel Padlocks for various uses - https://www.ebay.com/itm/255807497282
Stainless Steel Pony Chain Swivels Lot of 12 - https://www.ebay.com/itm/255807358982
CS Osborne Draw Gauge plus Extra blade - https://www.ebay.com/itm/255803922372
Thanks!
-
Hi,
Anyone know what happened to proedgeburnishers.com ? I feel like I checked their site a few months ago and it was up and running, looks like things are not working anymore. I was hoping to get a few dremel burnishers from them, hope everything is ok!
-
15 hours ago, chiefjason said:If the above does not work out just order the Springfield below. The main 1911 you need to be careful with is the Sig. The Nitron slides are wider at the top. The next thing to be careful of is something like the 2011 with the full length rail on the bottom. The rest are pretty much the same.
http://www.bluegunstore.com/SPRINGFIELDOPERATOR1911-A15.aspx
Thank you for that!
-
11 hours ago, Frodo said:Mr Lentz, Next time you run into this problem. Have your customer make a copy of the gun
Take the copy and glue it to some wood. cut it with a jig saw
This is a Femaru M37
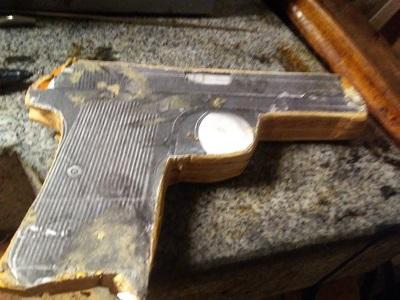
Interesting idea - it may not fit as good as a replica, but as long as the customer knows the difference I guess that would work.
-
1 hour ago, Hildebrand said:What measurements would you like? I put it on top of a Ruger SR 1911 and other than the rail it is identical. I will get some pictures in just a bit.
ToddOh great - you can private message me the photos of it and we can work out a sale.
Thank you again!
-
Hi Todd,
Send over a photo or two of it and a measurement if you can. I can pass it along to the customer and have them help make the choice.
Thanks!
-
Hello,
I have a customer looking to get a holster made for his Ruger sr1911 with a rail on the bottom. His words - it's a full size 1911 not the commander.
I am not having much luck finding the Ruger model sr1911 on Knifekits.com or Bluegunstore.com and am wondering what another holster maker in this situation would do? I am not very familiar with the differences in manufacturers of the 1911 so I don't really know if a Springfield version would do or not. Or maybe there is a better option.
Here's what customer support found for me at knifekits so far that looks similar:
https://www.knifekits.com/vcom/bluegun-holster-molding-prop-for-springfield-operator-1911-5in-p-5204.html
Thanks!
-
Depending on how aged you need it to look, I found one method to work quite well if you want that really old worn out look. Boil a pot of water and pour it over the leather you need aged. Careful where you pour though! It's unorthodox I know - but it'll shrivel and crack the edges a bit for a much more aged look. I have also dipped leather in boiling water, but that is a bit extreme and basically destroys the leather with cracking.
-
Excellent, that certainly clears it up, thanks Chief!
-
What's the difference then in how you make the Flat Back - flat backed so to speak? I had just made myself a 50/50 holster (for a dog leash not a gun just yet). And I immediately noticed the discomfort of it as the bulge pushes into your back. My next step was to figure out how to make a Flat Back, and go figure ... this thread popped up for exactly that. Any advice is much appreciated.
-
3 minutes ago, YinTx said:@MrLentz, I have several different backgrounders, if I recall correctly I used the ones in the photo. I did not modify the edges, if you try to blend you can get a bit of hamburger as seen in the center of the stampings. Just have to try to align them as best as you can and go from there. Hope that helps you!
YinTx
Ah - nice, ok so it is more about the placement. Thanks for the tip!
-
On 3/26/2019 at 6:56 PM, YinTx said:Hey - just curious where you got the checkered background tool and if you had to modify the edges to blend better?
-
Hello,
I am just learning how to make proper knife sheaths and I was wondering what styles of knives are the popular ones your customers/friends/etc typically need custom sheaths for? Or are they all across the board? I am not much of a knife guy so I figured someone on here may be able to point me in the right direction.
Also - anyone know of some mid-level priced knife makers out there that I could order a variety of styles of knives from? I would like some well made ones that are worth keeping... but can't break the bank at the same time! Basically I am looking to collect an array of the popular styles to practice different types of sheaths for - I can do some problem solving in advance and learn a lot that way before offering my service.
Thanks!
-
8 hours ago, Rockoboy said:Have you tried burnishing the edge with dry canvas to get rid of the dried contact adhesive? I find it grabs the smallest speck from between the layers.
I Haven't tried the dry canvas on it. Though while I did manage to scrape off all the goobers...I noticed that a few days later it had been pushing even more out. It is strange because I did properly dry everything. It's as if it is leaking goobers over time.
-
Well after trying the watered down Aquilim 315, it is still very difficult to get the awl through.
I also tried a very thin layer of Fiebings Leathercraft cement and heat gun dried it to a tacky state, then pressed together. That does not seem to be a problem for the awl at all. I would say the bond is about 1/2 as strong, but it should work for most projects. The Aquilim 315 is probably best used if you are easily able to avoid both the stitch line and the edge. The edge seems to create the goobers while trying to burnish etc..
-
Thanks! Yeah - I just purchased a small 15 degree angle and 20 degree one to that can be rubber banded to the stone. At least I will have a guide now when starting each stroke. (before using the angle guide - I sharpened for about 45 minutes and still had the same results: sharp for about 24 inches of cutting...then not so much!).
I will be trying the angle guides once they get here - but now my question is this - did the weaver master tools round knife come with a primary bevel off of the main body...then a micro secondary bevel? Hopefully I didn't screw the edge up too much by trying different angles! I am assuming I should just use the 15 degree angle for a good 30 minutes and that should be a strong enough edge (totaling 30 degrees included)?
-
I tried a few ideas yesterday and here's how it went:
- I have been using a bar of 50% bees and 50% candle wax - I don't notice the difference as far as ease of pushing the awl blade through. The awl blade is brand new from Barry King and extremely well polished. I also stropped it a little just to be sure.
- Tested a thin layer of Aquilim 315 all the way to the edge: still gums up the awl (however I just noticed the note to try watering it down, I will test that out and try again)
-Tried thin layer of aquilim on either side of the stitch line but not on it: this of course worked well but can be hard to put it down in the right spot. This could be a solution if it is just put on the inside of a stitch line - it may hold up enough to do stitchwork and be out of the way.
- Tested out Fiebling's Leathercraft cement all the way to the edge: this is very viscous so you have to be very careful applying, once fully dry - the awl blade passes easily through it with no problem. Seems to dry harder than Aquilim, but still stay flexible. Also seems fairly strong if you let it fully cure - though slightly less grip than Aquilim. One tip I used is to apply to both sides being glued, then use a heat gun to get it to a gummy stage, then press together and clamp. The reason being is it will prevent the glue from running out of the edge.
I will be trying out the glycerine soap - maybe saddle soap? Also thinning the Aquilim 315 with some water to make it much thinner.
Thanks!
-
Hi,
I am making a knife sheath that is causing me some trouble and am wondering if anyone has a solution. I have the welt glued in with reina aquilim 315 which is a water based contact cement. It works great and I do follow the directions about applying to both sides, waiting until clear (around 30 min), then pushing pieces together and hammering. Then I waited at least 24 hours before using my awl and it seems as though the glue gets stuck to it creating little boogers. It makes it hell trying to punch the holes as well as slightly dangerous and prone to error when trying to hit the groove on the back side.
I have been gluing the entire piece, so my next thought is I should try gluing everything except the area close to the approximate location of the stitch line. I think that would help, but on a welt - there really isn't much space there. I really don't want to resort to using Barges or the other hardcore cements, anyone else have this issue and have a solution for it?
Thanks!
-
I am going to give that a shot today, thanks! I read through the Leather Wranglers booklet on sharpening (a good quick read on sharpening theory and how-to's for those new to it). In it they say the reason to go to higher grits like the 8,000 is that you are actually just polishing down the striations or grain cut into the metal from the lower grit stone. Each successive higher grit will of course polish it further creating smaller and smaller grooves that help the knife slice through leather.
That's the theory anyhow, in practice it definitely could be a bit different and dependent on many factors (blade thickness) as you guys mentioned.
-
Hello,
I purchased a Weaver Master Tools round knife a few months back and recently started cutting out some 8/9 oz veg tan using it. Didn't work too well so I ended up following the leather wrangler's video on sharpening the round knives using 1200 grit + 8000 grit diamond stones and a strop with green compound. After going through that sharpening process the knife cuts through leather like butter...for about 30 inches or so and then it slows down and considerable pressure is needed. I re-strop and it's great again for the same length. I then re-sharpened it over again spending much longer on the 8,000 grit and longer on the strop, but still have the same experience. The burr is gone after sharpening and I don't feel it after cutting the leather, so I don't think that would be the problem.
I've read through many posts about the new osborne and tandy knives using poor quality steel that wont hold the edge very long - but my question is - does anyone know if that also applies to the Weaver Master Tools round knife? My experience would say yes, though I am not 100% sure. I did place an order for a Leather Wrangler's knife but it is several months out so I may have to do with the one I got for now. Originally I thought the Master Tools were a step up from the regular tools which is why I bought it.
Thanks!
-
Hey thanks for all the tips! I will probably go ahead with it and plan to use a cutting mat for the knife. It's long grain, so not quite as nice as the end grain described. I have a couple laminated tables, so it'll be nice to have something wooden that looks a bit better!
-
Hello,
I am putting together a workbench to function as a multipurpose space for tooling leather, assembly, stitching, and a little dyeing too. I have access to a lacquered maple butcher block style table top and was wondering if there are any pitfalls about a lacquered finish with regards to general leatherworking? I hear lacquer is a very strong finish, but also tends to be thin and can scratch after some time. I will be tooling on a granite block inset into the table so there's no damage happening there. I might use the table top to bevel edges now and then. Is lacquer a good choice for a table top or should I go with a laminate instead?
Thanks!
Large collection of Holster DVDs, Sheath DVDs and Back Issues of Leathercrafters and Saddlers Journal
in How Do I Do That?
Posted · Report reply
Just a head up I have quite a few used DVDs for sale for various types of leather working. Including holster making, knife sheath making, bags, leather carving etc. I feel like not too many people navigate down into the for sale area of periodicals on this forum so I though a re-post up here might help! They are all priced to sell quickly. The auction ends 11/15/22 in the evening.
For links to all the DVDs for sale check out my post:
For a link to all of the Back issues of Leathercrafters and Saddlers Journal 2002-2012 find it here: