


ENC
-
Content Count
65 -
Joined
-
Last visited
Posts posted by ENC
-
-
I meet a lady selling masks like this at a street fair and asked if she was willing to share her basic methods. She said she soaked the leather in watered down white glue and then stretched and pinched the folds. It sounds like free hand wet forming with the glue as a stiffener when it drys. The leather looked like it was mostly embossed splits, under 3.5 -4 oz, and factory dyed.
Ray
-
You can get sewing machine belt by the roll 1/4" or 3/8" round leather for the old treadle machines from ebay.
Just 1 quick find example, but it shows the brand name.
Ray
-
I wrote Fiebings and got a letter back some time ago with permission to post it here. This dates from 4/2014.
________________________________________________________________________________________________________________________________________________________
Leather Dye is Alcohol based. Pro Oil Dye is alcohol and oil color based (I think he means the pigment is oil color based). Leather stain is vegetable oil based and can be mixed with most other oil up to 20%.Professional Oil Dye is the best product as it dyes more level and does not fade and can be used on oily leather. In many cases Leather Dye works and islower in cost.You may pass this on to others.Thank YouRichard ChasePresident_______________________________________________________________________________________________________________________________________________________I would try the stain on Harness because of the oil base.I didn't find the stain at Tandy but I did at Springfield. There are only 4 colors of the stain as far as I know.RayImperial Leather Works -
gandgphi: It looks like you are in CA and so you cant get the hobby size fiebings products. There are two was to get around this. 1 If you have a resale license you can order it in minimum quart sizes for professional use. They can not be put on the shelf for retail but tandy can/will custom order it for you with the right paperwork (your results may differ depending on the store manager, but I have done it.), or you can get it from Weaver or Springfield. 2 The other way is to use Angelus products. They are made in CA and don't fall under the VOC law. They are my preferred brand, and can be ordered on line.
As a side note, Angelus makes a product called luster cream. It seems to be a waxie finish and the colors have 10-20% pigment in them. I use the neutral to finish/slick the flesh side of belts among other things, rub it in well and it will even stop die from penetrating most of the time. I found this out when I got a bit on the edge and then couldn't get the edge to take die. Using the matching color to a died piece can make small scratches disappear because of the pigment in it.
Ray
-
It sounds to me that you are talking about what the LARPers call a Hero's Belt. Basically a 4-6 inch wide ranger belt with 2-3, 1 inch buckles, (1 buckle for every 2 inches wide). Then add some magazine pouches ( wet formed and sewn on ?) and use a vacuum sealer to make up shot bags to keep the shot from spilling out. You would be able to add or remove weight as you need to.
I hope that helps.
The hero's belt always reminds me of movies like the Seventh Voyage of Sinbad.
Ray
-
You could try searching for bleed knot. It might be a good way to use 2 or more pieces to make a longer leash.
Ray
-
If you are using a thread size less than 138/(135) you may be able to go to a smaller needle. This link goes to one of our sponsors and has needle size minimums for thread size .
http://www.tolindsewmach.com/thread-chart.html
Ray
-
It is back stitching using 1 thread, 2 forward on top 1 back on the bottom. Look at the corner on one of the wallets where you can see both the top and bottom stitching. You will see that the corner stitch on the top goes diagonally missing the corner hole, but the corner hole still has 2 threads 1 going in and 1 coming out.
Ray
-
What several of my friends have missed when doing hole layouts is there is 1 less division than there are holes. 11 holes 1 in apart cover 10 in because you have a hole at 0. Also its much easier to use metric measurements, it's much easier to mark out 5.76 mm than 2.4 inches, after you do the spacing division and end up with strange decimals. I use a XL spread sheet to do the math for me and come up with a measurement for each hole then place the ruler , clamp it and, mark each measurement distance from the 0, avoiding iteration error like you get from walking dividers.
Ray
-
Thank you TinkerTailor, You got it right on the head. In only 24 views, I got my answer. I knew one/all of you had the information somewhere.
Ray
-
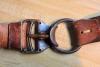
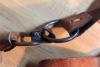
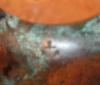
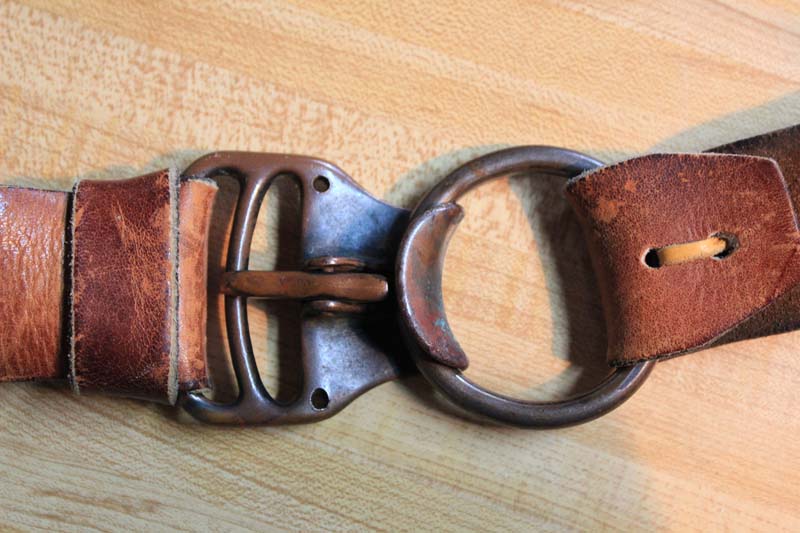
A friend has had this "belt" for over 30 years and it was old when she got it at a thrift store. I have looked everywhere I can think of to identify it, but have had no luck ,so I figured I would ask the experts. I am going to make her a new belt for it but I think it looks cool and would like to make some belts with buckles like it to sell. She said it was never brass in color, so I checked it with a magnet and it is magnetic. I also found what I think is an anchor on the back (see 3rd pic). I was thinking it was something to do with tack but now I'm wondering if it is military in origin. If anyone can identify it, has any ideas about its origin or where I might find more please let me know.
Thank you for your help in advance.
Ray
-
You can add Inkscape to the free list for Vector graphics. I have been using it for years. Only down side is I have to export a format that my old version of photoshop will take to print. That may have been fixed in the version released in Jan 2015. I haven't tried to print directly from the new release yet. My $30 epson printer from 10 years ago will print up to 8.5 by 44 in. I tape paper together on the back side, and set length/size I need in the printer set up.
-
In any case I would glue the seam together first. If the bag is big enough and the leather soft enough you can feed it under the foot from back to front before you start stitching and then sew your way out of the bag. If not you need a "sew off machine" (or to stitch by hand). Its like a cylinder arm machine except the cylinder arm goes in the same direction as the feed. Some machines sew front to back with an arm that is perpendicular to the front edge of the table. Others look mostly like a normal cylinder arm machine, but sew right to left off the arm.
Ray
-
That tool has a lot of slop in it. The blades move every time you use it and have to be reset to the correct spacing. If you are doing round spots up to 1/2 inch, this is the next step up is. http://www.tandyleather.com/en-usd/search/searchresults/8114-01.aspx. It looks like Tandy has discontinued the kit that had 4 sizes in it. The next step up from there is expensive...a hand press and dies. Last I checked with Standard rivet it was about $125 per die, but they can make one for any shape/size of spot.
I have been using the tool you have to mark where I want the spot staple legs to go or you could use a divider, and then use a single flat lacing punch to make the slots. Then I roll the legs so they point back into the leather with round nose pliers, they have to be strong for the bigger stuff, and once they are rolled, I put the leather face down on a piece of carpet over my stone and tap the legs flush into/with the leather. The carpet lets the spots sink in without scratching or flattening them but is hard enough to hammer down the legs.
Hope this helps,
Ray
-
It looks like what you are talking about is a lap seam. The one you showed was done on a double needle machine, however you can get the same thing by sewing the (over)lap twice, but you wont get the perfect equal distance between the stitch lines that a double needle dose.
Ray
-
The formula is C= 2 x pi x R. where C is circumference R is the radius of a circle and pi is a constant, 3.14. So any change in radius is going to change the circumference by 6.28 times the change in radius, regardless of what the radius change is.
Ray
-
I use to make fake fur leg warmers/boot covers for the rave crowd by the 100s. Using the hose from on vacuum cleaner gets most of the loose stuff off, but I found the most efficient method to remove loose hairs was to just beat them on the ground when the boss wasn't looking.
Ray
-
It looks like block dye (paint) removal. Wrap a layer or 2 of t-shirt around a block, 2x2 works well, dampen it to help the paint you remove absorb into the cloth. After dying and sealing everything, thin the paint a little and put it in the low areas and then quickly remove what slops onto the surface with the damp cloth on the block. It will remove the paint from the high spots. The same Idea can be used to applying a dark dye to the surface. Dye the entire piece a light color (red or yellow for instance), then use a dauber to lightly apply a darker dye ( dark brown, black) to the block and t-shirt, drag it across the surface. The block keeps the darker dye from getting into the tooling. The 2x2 and t-shirt works well for removing paint, something thinner like a credit card on edge seems to work better than the block when applying dye to the surface.
Ray
-
My guess is a single leather piece split down the middle but not to the ends, as a core to wrap around. (look up magic braid or mystery braid to see what I mean). Then a single piece of lace wrapped in a figure 8 around the leather core(s) with a half twist as it passes through the slit to keep the top side up. If you look closely the twists in the center are offset left to right by half the width of the wrapping lace. Also you can see skin in the second picture as the two pieces of lace go through the vertical.
Ray
-
I f you go to the last link... the ferns. there are several other pictures at the bottom. They clearly show mistakes where the leaves got folded over themselves. Looks to me like its airbrushing through the leaves. But I don't have any idea how that is possible.
Ray
-
I went to Vegas for the nationals with a friend whose team won the San Diego regional playoffs in A.P.A. APA is basically a national bar pool league. There were some dealers there selling equipment including cue cases. 2x4 cases ( 2 butts 4 shafts) in all black with no tooling were selling for over $700. They didn't look anywhere as nice as the one you made. So yes there is money to be made in cue cases.
The only suggestion I have is to add a pocket that is big enough to put a cue ball in. Cue balls in bars are just a tiny bit smaller than the rest of the balls so the will drop through the return track when you scratch. Many of the players bring their own cue ball so that the target balls don't get lift on contact. It certainly doesn't make any difference in my pool game but some of the top end players I have talked to say it dose for them.
Good luck, your work is fantastic.
Ray
-
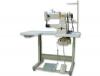
This is a different type of machine but its is the same idea. The smaller pedal is attached by a chain to lift the presser foot or stop one of the needle stops in a double needle machine, so you can turn a corner. The same set up can be used to pull the reverse. I had this type of set up on my gathering machine. Unfortunately I laid the head back without disconnecting the chain first and broke the pedal in half.
-
Could have been set up to have a reverse peddle. Is there a shaft coming out the side under the hand crank wheel? Or underneath... maybe an arm with a hole that could have had a chain attached?
Ray
Picts. might help.
-
Try http://www.standardrivet.com/ they have rim mount 34ss-40ss and 48ss Swarovski Crystals as well as several types of acrylic stones. The mounts are meant for leather. They also sell the presses and dies to set them.
Ray


osborn 84 spliter scale of thickness marks
in How Do I Do That?
Posted · Report reply
I was wondering if someone could tell me what the marks on the scale of the osbourn #84 splitter are. Like where is 10 oz and where is 6 oz. I currently have a weaver 8 inch and there is no scale and the difference between 18 oz and 6 oz is 3/4 in. the difference between 6 and 10 oz is about 1/8 inch. this makes it completely worthless to try to skive the end of a belt.
Thanks for the help
Ray