


SWFLholsters
-
Content Count
23 -
Joined
-
Last visited
Everything posted by SWFLholsters
-
Servo Motor Mod: Diy Easier Speed Control
SWFLholsters replied to SWFLholsters's topic in Leather Sewing Machines
Yes you can modify a needle positioner servo, it is not as easy to do as a standard servor, but not too difficult. Check out the following link for instructions. http://www.swflholst...-eps-speed-mod/ Gook Luck! -
Cobra Class 14 Splitter: Day One Video, Plus Photos
SWFLholsters replied to SWFLholsters's topic in Leather Tools
The net weight printed on the box for the head is 48.5kg (107lbs) and the total weight on the shipping invoice was 136kg (300lbs). You may be right about taking smaller 2oz splits, I'm new at this and need some schooling. After the holiday's I plan on calling David and Steve for some splitting pointers. -
Hey Eric, on the holster I didn't notice any big change in the retention ability, but the look and feel was very nice, and IMHO a big improvement over acrylic. On the belt I did notice a pretty big difference, kind of like going from a new belt to a nice broken in feeling. No problem with the belts vertical rigidity though. This combo was for my bother-in-law so I will be able to keep tabs on how it performs. I think the baking after forming really locks in the holster firmness, but we will have to see how it holds up over time. I just need to figure out how to speed up the application and lessen the labor. I forgot to mention that I did apply Angelus 600 on the interior of the holster.
-
Cobra Class 14 Splitter: Day One Video, Plus Photos
SWFLholsters replied to SWFLholsters's topic in Leather Tools
Thanks guys! I'm glad you liked it, I actually enjoy making the video's. Each time I do one I learn new things to speed up the process. A little update... For fun I tried splitting a few small pieces by hand with the hand wheel and I would most definitely advise getting the servo powered setup. The pieces I experimented with were small and it took quite a bit of muscle power. I surely would not want to split a run of holster pieces by hand. Maybe the unpowered machine comes with a handle instead of a hand wheel, even if they do I think the servo setup is money well spent. Of course I would say that. -
Excellent work overall and outstanding lace work.
-
I have been struggling with this issue too, I like the water proofing properties of acrylic but hate the fact that you are basically locked into that finish. I ordered some Sno-Seal and Montana Pitch to see if they would be good alternatives. I did a quick test on some scraps, and to me, Sno-Seal beat the Montana Pitch in the water resistance department. I need to do a more thorough test to be certain that Sno-Seal is better. I'm including several photos that show the finish difference between Sno-Seal and Angelus 600. I love the way Sno-Seal leaves the leather feeling and looking like leather and that you can reapply whenever needed. The one problem I noticed is that any of these paste heat gun solutions involve more labor and time to apply, especially on belts. I am thinking maybe it could be an option for a few dollars more? I recently ordered a quart of Angelus 620 with hope that it will tone down the glossy look. I doubt it will change the plastic feel though. I will report back after I get a chance to do more testing.
-
It's here and it's a beauty. This is my first splitter and I am learning as I go, I'll try to answer questions as best I can. Happy Holidays to all, and a big High-Five to David and Steve at Leather Machine Co. I have delivery and setup photos along with a video posted to our website. Please try to ignor my obsessive tendency in the video. ;-) http://www.swflholst...d-setup-photos/
-
Cowboy 4500 Delivery And Setup
SWFLholsters replied to SWFLholsters's topic in Leather Sewing Machines
Thanks Eaglestroker, it sounds like you are well on your way to stitching happy land. Let us know how it goes. -
Cowboy 4500 Delivery And Setup
SWFLholsters replied to SWFLholsters's topic in Leather Sewing Machines
Thanks Eaglestroker, it would be nice if you could snap some photos of how your Cobra was packaged. By the way, I thought you were supposed to wait until Dec 25th to open your presents. You are in for some fun times, enjoy! -
Cowboy 4500 Delivery And Setup
SWFLholsters replied to SWFLholsters's topic in Leather Sewing Machines
Yes I am a very lucky man to have what I have and to have a wife that allows me so much freedom. This leather venture has overtaken our family room, craft room, storage room, etc, the garage hasn't changed much except reorganized a bit. Her understanding is a blessing from above. Yeah, I had a bit of a rough start with my Cowboy but after some tweaking and TLC all is working well now. I have talked to the dealer and he is well aware of the problems I have had. I agree I would not want a machine this size to be shipped with the head mounted to the table. The pedestal stand is bouncy enough when sewing I can only imagine how bad it could get during shipment. I thought the pallet loading/packaging on my order was outstanding. CNC is a dream that I think will have to wait for another lifetime. I think that one could break the wonderful understanding relationship that I have -
My New Iphone5 Case
SWFLholsters replied to hunio's topic in Purses, Wallets, Belts and Miscellaneous Pocket Items
Incredible craftsmanship, very inspiring. Thanks for sharing -
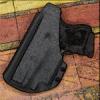
I owned a Tacsew 155 for about a month and had to send it back because of a binding problem. I would say that if you can see the machine in action and you know this guy, I wouldn't at all be afraid of buying it. I did a lot of research before buying mine and there are a LOT of happy Tacsew owners. Do a search for Tacsew on DIYTactical.com and HotRodders.com and you will find many happy owners. I stitched quite a bit with the Tacsew before trading it on a Seiko STH 8BLD and it stitched every bit as good as the Sekio just not quite as smooth. A heck of a lot less money though. If you said you were buying new, I would recommend only buying if you can demo it and or return it easily. It is a typical china made machine, some good, some not. When you get a good one you have a reasonably priced good machine. This photo shows where mine had a problem, the presser foot shaft and tension adjustment hole were out of wack which caused binding when the tension adjuster was screwed into the casting. Looks like it was bored off center. Anyway, I hope this helps, I wish you luck and happy stitching! A shout out to Sewinggold.com Steve Levin for outstanding after sale service on my Tacsew.
-
Hi guys I finally got around to posting photos of my Cowboy delivery. I love equipment photos and I figured some of you may too. And these photos may help soothe the anticipation jitters for those that are ordering machines and are wondering what to expect on delivery. http://www.swflholst...very-and-setup/
-
I have had the same problem with my Seiko STH 8BLD. By adjusting the reverse stitch length I finally got it to reliably stitch back into the same holes. The problem I have is that the thread tension is just not the same back stitching as it is stitching forward. Perfect forward stitching tension produces a lousy back stitch lock on the bottom of the stitch. Adjust the tension to get a good back stitch and then it is too tight stitching forward. I gave up because I was never happy with the stitch quality. Now on things where I want excellent stitch quality I just back stitch the old fashion way... turn the fabric. I know it sounds crazy having a fancy machine with a reverse lever but for me the best results are manual reverse. I do the same thing with my new Cowboy 4500 when stitching holsters because to me it suffers the same problem. The stitch lock on the bottom of the stitch is just not quite right when back stitching. Maybe someday I'll get it figured out and it could be my pickiness is part of the problem too. I wish you luck.
-
Tangleboss Swivel Knife W/1/4" Angle Blade For Sale
SWFLholsters replied to stelmackr's topic in Old/Sold
I will take it, I'll PM you for details. -
Servo Motor Mod: Diy Easier Speed Control
SWFLholsters replied to SWFLholsters's topic in Leather Sewing Machines
Kevin, if your motor looks like the one in the link below then I am almost certain that this mod won't work. Any motor that has a knob for speed adjustment most likely does not use an optical speed control and therefor this mod would be useless. You could research more on your motor to be sure. http://image.made-in...or-CF-400C-.jpg On the other hand if you don't have a control problem you most likely don't need to worry about modifying anything. You know the old saying... If it works don't ... with it. Cheers! -
Servo Motor Mod: Diy Easier Speed Control
SWFLholsters replied to SWFLholsters's topic in Leather Sewing Machines
Thanks for the update and info on how you accomplished the mod, I am sure this will help others down the road. I will add your servo motor to the list. SewQuiet 5000 SewQuiet 4000 Skyrit TN-411 (looks very similar to a Consew) TN-421 (no name) Enduro Pro SM600-1 Do you mind if I add your procedure to the end of the how-to? -
Servo Motor Mod: Diy Easier Speed Control
SWFLholsters replied to SWFLholsters's topic in Leather Sewing Machines
Eric, great video, I love your holster work and really appreciate your video how-to's, thanks big time for sharing. I can't wait to add a Cobra 4 to the holster tool box. -
Servo Motor Mod: Diy Easier Speed Control
SWFLholsters replied to SWFLholsters's topic in Leather Sewing Machines
Glad to hear it worked. What motor are you using? -
Servo Motor Mod: Diy Easier Speed Control
SWFLholsters replied to SWFLholsters's topic in Leather Sewing Machines
Awesome! I am glad it worked. I am not sure we can get the complete 1-40 range of speed. Mistakenly I didn't try for it, I was happy with a 1-20 range as it covers all of my needs. When I get some free time I'll try some more testing A member named Cronko on HotRodders.com had success with his SewQuiet 4000 but he had to use thin cardboard instead of paper because his optical sensor was so bright the paper would not work. He then layered the sicky side of postit note paper on top of the cardboard to create a gradient of paper and then used pencil marks to fine tune the paper gradient and that worked for him. So it sounds like each brand of servo may require a different approach to the gradient. Link to post at HotRodders: http://www.hotrodder...tml#post1577862 What brand and model servo do you have so I can add it to the list? Cheers! -
Servo Motor Mod: Diy Easier Speed Control
SWFLholsters replied to SWFLholsters's topic in Leather Sewing Machines
Thank you for the kind words. 1. I doubt that the manufactures see this as a problem. I can see some of the dealers possibly doing the mod in-house for customers that request this. I think as the number of successful mods increase the dealers may be more inspired to look into it. 2. What motor do you have? On my Enduro Pro the slow start works but not in the way I would have hoped. It adds a delay that only complicates the short range of travel. You end up pressing the treadle too much because nothing is happening and then bang you are going too fast. There is a noticeable delay but it seems to be more of a delay than a slow ramp up of speed. However, on my motor the bigger issue is that the slow start setting seriously messes with start up torque, the torque difference between L-9 and L-0 is very big. 3. If I understand correctly your motor does not turn off when you hit the power switch? My Enduro Pro has this problem, when you switch the power off the motor is still active for 10 to 12 seconds. That to me is a design flaw, but I can live with it. I am sure the Efka 1550 is a great motor but with this mod I am more than happy with my Enduro Pro. However, I am only using it on a Seiko STH-8BLD and not a 441. I wish you much success. Larry -
Servo Motor Mod: Diy Easier Speed Control
SWFLholsters replied to SWFLholsters's topic in Leather Sewing Machines
Thanks! I promise you won't be disappointed. :-) Just use 22lb or thinner paper and you should be good to go. -
I am new to sewing and recently purchased a Seiko STH 8BLD-3 and I have spent many hours reading here on Leatherworker.net, on HotRodders.com, and on DIYTactical.com, and thank everyone for sharing their experiences. I hope, with this post to pay back a little and make a few people really happy like me. This MOD for me ranks up there with best Xmas present ever... in July, no less. In my research to learn more about my new sewing machine I ran into a lot of posts of people unhappy with their servo motors speed control, this included me. I was lucky one day and found a post here on Leatherworker.net where a member named DDahl - Dave had used a paper and pencil gradient MOD to give a wider more controllable range to the speed controller of his servo motor. Here is the link to DDahl's post that motivated me to make this how-to. (Thank You! Dave) Amazing to me, Dave's post didn't stir much conversation or motivation, I attributed that to peoples fear of modifying things. I made this video and how-to to show how easy this MOD really is and hopefully make a lot of people happier with their machines. Enjoy! In addition to the video I have photos that can be use as a guide while preforming the modification. I will also post updates and tweak the how-to as needed and if people participate, post a list of servo motor models that work well with the modification. Servo Motor MOD: DIY Easier Speed Control I tried to embed the YouTube video but failed, if it is possible please PM me and I'll update this post to include the embedded video. P.S. I am not a writer and struggle with things like this, if anyone sees errors or has suggestions on how I can improve my writing to be more clear please let me know. :-)