


Keeleon Ohms
-
Content Count
21 -
Joined
-
Last visited
Everything posted by Keeleon Ohms
-
Possibles Pouch
Keeleon Ohms replied to Jelle's topic in Purses, Wallets, Belts and Miscellaneous Pocket Items
Sorry to hijack, but what would more work on the edges require tool and skill wise, and end up looking like? I WISH I could get edges that smooth and round. Sometimes mine look nice and round and sometimes they're all fuzzy, but in my opinion this whole thing looks very professional and clean. -
Wow that looks amazingly close, except this would have to be for a giant with 40 inch biceps>.<
-
That was my first thought and why I bought it. However, it has no curve to it, and fits terribly on a woman that isn't shaped like a tin can. And if you try and wear it curve down, the curves make no sense lining up with the crotch, but if you try it curve up, the curve is WAY too wide for "normal" breasts. Keep in mind this is the whole thing laid out flat, and it wraps around me tightly with a 38 inch waist. If you were looking at it with the back folded up under it, it looks exactly like an under bust. Any other tries?
-
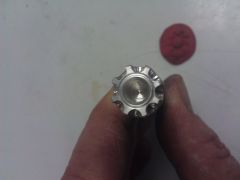
See, that's the kind of "I have no idea what you're talking about" I was hoping for! The yellow thing under it is a 24" ruler for scale. So it's prolly like 34" across.
-
Nope, tried that too. It makes no sense as an article of clothing with the 2 buckles in the center and not at the edges. I mean it MIGHT be, but it looks very well put together and I have a hard time believing it's this nice and doesn't close securely. My best guess is there's supposed to be another piece between the 2 ends of the buckle. I was just hoping someone would take one look at it and say "oh clearly you're not a _____, thats a _____!"
-
That's what I thought it was when I bought it, but the closure straps make no sense, they should be further out to the top and bottom otherwise it gets a weird pucker and doesn't connect properly. and the picture is actually upside down from how I would assume it would be worn. But then what are the straps on the bottom (or top...)? They would either be for like suspenders or...?
-
I got this at a thrift store several years ago, because I thought it looked cool, and thought it was some kind of a corset or harness. I have never been able to figure out what it's supposed to be. I don't ride horses, so I'm thinking it might have something to do with that. Ideas?
-
I didn't think about that, but the physics certainly don't lie. It's tight enough that it doesn't seem like its going to fall out without the snap, but I suppose a bit of bustling and leaning over, it would be safer vertical. And while I think rivets would have been easy enough to do back then, snaps would have been a lot more difficult. I think your first point is more to crossdraw vs. main hand draw, and I hadn't thought about that, but the swinging can be pretty slow, especially on a big heavy revolver like this. But my idea for this is more a compliment than a main weapon. If I were to wear this it would be in addition to my right hand holster which actually is vertical. This is something I've always been curious about, but hav e no practical experience with. Why are rivets weaker than thread? If a point on the thread becomes damaged that will affect the integrity of the entire stitch and have to be redone. Where if a rivet becomes damaged or popped, it will put more stress on it's neighbors, but the integrity of each one is independent of the rest. Obviously every leather holster I have ever seen has been sewn and not riveted, so I must be wrong, I just don't understand why. The costumes I'm making are not historically accurate to begin with, as it's mostly steampunk inspired stuff. So I'm not AS concerned with being accurate as some other people might be, I'm much more interested in being creative and doing what I think is cool. In fact, the fact that nobody makes angled holsters like this will be a boon to my wallet, because I know people will like these, and I will be the only one making them ;P I do like at least understanding the practical and historical significance, even if I choose to go against it. For instance, if materials cost played a large factor in why something never existed, that is a moot point to me, since I am making things for fantasy characters who could in theory have a limitless expense account. and since I doubt anyone will ever put a real gun in any of my holsters, the ability to draw and shoot something is less valuable than the ability to show off your cool gun ;P I actually have almost that exact cross draw on the left side of my costume now, and have seen that before. I was mostly curious about the drastic angle. I do think the next one I make will have a less severe angle due to the weight issue, and I find a long barrel sticking out so much is a target to catch on stuff. Any body remember "Wild Wild West" with Will Smith? there's a scene where he's asked to disarm, and pulls aside his coat saying "this gun?", and then quickly pulls a pistol from behind his back "or THIS gun" That's kind of what I was going for with this. Thanks for all the input
-
So, I picked up some Denix replica revolvers to sell on my website and at shows, and I thought I need to start making some holsters an rigs for them, to really give them that extra cool factor. I've looked at quite a few holster designs on here and learned quite a bit I think. I don't like sewing, because I'm impatient and I think rivets look much cooler, so a lot of the techniques weren't applicable. So this is the first ever revolver holster I have made. I just made it out of some scrap I had sitting around to play with, but after wearing it and drawing from it, I think I really like this design. It can be worn anywhere on the belt even at the belly or back for a crossdraw. What I'm curious about is why have I never seen an "old west" holster that looks like this? They usually always cover the barrel, is that for safety to cover the hot barrel after shooting? And they're almost always straight up and down, when this seems more comfortable to sit and ride with. The main thing I can think of is so you don't sweep your neighbors, which might be a social no-no. Of course, I'm making these just for costumes, so I'm not too concerned with historical accuracy vs. "looking like a tough-guy", but I find the draw to be quite comfortable and easy. And if I were the tough-guy I pretend to be, I'd like to carry like this. Am I just missing something and this maybe DID exist? Regardless, I just wanted to show off cause I was pretty proud of myself, and I'm sure there's more than a few people in here who'll gladly tell me why this would be terrible for real steel. ;P
-
Sure thing! I'm actually making a custom order for a bike mask right now so I'll just take pictures and post as I make it. The first thing is to cut out the basic shape. I made my pattern (through a lot of trial and error) by folding a piece of cardstock paper in half to make sure both sides were symmetrical. Then I cut out the base piece shown here. I'm gonna be caving some flames on it (free hand >.<), and I'll post some more pictures as I go.
-
Its called the "Uncanny Valley" ( http://en.m.wikipedia.org/wiki/Uncanny_valley) , although it more refers to when an image or creation is SO close to looking lifelike, but is just missing "something". This is actually closer to the opposite of that, where all the features have been removed or exaggerated to the point where you know its a face, but there is no legitimate reason to know that. It has eyes, and yet there are no eyes, and it clearly has a mouth/nose, and yet not at all. Its a very interesting part of the human condition that allows us to look at the mask and know its a face, even when it has none of the characteristics of a face, and that is unsettling in a different way then the Uncanny Valley. I would like to know what that concept is called. The canny valley? Its a similar concept that ancient warriors would use when going into battle, and why you see such scary disfigured monster faces on some "battle masks" and helmets. Or it could just be a coincidence because its defined to fit the contours of a human face so therefore it has the shape of one ;P
-
I don't know WHAT I would have done without the steampunk craftaid: http://www.tandyleatherfactory.com/en-usd/home/76605-00.aspx that came out about the same time I got into leather seriously! If you've never used a craftaid, I can highly recomend them. I just wish there was more variety, but they make for such a cleaner carving then if I were to try and hand draw or trace. And actually, jsut a couple of weeks ago, Tandy came out with some gear stamps I have been waiting for, for a while. They're not as amazing as I would have hoped, but they do still make adding a small gear here and there much easier than carving it out. I still think just wetting and "embossing" real gears into the leather makes for a prettier impression. You can't really see it that well in the picture, but here's an example of embossing on this belt: And if you look here: https://www.etsy.com/listing/110489580/steampunk-leather-rebreather-w-gear You can see what the new 3d stamp from Tandy looks like. I much prefer the carving to any of them, but the first one I showed with the carving took me like 3 times longer to make than any of the other ones >.< Those are the only ventilation, however, for me at least, they provide plenty. In fact some of the masks I've made have no holes, and I haven't had a problem with them. Of course, I have been wearing full face costumes and gas masks for years, including my most recent latex Predator costume for up to 8 hours at a time, so my tolerances may skew from the norm. The mouth mask does have snaps on the side so it can be unnapped and dangle offo ne side and resnapped within like 5 seconds, so even if you were to need some air, it can be gotten easily
-
Thanks! That was actually part of my goal. I do like the look of wearing the face mask OVER the mouth part, except it doesn't become quite as "seamless", because it flaps up a bit. It's not that easy to see in the pictures, but the dust mask part is removable with 2 snaps, and I have easily swapped out another one to show off at conventions. And then when tightened it sits snug right under the eyes keeping the whole thing from flopping, where it doesnt do that with the eye mask on top. I plan on making different mouth pieces too, like a plague doctor "bird beak", to give even more options
-
Some new top hat prototypes I made trying to figure out the whole process. This one is my favorite Some other pictures of them: https://plus.google....556300180684065 Do you guys have recommendations on lining them? 2 are made of a 3oz leather with the brim being like 7 oz to maintain it's shape. I think they like the best, but they get a little tight and the brim is a little hard. The brown one on the right is the most comfortable, but has absolutely no shape since it's made out of a soft upholstery leather. It';s actually got a cardstock tube inside keeping it's shape, lol. Hmm, should have taken pictures of the inside to show here... I should also give credit, that I took a lot of tips and info from here: http://tombanwell.blogspot.com/2010/01/steampunk-leather-top-hat-tutorial.html I didn't follow it verbatim, but it's the same basic idea.
-
Lol, "scary" is usually what I get... ;P I guess my mind is just in a creepier world than the average person. I had to get constant reassurance that I was "creepy" enough for the Halloween event, and I guess I was successful. It's not for everyone, definitely, but of course I don't think I'm ever gonna do a pair of saddlebags for a Harley with horse carved into them Thanks for your comments. I'm pretty OCD about having all my stuff be even and symmetrical, so I'm glad you noticed.
-
This is a work in progress, but I present the "beta" version of my modular face mask design! It consists of 3 pieces that can all be worn seperately or in any combination of each other. I have been costuming my whole life, and I have always tried to be as efficient with my costume pieces as possible, having them serve multiple purposes. So I try to keep all my designs as open, flexible and interchangeable as possible the next piece I'm going to work on is an aviator cap, to make a full head coverage. I'm using a retail one now, but there's no reason I shouldn't be able to make the whole thing. And check out my facebook for some cool pictures of a Halloween event I did recently with these where I represent "The Mad Hatter's Clockwork Army" along with a couple creepy mannequins. And if you wanna see more...
-
Some Of My New Stuff
Keeleon Ohms replied to Keeleon Ohms's topic in Collars, Cuffs, Leashes and Leads
Ya, the bottles are my most popular item, and sell really well. It's actually the design that made me get into all this leatherwork in the first place. I would see other people selling similar things and think, "I can do that and for nicer AND cheaper!" Of course now that I've really gotten into the "cheaper" is becoming less possible, simply because man this stuff takes TIME. I actually DONT oil anything, although the more I'm reading it makes me think I need to start messing with oil. Basically my process is design and cut out of paper, cut out leather, bevel and border, dye, assemble. At what point in that process should I be oiling? I heard someone will mention oil can take the squeak out of layered things rubbing? I also think my dyes and finishes come out kind of "flat". I really like that smooth glossy "supple" look some people have. I've tried resolene and super sheen, and they seem to work alright, but they also seem to want to make it all sticky and leave bubbles that I don't know how to get rid of. I've tried with brushes and sponges. Would oiling have any effect on that? I've heard of waxing too, how does that work? I'm not looking to armour/harden these things, I just want them to have that cool shiny finish some people seem to get. Those bracers were out of like a 5oz leather and I prefer the look and feel of like 9oz for that kind of piece, I just didn't have any and needed to make something for a show. and that leather gets really ugly when you try and bevel it for some reason. I am definitely gonna start trying out shaders and other things, since I am still brand new to carving. I picked up and read through the Al Stohlman carving tips booklet and I have a better idea of what tools I need. I just wish there were more "steamy" craftaids >.< I've added a couple more pictures of somethings I've been working on. The mask on the right has a finish I am really happy with, but the one on the left just looks "blech". Is that something that just happens with cheap leather? Or is there a way I can make it "pop" a little more? Pretty much at this point I am just buying whatever the cheapest vegtan Tandy has in stock, although as I'm starting to make money I'm starting to look at nicer vegtans so as to avoid the scratches and other blemishes. But there seems to be a drastic difference in the way the one thinner leather takes the same dye as the thicker leather. Also, here's some pictures of a steampunk themed Victorian Ball we went to this weekend. I did all of the leatherwork pictured https://plus.google....=CPOUnrXyktHDGw Thanks for the feedback! -
Steampunk stamp 2.jpg
Keeleon Ohms commented on TTcustom's gallery image in Our Leatherwork Galleries
 I'd also be interested in one of these if you were looking to sell them.
 -
Would it be possible to get a copy of this? the hosting is down and I've been looking for a corset pattern to tinker with.
-
Still pretty new, but I just recently did my first event, and it went great. People really liked my stuff, and I'm looking forward to making more in the future. Here's a few examples of my recent stuff I'm proud of. You can see some more of my pictures here: https://plus.google.com/photos/100186573419365785808/albums/5750042846997363777?authkey=CPHzmvG4g-zYTQ And here: https://plus.google....=CK3psvzRn8KFHw And my website: www.TheBrassWardrobe.com Lemme know what ya'll think!
-
So a friend and I have decided to try and start up a costuming company, and I thought I'd show off some of the stuff I have made lately. I hope just posting a link to my site is allowed, since that's where all the pictures are: http://www.thebrasswardrobe.com/home/products I'd love to hear any feedback you might have on any of my stuff. I've only been doing this "seriously" for about a month and a half, and I have seen some serious improvements in my own work. I actually consider myself an "artist" now! LOL I've learned quite a bit on this forum, and I plan on learning a lot more. I'm still having some problems understanding finishes and stains "resolene" and what not. I see other people's stuff, and I go "I want it to look like THAT", but I haven't quite figured out what dyes turn what leathers into what finishes. Definitely more an art than a science >.< Doesn't help thaT I seem to have a mixture of Tandy's old dyes and new dyes which are made differently I hear. I've also attached a photo of a belt I finished last night to take to Ren Faire on Sunday. I also made a pair of bracers, but I guess I can only upload one picture... Here's the bracers!