.JPG.4e1168cf7a6fb5a83ffe216cc6d17428.JPG)
Tim Schroeder
-
Content Count
768 -
Joined
-
Last visited
Status Replies posted by Tim Schroeder
-
Hi, Tim,
Just wanted to say I am a great fan of your work. It's some of the best I've ever seen on Leatherworker.net, and I am wondering if you can give me some tips.
I started doing leatherwork last fall when I bought a starter kit from Tandy, which included 8 weeks of free lessons. I am now thoroughly hooked! I moved in January, and that was the beginning of a long hiatus from leatherwork. I am only now getting into it again, and know I have a lot to learn.
Questions -
1) How do you get such remarkably smooth, even beveling? You'd almost swear your work was stamped rather than carved! I see you use a smooth beveler around the outside of your design, but what about on the inside of the carving?
2) Of course, due to time constraints in the leatherworking classes, we'd just moisten our projects with a sponge. Is Hidepounder's method of casing leather REALLY that much superior? What's the best way to tell if the leather is properly cased?
3) The finish on you work is absolutely first-class! Can you please tell this newbie how you achieve it? From reading your posts, I know you use Fiebing's dye, thin it and spray it on with an auto sprayer. In projects like the recent ones you did for your wife (computer case, etc.) how did you keep the dye off the areas you want to highlight? Did you use gel antique for highlighting the carving, or just let the dye stay in the cuts? And what is the order of the steps you use for dyeing and finishing your work?
Thanks for your time, and KEEP UP THE GREAT WORK!
Jane, in Ontario, Canada

-
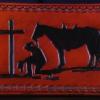
Yes spray the the tooling brown then brush and trimmed wool the black. The dye pen is 3/4" wide like a big fat marks a lot sharpie. You have to use a small brush on the background.
-
-
Hi, Tim,
Just wanted to say I am a great fan of your work. It's some of the best I've ever seen on Leatherworker.net, and I am wondering if you can give me some tips.
I started doing leatherwork last fall when I bought a starter kit from Tandy, which included 8 weeks of free lessons. I am now thoroughly hooked! I moved in January, and that was the beginning of a long hiatus from leatherwork. I am only now getting into it again, and know I have a lot to learn.
Questions -
1) How do you get such remarkably smooth, even beveling? You'd almost swear your work was stamped rather than carved! I see you use a smooth beveler around the outside of your design, but what about on the inside of the carving?
2) Of course, due to time constraints in the leatherworking classes, we'd just moisten our projects with a sponge. Is Hidepounder's method of casing leather REALLY that much superior? What's the best way to tell if the leather is properly cased?
3) The finish on you work is absolutely first-class! Can you please tell this newbie how you achieve it? From reading your posts, I know you use Fiebing's dye, thin it and spray it on with an auto sprayer. In projects like the recent ones you did for your wife (computer case, etc.) how did you keep the dye off the areas you want to highlight? Did you use gel antique for highlighting the carving, or just let the dye stay in the cuts? And what is the order of the steps you use for dyeing and finishing your work?
Thanks for your time, and KEEP UP THE GREAT WORK!
Jane, in Ontario, Canada
-
You dye the background with a small pointed brush. You dip the brush in dye then start in the middle of the area you are dying. The dye runs and stays pretty much in the background area. Then with the same brush now having less dye you can touch up the small spots where the dye didn't run. The outside I do with trimmed down wool.Trimmed from 1" down to 1/4" or so. I use like a 3" x 3" square and you can dye right up to the bevel lines. You will have to go around 2 or 3 times to get even coverage. Then with a small brush you go around and dye the beveled part. Dye runs pretty good and stays pretty much in the beveled area. Just don't try to put to much dye on at one time. Just dipping the brush in the dye lightly. Most pieces I make just have 1/2" outside the tooling and I will do the outside with one of Hidepounders dye pens. They are great and really work well.
-
-
Hi, Tim,
Just wanted to say I am a great fan of your work. It's some of the best I've ever seen on Leatherworker.net, and I am wondering if you can give me some tips.
I started doing leatherwork last fall when I bought a starter kit from Tandy, which included 8 weeks of free lessons. I am now thoroughly hooked! I moved in January, and that was the beginning of a long hiatus from leatherwork. I am only now getting into it again, and know I have a lot to learn.
Questions -
1) How do you get such remarkably smooth, even beveling? You'd almost swear your work was stamped rather than carved! I see you use a smooth beveler around the outside of your design, but what about on the inside of the carving?
2) Of course, due to time constraints in the leatherworking classes, we'd just moisten our projects with a sponge. Is Hidepounder's method of casing leather REALLY that much superior? What's the best way to tell if the leather is properly cased?
3) The finish on you work is absolutely first-class! Can you please tell this newbie how you achieve it? From reading your posts, I know you use Fiebing's dye, thin it and spray it on with an auto sprayer. In projects like the recent ones you did for your wife (computer case, etc.) how did you keep the dye off the areas you want to highlight? Did you use gel antique for highlighting the carving, or just let the dye stay in the cuts? And what is the order of the steps you use for dyeing and finishing your work?
Thanks for your time, and KEEP UP THE GREAT WORK!
Jane, in Ontario, Canada
-
Hi Jane,
I wrote a detailed description but it's not there now. When I added the pictures it covered it up.
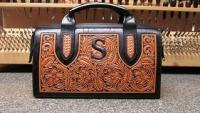
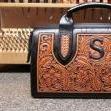
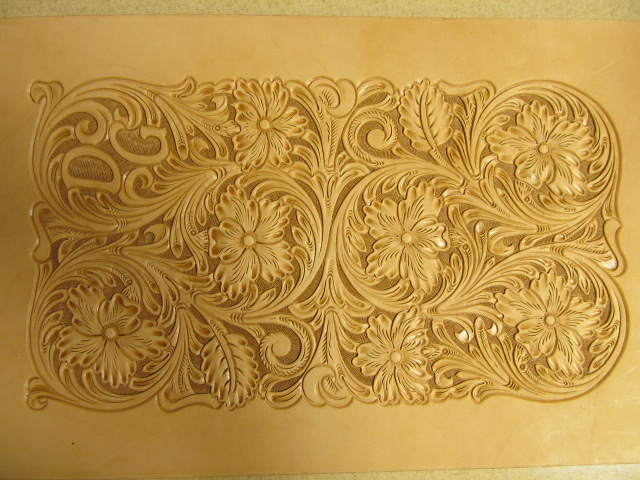
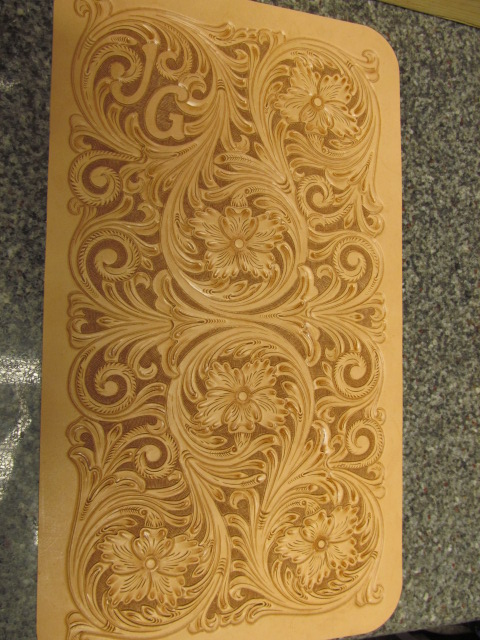
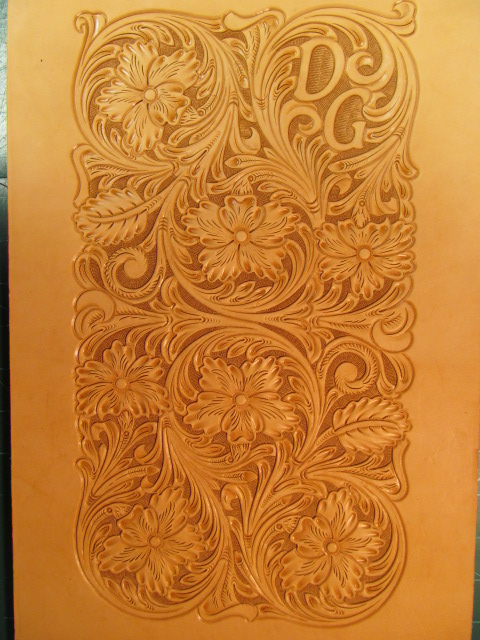
That color dye is Feibings Chocolate and Light Brown mixed 50/50 and thinned thinned 50/50 with Feibing's thinner. I spray the whole piece with the dye then dye the background and around the outside with black. You need to buff the dye with a piece of wool when it's dry. Then spray with Wyo-Sheen lightly and let dry 20 minutes then spray again both coats light. Wyo-Sheen is a Lacquer based finish. You can put it on thick but is to shiny for me. I am only trying to keep the Feibings Antique Finish from sticking to the tooling. Then using a piece of trimmed wool spread the Antique finish over the whole piece. To leave a lot in the depression I wrap a damp T-shirt around a flat block of wood and wipe off the excess. Most of the time I will take the Wyo-Sheen off the outside black with Tandy's Deglazer. This make the black a matte finish or flat no sheen. Thin using trimmed wool wipe Tandy's Eco-Flo Satin Sheen over everything let dry and buff with trimmed wool. By trimmed wool I mean taking my shears and cutting the wool from 1" thick down to 1/4" or 3/8".
Thanks Tim
-
-
Hi, Tim,
Just wanted to say I am a great fan of your work. It's some of the best I've ever seen on Leatherworker.net, and I am wondering if you can give me some tips.
I started doing leatherwork last fall when I bought a starter kit from Tandy, which included 8 weeks of free lessons. I am now thoroughly hooked! I moved in January, and that was the beginning of a long hiatus from leatherwork. I am only now getting into it again, and know I have a lot to learn.
Questions -
1) How do you get such remarkably smooth, even beveling? You'd almost swear your work was stamped rather than carved! I see you use a smooth beveler around the outside of your design, but what about on the inside of the carving?
2) Of course, due to time constraints in the leatherworking classes, we'd just moisten our projects with a sponge. Is Hidepounder's method of casing leather REALLY that much superior? What's the best way to tell if the leather is properly cased?
3) The finish on you work is absolutely first-class! Can you please tell this newbie how you achieve it? From reading your posts, I know you use Fiebing's dye, thin it and spray it on with an auto sprayer. In projects like the recent ones you did for your wife (computer case, etc.) how did you keep the dye off the areas you want to highlight? Did you use gel antique for highlighting the carving, or just let the dye stay in the cuts? And what is the order of the steps you use for dyeing and finishing your work?
Thanks for your time, and KEEP UP THE GREAT WORK!
Jane, in Ontario, Canada
-
Hi Jane,
Thanks for the compliments. I would be glad to help any way I can. Thank God Hidepounder was willing to help me. I tooled a wallet cover everyday for a week while looking at his stuff until I got better. Drawing is a issue too. I have Hidepounders book on that too.
I get the smooth beveling from walking the bevelers , moving them as I strike them. You have to think of it more like a machine. The beveler never stops moving and you just keep tapping them quickly. You don't have to strike them very hard. The swivel knife cuts should be half as deep as the leather is thick. The bevelers will bevel down to that depth pretty easily. I tool a lot of 2/3 oz. and 3/4 oz. leather and it works the same. Those computer cases are done 5/6 oz. I also have every smooth beveler Barry King makes. 7 different sizes in straight bevelers, 4 sizes of inside round, 4 sizes of outside round and 4 sizes of under cut bevelers that do the the inside of the flower tips. They lift up the spots between the shaders (thumbprints) to create more depth. I don't use the outside bevelers very much, I use the biggest straight beveler that fits. All of my bevelers and thumbprints (shaders) are smooth. I always use the biggest beveler I can. After I bevel the outside lines I will take a modeling spoon and smooth out any beveler marks. After backgrounding I will also use a modeling tool to smooth the pedals into the stems where the backgrounding tool stops. That really cleans up the tooling and smooth all the inside curves. You can clean up a lot with modeling tool. I use Tandy's modeling tools, mostly the one with a big spoon and and a medium spoon. Most of my beveling is already smooth but I still use the modeling spoon on a lot of it. You will see when you get the walking action down. The modeling spoons can be used to straighten up your initials and anything that doesn't look rite.
Casing the leather is on of the most important steps and is key to getting crisp clean smooth looking tooling. I use Hidepounder's casing and beleive it is critical for good tooling. I fill the sink half full and then pull the leather thru watching the air bubbles as they come out of the backside. You don't need to wait till the air bubbles quit coming out but almost. Then I lay it out for 30 minutes letting it wet evenly thru the whole piece. Then put in a plastic bag or lay a piece of glass over it for at least 14 -24 hours. Take it an hour or so before you want to start because it will be way to wet. I will usually wait an hour or so then put it up to your cheek and you can feel how wet it is. It should just feel a little cool not wet. When you are able to slide it on a piece of granite with out it sticking it is ready to trace your pattern. After tracing, if the lines are light and hard to see it is to wet. The lines should be dark and very visible. I copy all my drawings onto regular copy paper and use a different color ink pen to trace the lines so you can see what you have traced. If the paper gets wet the leather is still to wet. The paper will always get damp but not wet. On big drawings I will put the pattern on the leather and lay a piece of glass on it for 5 minutes. If the pen is going thru the paper the leather is still to wet. I don't wait until the leather is all the way back to the natural color but almost. You can cut and bevel with the leather still just a little darker than its natural color. It should feel a little firm not mushy. Tooling with the leather to wet will make it stretch and pucker up. So casing is very important to good tooling. Like I said before, when you touch it to your cheek it should feel cool not wet. Dark lines after tracing tell you if it is ready to tool. When you start beveling the bevelers should leave dark burnished looking marks. All the tools should be leaving dark burnished looking impressions. If not the leather is to wet. When you are tooling big pieces like the pictures I included I cover up everything except the area I am tooling. I would cover about 60% of the pieces while tooling. If the leather starts to get to dry then spray the back lightly and let sit for 10-15 minutes and go back to tooling. If you have to add water after you start you tend to loose some of the color the tooling.
I am getting ready to start making some really cool looking Cowboy style boots with tooling. I will be posting some pictures in Jan. sometime.
Hope this helps and if you have any other questions fell free to ask.
Thanks Tim
-
-
Tim:
Your boot work is outstanding. I'm wondering what sewing machine you are using, especially for the doing the sole stitches. Can you let me know? Any other specialized equipment you're using, as well? I'm interested in making myself some boots, but have a feeling I may not have the gear.
Thanks!
-
Hi, Making boots are all about technique. I watched a bunch of Lisa Sorrell videos and a few other peoples to learn the process and then built a few pairs. Hands on experience is the best way to learn. Making them for yourself you learn how to measure a foot and make a boot that fits. I built the first one out of some upholstry leather just to get an idea of building a boot.
You need a curved awl to sew the inseam. I bought one from Thornapple but Panhandle leather has Osborne awls. Lasting pliers I bought of Ebay. I get all the materials from Panhandle Leather. Insoles, soles, heel counters, and any other supplies.
I use a machine that is a triple feed for most of the uppers. It is the same as a Cowboy Class 18. I had to use a Singer 153K103 in a few spots. It is a Triple Feed cylinder arm machine. I had to take these boots to a local shoe repair for the sole stitching. He uses a Landis 12 model K. I have a Landis 12 Model l but I am am just now getting it going. I still need an adjustable edge guide to be able to run two rows of stitching. There is no doubt that you could hand stitch all of the uppers.It would take more time but possible. Hope this helps.
Thanks Tim
-
-
Been away from the craft for a while...nice to be getting back in to the swing of things. Had a bad case of lackofmoneyitis, and still dealing with tendonitis in both elbows, but glad to be back.
-
Sounds like a drag. I've been suffering from a case of rectalretnopothy. Hope I get over it soon. Good Luck
-
-
alot - is not one word
-
I like it when someone makes an ass out of them self while trying to make an ass of someone else.
-