

Boriqua
-
Content Count
941 -
Joined
-
Last visited
Everything posted by Boriqua
-
Just received their eflyer with this machine and wondered if anyone had anything good or bad to say about it. I had been eyeballing a tipmann for the longest but the tandy has a deeper throat and might be worth looking at. Any thoughts? https://tandyleather.com/pages/cowboy-outlaw Alex
-
Thank you so very very much Fellows. Forum never lets me down!! Alex
-
It appears tandy has given up on stamps. Their website was bare. Does anyone know where I might find the border tool that made the meandering line on this holster. Had some Xmas money I want to spend on building up my stamp tools but cant find it anywhere including the etsy shops. Thank you in advance for any insight or leads. Alex
-
Day of Dead Insprired Bag
Boriqua replied to Boriqua's topic in Purses, Wallets, Belts and Miscellaneous Pocket Items
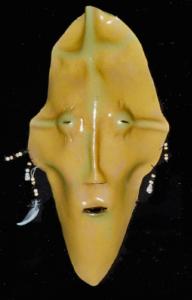
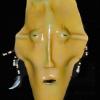
My motorcycle saddle bag on my bike is built in a similar fashion but has wrap around straps. The interior is boring with only a phone pocket at the back. I did dye it though. So except for the black which is just fiebings Pro and the white the prettier bits were done with Tandy ecoflo. I wont use it for large areas but I have come to really like it for painterly stuff.It blends nicely. I start with a 50% dilution for the red using "scarlet red" for the roses then I bleed in my shadows in the bevels and indents by mixing some scarlet red straight with Forest green and then I use 100% scarlet red for the bridge. Its hard to pick up in the photos but edges of petals and where ever I thought appropriate I let the 50% dilution be the highlight by bring the full red up to it from the brownish color. For the leaves I start wtih ecoflo yellow at the highlights, a 50% dilution of the forest green which I use in washes like you might watercolor .. which is basically what this is and then come up from the deepest spots with 100% forest green. At the end I did a touch of Forest green and red in the very deepest recesses but I did it dry brush for just a touch of flavor. Yea .. I got carried away!! The little flower on the chin is washes of diluted violet with washed out yellow highlights. The whole thing is then sealed with a sprayer shooting 50% resolene and water and any exposed edges I treat with a paint brush and supersheen. Here are some color pics if you havent tried this stuff and want to copy. Its not great but .. they client liked it and it was really a bit of fun since I spend most days making holsters. Dont treat it like paint but like water color. Fades and washes until your happy and the best part is since you build it up .. its hard to mess up!! I know everyone says it!! but the pix really dont show off the color shifts well at all. The light and camera just kind of make it one color. Those roses are SOOoo more juicy. -
Day of Dead Insprired Bag
Boriqua replied to Boriqua's topic in Purses, Wallets, Belts and Miscellaneous Pocket Items
The white is referred to by the manufacturer as Acrylic painters ink. I have used a lot of acrylic in my life.. its just acrylic. What I do is I dilute it way down. My first few passes has almost no pigment but it begins to get into the leather and work like a primer. As I build up I will dilute it less but its always pretty dilute. I havent found a better way to get a good flat finish with acrylic. Each of those white areas has about 6 coats. I could have sprayed it but I would have had to do a lot of masking and I found when I spray the acrylic without doing several passes of really dilute acrylic its not as durable. -
Day of Dead Insprired Bag
Boriqua replied to Boriqua's topic in Purses, Wallets, Belts and Miscellaneous Pocket Items
Thanks brother! I have to make the time to come around more often. That is also the first piece I did totally with dyes and no stain. So all the shading and highlights were the result of careful painting. It was time consuming but the results were so much more satisfying. I remember how much you love stain .. NOT! It was a commissioned piece and I think AZ is more into Day of the Dead than Mexico. -
Haven't posted in forever but have been lurking about. This is a recent project and a good bit of fun. Its about 14" wide by 12 " high and a 3.75" gusset.
-
So it turns out he loves it!!! Sent me this pic
-
Angelus dyes are so juicy because they have a ton of pigment. I absolutely love their jet black but unless you cut it some you will be buffing until your eyes bleed. Even their cordovan requires a bit more work than Fiebings cordovan but I like the color better. I have no problem with Mahogany and brandy though so its color specific and not all angelus dyes are a pain. Here is my 2 cents and worth about that much Leave your piece alone after dying at very least overnight. I did not have the same success cutting Angelus dye with denatured that I did with fiebings so for me it was worth it to buy the Angelus reducer for the colors that need it like the jet black. Use a throw away rag as your first couple of passes. I keep all my old tee shirts and such and have a container of them in the shed. Soil one up toss it and then use another. My wonderful wife cuts them into smaller pieces for me. You can final step with the sheep's wool and tandy sells a fair sized bag of remnants for cheap. I still have some from the last bag I bought months ago. https://www.tandyleather.com/en/product/sheepwool-remnants-4-oz
-
I love my round knife but when I reach for a knife to trim one piece to another I use my Fairly inexpensive Kiridashi. https://www.ebay.com/itm/Japanese-OKEYA-Kiridashi-Kogatana-Woodcraft-Knife-Hammered-Blade-Left-Handed/381797595256?hash=item58e4e8f878:m:mBzArzR6jzw-euOiaUWfjTA Mine is white steel and so long as you strop it before every use it stays mind blowing sharp. This is my go to for matching a back of something to a front. I usually oversize the back of my holster to the front, glue and then trim. I use the left handed version which when used in a draw fashion has the flat facing away from the work and the steep bevel against the work. So why do I use this over my very nice and sharp round knife. I have found my Round knife can, if not really really careful, ride up onto my face piece and potentially ruin a good deal of work. With the kiridashi I pull the knife around the top as my guide and there is little danger of it riding up. The left hand version with the steep bevel to the inside is perfect because you naturally tilt your hand to the right when cutting which actually makes the cut right up flush to the top piece. A little sanding and its done.
-
Chased, Walked .. one and the same... I can see where the bevel tool looks like an individual stamp so the method you are using isnt being walked. I dont know .. maybe there is another term. It is one of the hardest things I ever learned in carving and ...... I still suck! There are many threads on how to use the bevel tool and I think its covered in one the the Stohlman books. I find the most satisfying method is to get a machine like rhythm So that when you are beveling it is tap move tap move tap move as you go along. I get my best work when what someone would hear if they were next to me is Tap, tap, tap tap in a somewhat rapid and even cadence. Think a slowed down sewing machine In the early days when I would hit the beveler then move it and then hit it again deliberately I would get the same kind of individual bevel marks I see in the piece you posted. If I had to guess I would say because they overlap isnt right and its hard to hit with a very consistent force when you hit it ..... move it .... set up the tool ... and hit it again .. so you get more varied bevel marks. Hope that made some sense but if not look up beveler here and there is lots of advice.
-
Ah so thats it!!! Football. I couldn't figure out what the significance was but he expressed how important the orientation of the stars was.
-
Sheath For My Custom Karambit
Boriqua replied to Chief Filipino's topic in Gun Holsters, Rifle Slings and Knife Sheathes
I wish I could share them. My father was gifted and would collect wood and such from the empty lots in the Bronx and make wonderful sculptures. He was also a fine painter. His drawing skills brought him here to be an illustrator but his best stuff was the stuff he did from his heart. He was born and lived most of his life in the mountains of Puerto Rico. I am a citified brat born and raised in NYC. I grew up in a world of order and grey. I think he was just in touch with something I am not going to get. My adult life has been about creating for others so I slavishly try and watch the details. Even in my painting and other artistic endeavors I am a little to rigid and so will never be a really good artist. 6 yrs of art school and 18 years in design and production of exhibits just means I am a art "Contractor" I may have to disagree with Bill's suggestion but with a caveat. I think the work is beautiful as it is. I think those two lines running perfectly parallel would ruin it for me. The errant cut is distracting because that is a skill thing and not an art thing but I wouldnt change those lines at all. So the caveat starts with a question. Are you trying to become an accomplished carver in the strictest sense? If so then Bill is dead on. If you are trying to create unique practical art .. I think your there and it would be lessened by the carving getting much tighter. Practice your skills so that strange cuts dont appear and even stitch lines are a peeve of mine but the carving and the quality of it I think is wonderful. I have produced all sorts of public display but if I could do this below I would be more thrilled than any of those pieces I made for the masses. -
Sheath For My Custom Karambit
Boriqua replied to Chief Filipino's topic in Gun Holsters, Rifle Slings and Knife Sheathes
I LOVE the tooling. My father was great with what I I will call primitive style patterns. Its a gift I don't seem to get the hang of. I am Jealous .. your piece looks fantastic. -
I like it when a customer gives you a thread but not so much an ending. I didnt know this but there is a Tennessee orange? I dont know if it associated with a school or the state seal but its a thing and I have one guy who is very into it being from Tenn. So he sent me this And it is some important Tennessee symbol at least to him and told me he had a new gun and could I do something with this. He is a repeat and I love my repeats .. says they were happy with my work!! and I do get a great source of pride when you come back so I said ... sure. So I made him this .. its simple but I think he will like it. Its orange lizard on a simple black. The orange is a lot juicier and nicely textured but my camera refused to give it to me.
-
yea .. I will second what mike said... and I learned the hard way. I give customers a minimum of 2 weeks but likely 4 and sometimes they ask why so long and I explain that its all about curing times. If I stamp it or carve it ... it sits a day, If I dye it .. it sits a day MINIMUM ... and I live in one of the driest places on earth. I buff it to hell and then I seal it .. I WILL NOT put it in a box to ship for at least three days. I have a mess of wire hanger hooks I made and a shelving system so I hang them up and they sit. I have developed a certain sensitivity to when the surface feels fully cured. Its kind of a bummer because I am usually at least as excited to send out my projects and get the customers reactions as they are about getting it but .. with all the work I put into everything, should the paper I wrap it in get stuck to the finish because I didnt allow it to cure I would be heart broken and .... I would have to make good and take hours making a new one. I used to have a terrible time with rubbing until I realized I needed to let that dye dry proper before applying seal. On to other things .. the sheath is freagin awesome! Nice work! I dont know how long the knife sat on the table but it looks like it was in direct sun. Has anyone tried a paste wax. I would be afraid to use say a spray on polish like favor because it has cleaning agents but a straight wood wax might restore that.
-
I always cut in my line with 1/4 in swivel blade. For that technique I prefer the Square cut one and not the 45 angle for this as I can cut lines a bit straighter and get more blade in for a bit more exaggerated width. I have two smooth store bought bevelers, a b200 and a b935. The B935 is thinner but much steeper than the b 200. With my cut made I put my beveler in the cut and draw. If you want more just go back to the top of your line and draw again until you are happy. I get nice clean bevels with this method. I also made a tool from some brass rod that will bevel both sides of the cut. Same deal .. but a nice cut, fairly deep is needed to hold the tool. Then I just press and push until I am happy.
-
A few things to suggest .. first .. your cuts and beveling can use some work. The beveling doesnt look like its being chased so its uneven. Antique will highlight all the good stuff .. but also some of the stuff we may not have been thrilled with. I like to use the Fiebings Acrylic antique and I use it all the time and have for years. I like the paste as well but the learning process is a bit more involved to get really good results in my experience. Now the antique is going to impart some color to your smooth leather because it has grain. The tighter the grain the less color will be imparted so sometimes its about the niceness of the leather used. Having said that the amount of sealer you apply before staining is really key to controlling the result you are looking for. If I want the smooth sections to remain really clean I put more sealer up front. Sometimes however I am looking for a heavy "streaky" kind of stain job for a particular project or I have a color I want to deaden and know how much sealer to put in order to have the color impacted more by the stain. I wanted this one to be fairly clean but I start with oxblood as my base color and it can be to bright so I adjust my application of resolene so I get clean but still allow the stain to darken the oxblood The one below i wanted it to feel like it was old .. like an old book might look after a lot of handling so .... less seal and less removal. Here is my procedure and there was A LOT of trial and error that went into it. I spray sealer, 50/50 resolene to water on my item again with a thought to what I want the final product to look like. If there are areas I want to really resist more than others I may go in with a paint brush and apply a second or third coat just on those areas. I wait overnight before I stain it. In my learning process I found if the sealer wasn't fully cured I would get weird ugly things happening. When I am ready I have three small sponges and a paper towel ready. You can take one sponge and cut it into three pieces. I lightly dampen my three sponges. Run them under water and then squeeze them out until no water comes out. I apply the stain either with a dampened sponge or a large soft paint brush. I have been using the brush more and more for control. I apply the stain over the whole area and wait until it starts to set up. Usually about 5 minutes. Now being sure to keep my sponge square an flat to the surface I start removing the stain. I use one half then the other then flip so each little piece of sponge gives me 4 passes. By keeping it good and flat you can remove the stain from the flat areas while still leaving it nice and rich in the indentations. As the final step I take the paper tool and fold it into a square and buff like I mean it. It removes the last remnants of stain on the surface. Done. The next day I hit it with a light seal and call it a day.
-
I will throw my hat in with some of the others and suggest a heavier tool. Of course you want to grip the stamp tightly and work on a surface that doesnt bounce but I find with a light hammer you have to strike it a few times or the hammer itself bounces. My maul is a touch under 2lbs but I have worked quite well with the 1lb garland. Once you set your stamp in place .... give it a WHACK! Being tentative about it I find is the worst culprit to shifting stamps and ghosts.
-
Barb wire long wallet.
Boriqua replied to Mattsbagger's topic in Purses, Wallets, Belts and Miscellaneous Pocket Items
That is really sharp looking!!! Nicely done What awl are you using for the 8spi? -
Lets talk about WOW factor in leatherwork.
Boriqua replied to immiketoo's topic in Leatherwork Conversation
I build for me first and the customer second. I am my own worst critique and have restarted projects due to flaws I know would never have been noticed by the end user. I like to look at work I think is superior to my own, which is very easy to find, because my personality is somewhat restless and I know I would grow very bored if I weren't always trying something new and to push on bounderies. Sometimes I see something and don't think it is superior work or not even comparable work but am intrigued by how they did this or that and pursue it just for sport. Lately I have been working on some pyrography .. I am pretty sure its not a marketable item but its something new. I think wow is born of your own integrity to the Craft side of building first and secondarily the decorations you choose to embellish your work with. Luckily for me most of the people who come to me want outside the box type stuff so its easy to stay entertained and engaged .. Is my work WOW ... nah Im still working on it!! My real life before now was spent designing and producing large scale exhibits. In that role I managed a large group of carpenters, scenic painters, technology people, sculptors and everyone else involved with production. I once had a carpenter tell me after I commented on a 1/4" gap in his work "We're not making watches here. no one can see that from space" .... It was his last day! -
You can still do it exactly as described. Fold it forward, Go back about 3/4 inch or more and make a line across at that measurement, Skive from that point at full thickness down to zero, Glue it down to the back well. sew accross or you could just sew part way in from the open area at the spine. Lay down your welt and face piece and sew as in the picture being sure to go over the glued belt loop on the blade side. Done
-
How did you get into leather work?
Boriqua replied to Rolandranch's topic in Leatherwork Conversation
Wow wow wowwwwwww ... Mike that is some amazing carving!! You may have inspired me to do some carving this week just because!! -
I just purchased a second 1 5/8 osborne oblong punch after cracking my old one due to my own negligence. The one I received has a round shank. All the pictures I see including the one posted by the seller have a hexagonal style shank While I dont care about the shape of the shank but what I do notice in many of the pictures is that the ones I find with the hexagonal shank seems to have a nicer taper. My own recently broken one was a round shank and it had a horrible taper that had way to much meat behind the edge and made it difficult to sharpen and use. Is there a first and second generation oblong punch? I think I want to return the one I received. Thank you for any advice Alex
-
Hey Jason I wouldnt regard stitching over the top a mistake or fix. I am not sure how I decided it but sometimes I stitch over the top and sometimes I dont and I dont think either is wrong or right. It is usually an on the fly call like you did regarding construction and how I feel about the attachment but truth is like most of us ... if I didn't feel good about it I would start over even if I had a bunch of time in it. I dont however cut back my welt to accommodate the belt loop. I see you are leaving your "flip over" piece a little thick at the edge. I bring mine to zero or close to it.I then go over that with the welt and front. It doesnt really add a whole lot of extra space but I think it makes it a bit easier to sheath you knife if for not other reason it pitches the opening forward a small amount. Anyway ... if it is useful to anyone .. I found the close ups I skive the rough side so I get a good rough side to rough side glue joint before I stitch. I know for a fact that that one has been used on hunting and camping trips for over 6 years.