


nickhaprov
-
Content Count
6 -
Joined
-
Last visited
Recent Profile Visitors
1,103 profile views
-
 nickhaprov changed their profile photo
-
Ok thanks, I’ll give it a try that way
-
Hi there, looking for some advice on airbrushing RTC Sheridan resist and finish. Have tried looking for info but can’t seem to find much on it. When airbrushing it does it need to be cut with water (50/50 like resolene) and would be about the same psi? Gave a full strength light coat, and let dry for about 3 hours before applying a second coat and after 2 days is still tacky. Should it need to sit longer? It’s for the internal pocket pieces on 4/5 Oz veg tan The pieces were dyed with fiebings pro oil dye, sat overnight then buffed, light olive oil applied and then sat overnight again and buffed once more before airbrushing the RTC finish on. It has been warm and dry days with cool nights here in New Zealand and the items have been kept indoors. I’ve airbrushed because of different colour dyes on the same piece and am hesitant to wipe the finish on in case of dye run? Any advice or recommendations would be much appreciated. cheers!
-
Dwight, have you made cheek risers before that have gone on the outside of the stock wrap and been stitched as well?
-
Thanks Dwight, would you happen to have any photos of the process? Thanks
-
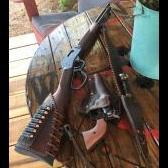
Hi there, I’m wanting to make myself a stock cover for my rifle and am after a bit of help with how to go about it, normally just do belts and the like so this is new territory for me. I’m wanting to stitch on the diamond shaped bit as a bit of a cheek riser but it seems that the leather main part when it folds around the stock pulls a bit? Just wondering how that would work after the piece is glued and stitched on? Would it be fine to assemble it all together after tooling and be good to go? Would it best to dunk in water and then wrap? Or would I need to tool the main part, put that on the rifle, then put the diamond shape on and mark for stitching and try to do it after the leathers curved on the stock? Tried looking a bit but might not be searching correctly. Any advice would be much appreciated as leathers a bit pricy in NZ. Will be using 7-8oz leather. Thanks! Below is what I’ve got in mind
-
Hi all, so I've looked around and tried to find some information on how to dye leather multiple colors but haven't really found much. I have read up on resist dyeing with antique, but what I was wanting to do was 3+ colors. Attached are pictures of what I am wanting to do. I have fiebings oil dyes (black, dk brown, saddle tan) and arcrylic resolene. I haven't purchased the antiques yet as I wasn't sure which colors I would need. I'm guessing the steps would be apply resist for natural, allow to dry, paint black oil dye to desired areas, allow to dry, rub other areas with dark brown antique or apply brown dye? What would be the best way to go about doing this? Any information or if someone could point me in the right direction would be greatly appreciated, thanks Nick