


BDAZ
-
Content Count
956 -
Joined
-
Last visited
Posts posted by BDAZ
-
-
Great. As soon as I have the first dozen finished, later tonight, I'll be able to work up shipping costs.
Bob
-
3 hours ago, CowboyBob said:Hey Bob ,I just got the samples you sent , they fit & work great!
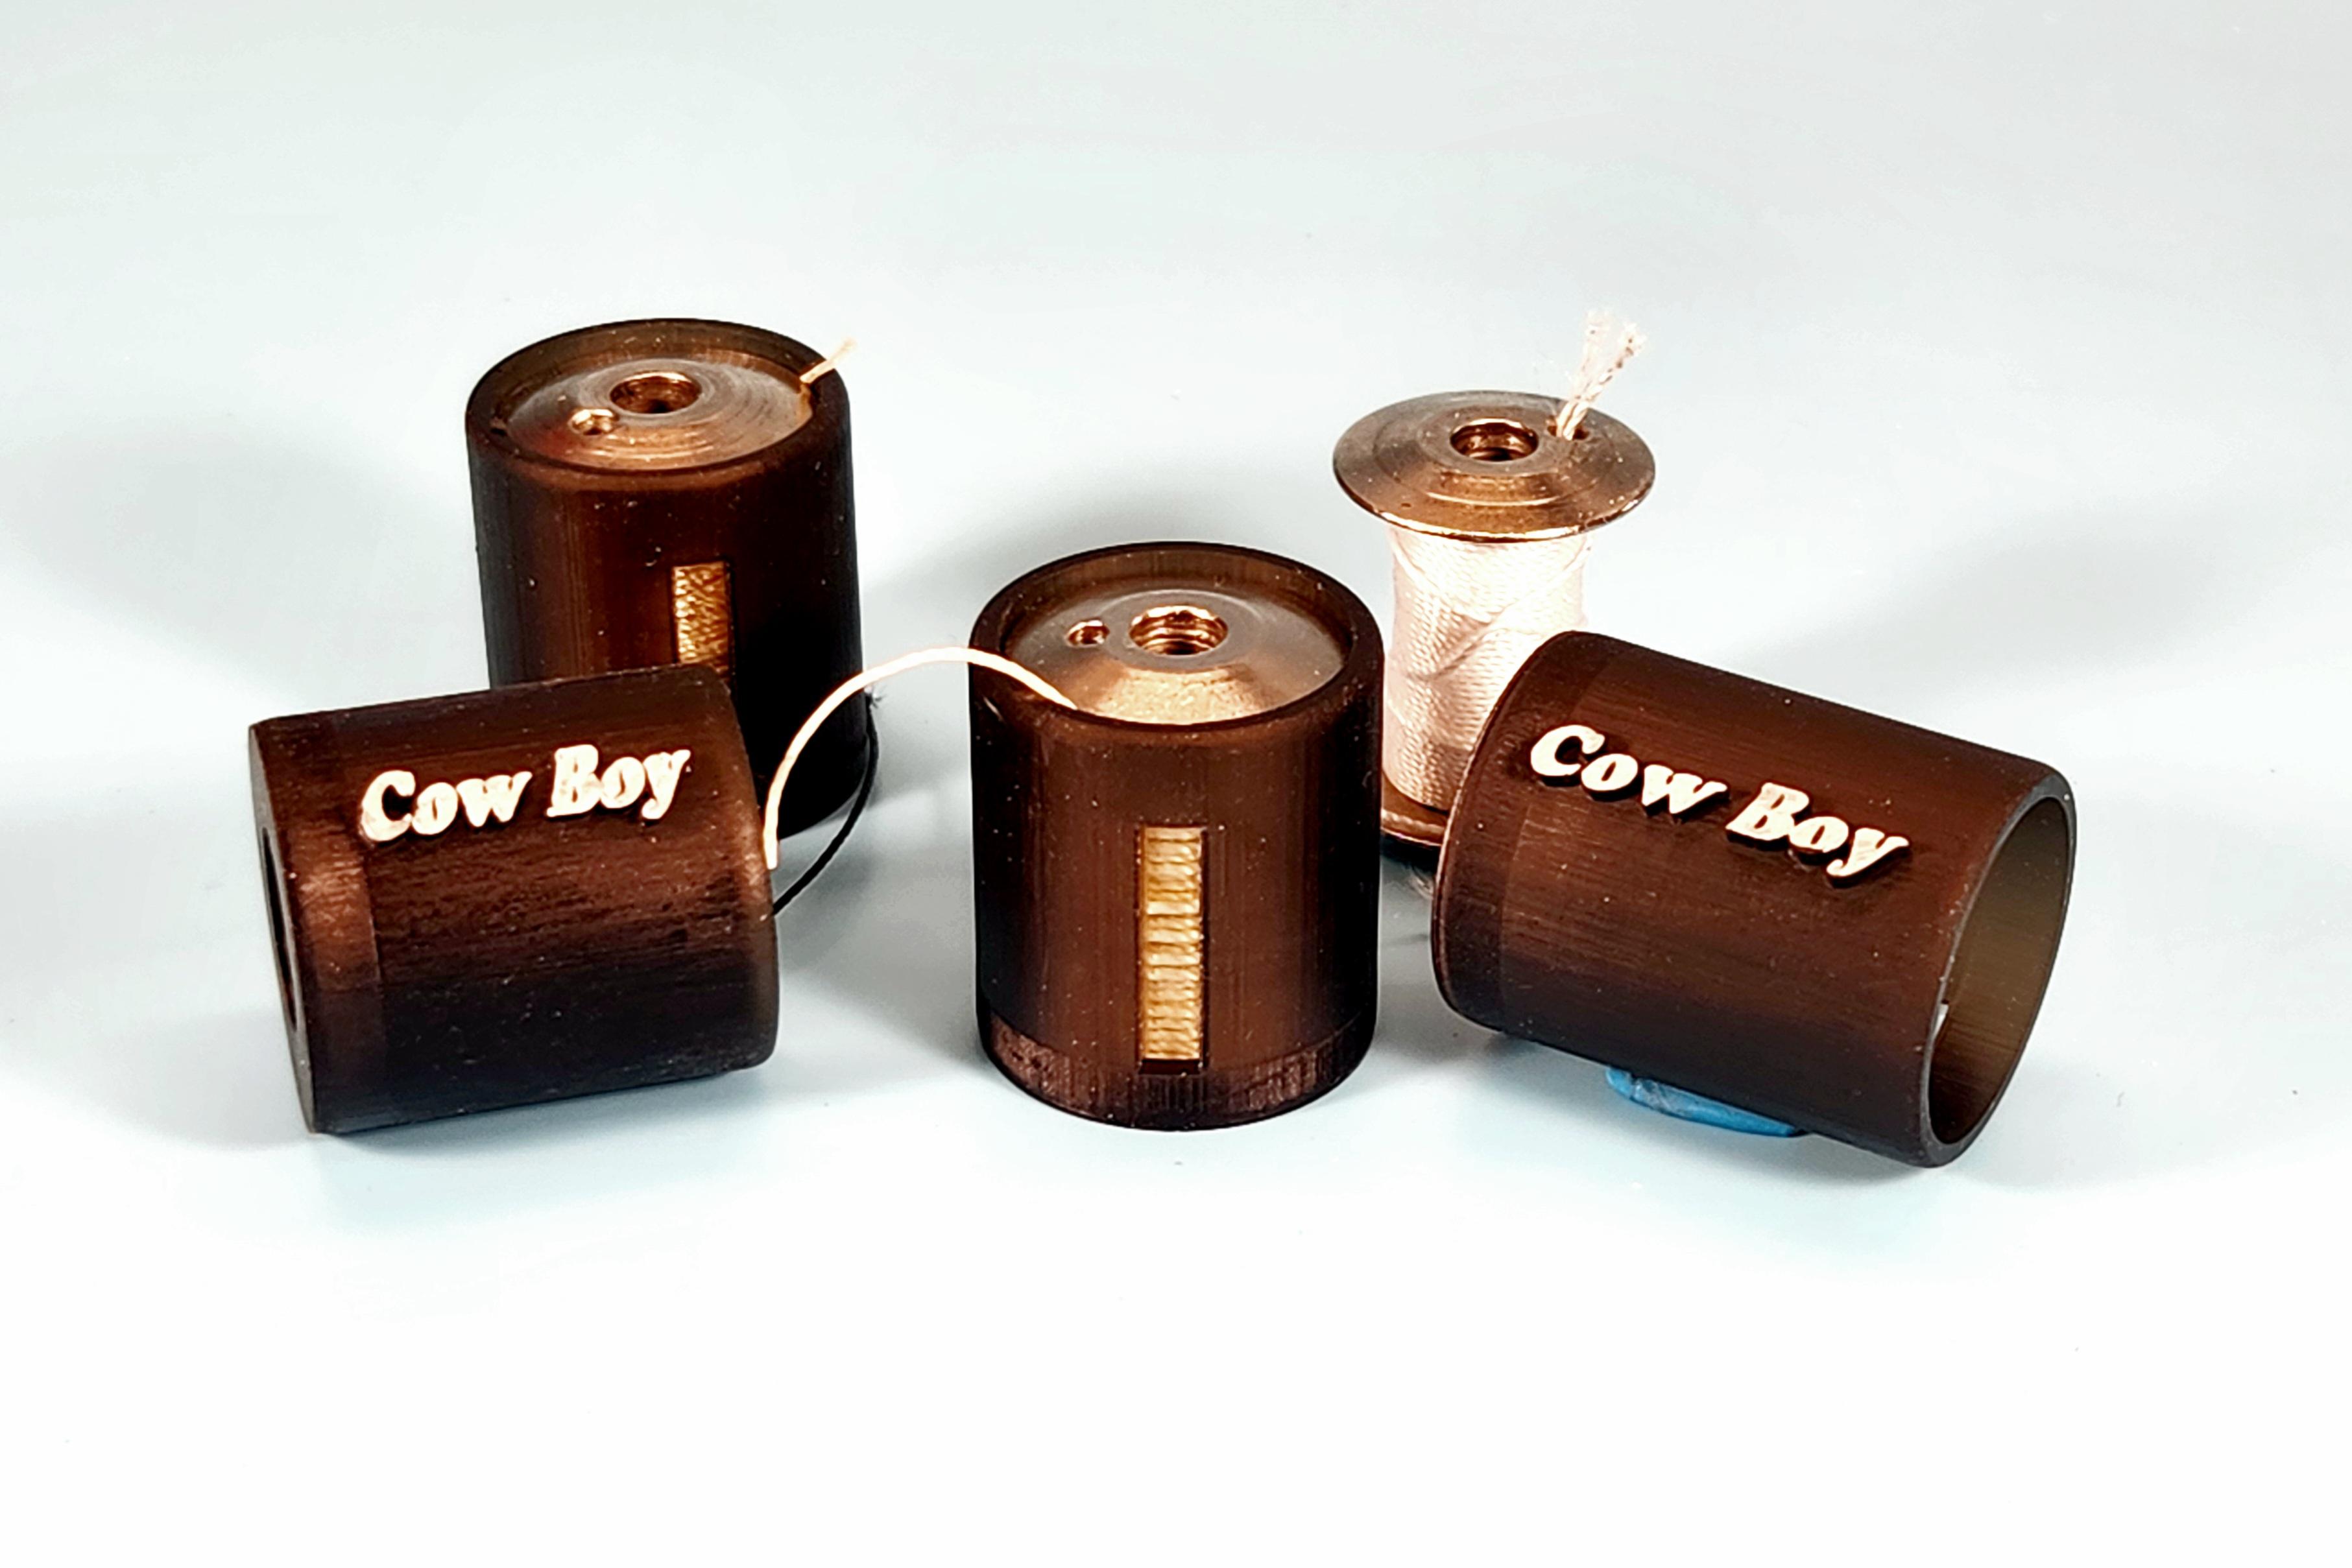
Excellent! I have started printing Bob's Bobbin Caddy production versions made from transparent resin and with a slightly (.025mm) smaller for a snug fit. They have certainly cleaned up my thread drawer on my 3200 from the bird's nest it used to be. You can write on the flat panel with a sharpie with thread size, etc and remove it with IPA.
Take care,
Bob
-
Wonderful! That's where I got mine, 10 years ago!
I have just received some transparent resin and I will do a test print tomorrow to make sure it works well and probably post the results tomorrow. At the same time I'll finalize the pricing. I'll work up a dozen price as well as singles.
Thanks!Bob
-
Haven't a clue. These fit 23.77 x 30.36. Size is easily adjustable
Bob
-
On 6/4/2024 at 12:00 AM, fredk said:Are they 3D printed?
Yes indeed, using an 8K resin printer
On 6/4/2024 at 2:54 PM, Hildebrand said:looking forward to ordering a few when you get it finalized and up for sale
Todd
Pretty close. Just deciding on what color for the production run. Possibly white or yellow.
-
1 hour ago, CowboyBob said:Looks like a great idea!
My 3200 is one of the best things I have ever bought. Hasn't dropped a stitch in 10 years. Mine must be an early one, as it doesn't even have a Cow Boy sticker! Somehow, it seems to work perfectly, even without one...
I'll fire off a few of the final holders for you to have a look at. I am assuming they fit current spools..mine are all 10 years old as well.
Bob -
15 minutes ago, jrdunn said:Fancy! These are what I use. Like me, cheap.
https://www.amazon.com/dp/B073NXF8XZ?psc=1&ref=product_details
Nice but these are only for the bobbins. The larger spools are a different and simpler problem. I just use a wide rubber band.
-
I'm just doing some final tweaking so I have some extras. If you'd like to play with a couple and want to pay for postage (+-$5) let me know.
Bob
-
Nor sure if anyone else will find these useful, but the drawer where I tossed my bobbins when changing thread, after filling, etc was a bird's nest of unravelling thread, broken rubber bands and unsticking painters tape. . I am sure there are other solutions, but these are prototypes that have made a huge difference in the sewing machine drawer. Not a nest to be fond now. I may add a textured flat panel to write thread info, and use white resin which will accept pencil marking. The spools are a snug but comfortable fit.
Comments?
Bob
-
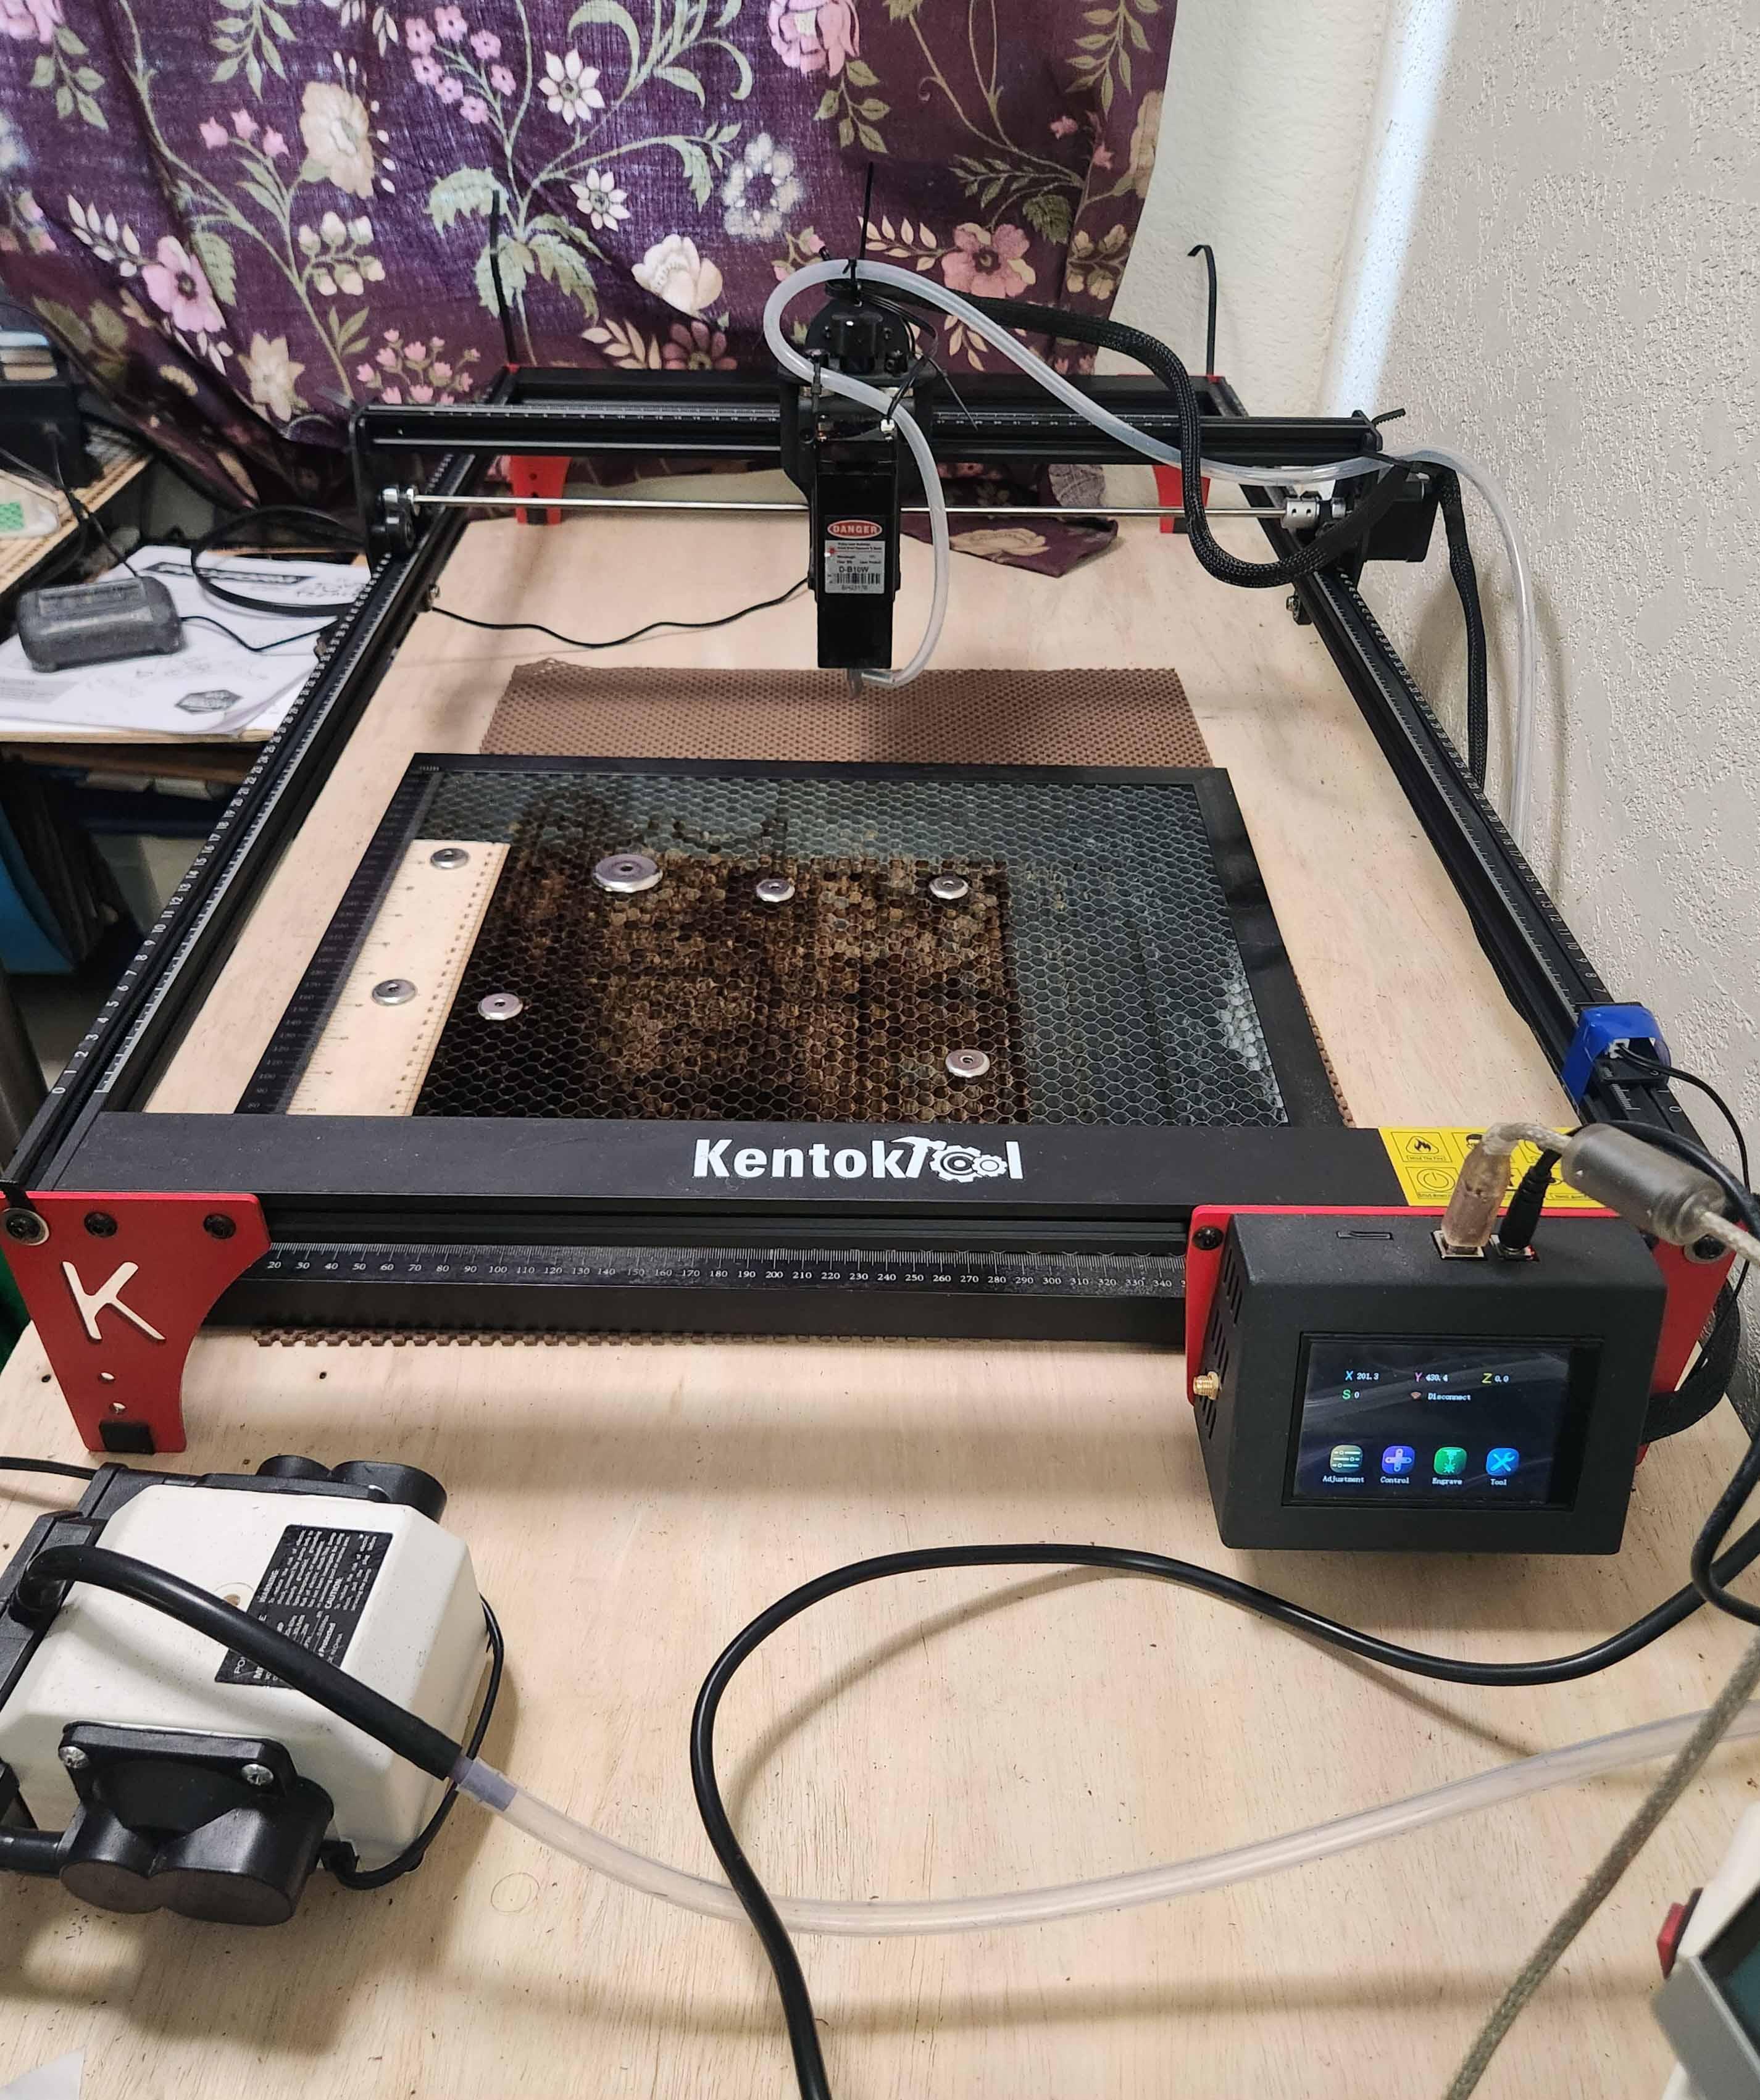
My magnets are 7mm thick and very powerful. I often just have room for maybe 1.5mm of the magnet overhanging the edge which is enough to keep my leather from shifting. If I have a really warped piece of ply, I can double them up. I looked at 3D printing some cutsie magnet holders but I simply use one magnet to pick up another..easy peasey. Just designing a belt for a very old and expensive Navaho belt which i could never have done freehand. When I am cutting tops an bottoms of items that then have to be wet formed, the registration is perfect and I no longer have to do any trimming of the edges ..just turn on the burnisher! I just noticed the kentok pic shows the original bed. Shortly after making the extension, I purchased a full sized bed. The other thing i find critical is the registration of the bed with the laser. I am <mm So I can repeat cuts or add to already cut items with perfect registration.
Better hit the rack. I have an irish gig tomorrow from 2-4 and an Appalachian gig from 6-8, both on restaurant patios. Weather is perfect!
Cheers!Bob
-
6 hours ago, RockyAussie said:Hey bob, I am interested to know what sort of module and set up you have running at the moment if you would care to share. These pics below in case you have not seen them before show how I modified the unit I have at the moment. To get better cooling I used a 50mm fan on top of a shroud to allow cooling all around and over the module as well as giving me an easy way to get Z adjustments.
I'm on my 5th laser in 2 years so I don't waste time on building cabinmates, etc. The critical thing I have done on all my lasers is to design and print a low profile, high output air assist nozzle. I use heavy magnets on my honeycomb bed to hold my work and the stock nozzles don't have enough clearance. This is my previous 10W. I am currently using an Azter 24 watt as shown in stock pic and I had to design a new nozzle which vastly improved performance.
I have never found cooling to be an issue. My laser is situated next to a window with a bank of exhaust fans installed and I have another blowing air under the bed which is raised 8mm and another blowing across the top. I can swap lasers in 2 minutes for another I use for roller work.Bob
6 hours ago, RockyAussie said:

-
3 hours ago, RockyAussie said:That size sounds about the same I extended mine to as well. First test on cutting 3mm acrylic I had the same problem cutting right through as well. I will have to try running a higher wattage diode soon as that would shave a lot of time on most jobs I think unless the beam gets too much broader.
The beam doesn't significantly increase with power. Wouldn't be noticeable for cutting. I also engrave all my stitch lines and no longer use a groover. I engrave glue pads for belt loops using a crosshatch fill and holes for my snaps and other decorations all at the same time. Magic! The only leather I would like to have more power with, is heavy bison. It takes multiple passes. I also apply water directly to the edge after cutting and run the cocobolo burnisher, which seems to solidify the carbon and produces a hard, glaze.
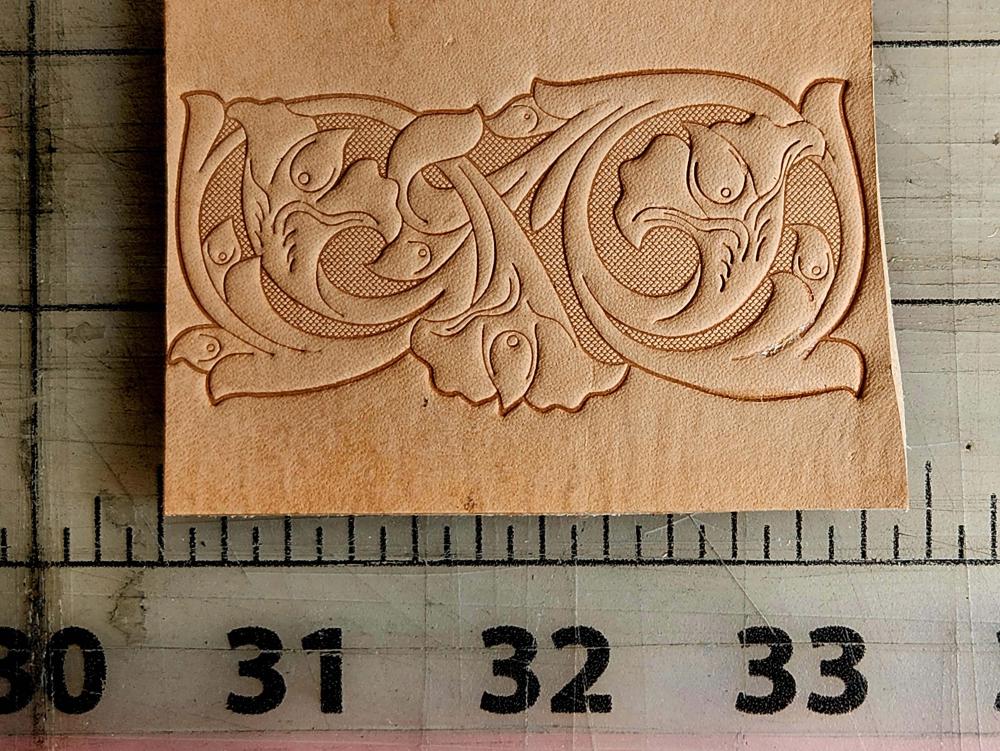
I did a test with the remains of my 2mm chip and made a tiny Celtic knot and it worked a champ on the black Perspex. I have a few sheets arriving tomorrow.
Bob -
50 minutes ago, KYCat said:I've got a 10w diode and have been wanting to attempt this (without buying a 3D printer). Were you able to cut it out with the laser or did you bandsaw it?
Love this, BTW--- very nicely done!
You can do very well with a 3D printer with the right resin but for fine detail, the resin doesn't hold up. I use a 6 ton press and have no issues with the Russian lucite plates, but the same design in resin would pulverise. Rocky's design would be marginal but the signature would not hold up unless twice the size.
Where inKY? I used to work in Nicholasville.
Bob -
Actually Rocky, it's probably
1 hour ago, RockyAussie said:For what its worth Bob you can get pretty good results with a diode laser. The one i used in this picture is a 2.5 watt done onto 10mm black acrylic about 2mm deep. Black and white artwork needed.
Brilliant!
Actually Rocky, it's worth the price of a CO2 Laser! I was planning on testing black acrylic. I had a small piece of 2mm black and my laser punched right through it. I have a 24 watt extended bed that I have been transitioning to for all my cutting. I am reducing production times by 75%. I can go as large as 850 x 650.
Those acrylic cuts look fantastic! The plates from Russia were made by a CO2 laser but I'll bet I can do as well with my diode, I'm going to order some black acrylic tonight!Thanks!
Bob
-
Thanks everyone for the response. I have no problem creating quite detailed embossing plates on my 3D printers but I can't get the super fine detail of these Russian ones. Also I am not sure I can recreated the line art from the plates I have, one unused. I may try, I have laboriously copied fine engravings in the past on Photoshop. My Avatar, which is a pearl engraving from a 1909 banjo peg head, took weeks of meticulous work to produce a T-shirt sized graphic. Anything is possible. If I can then I'll purchase a CO2 laser for engraving lucite.
Thanks again,
Bob
-
On 4/25/2024 at 2:48 PM, fredk said:That narrows it down to about 30 possible places in 7 miles

I think we were using the same chap though ebay. I was in touch with him and he was going to make some plates for me. Shortly after the Russian attack he was taken off ebay, as many more in Russia and then his website and email were taken off the system. I tried a few times to contact him but with no success.
That's why I love Ireland! Spoiled for choice, both North and South!
On 4/25/2024 at 2:48 PM, fredk said: -
Thanks very much. That's what I figured was a possibility, but wasn't sure if he was a Ruskie or Ukrainian. Pity...
Btw I played a gig in a bluegrass band in a pub located between Bangor and Donaghadee.
Also spent time in Mayo Bridge in the 70s.
All the Best!
Bob
-
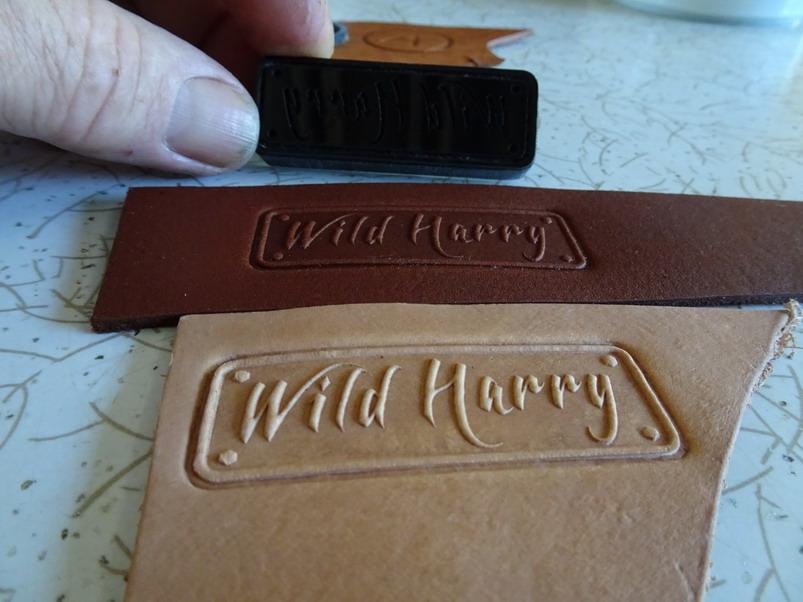
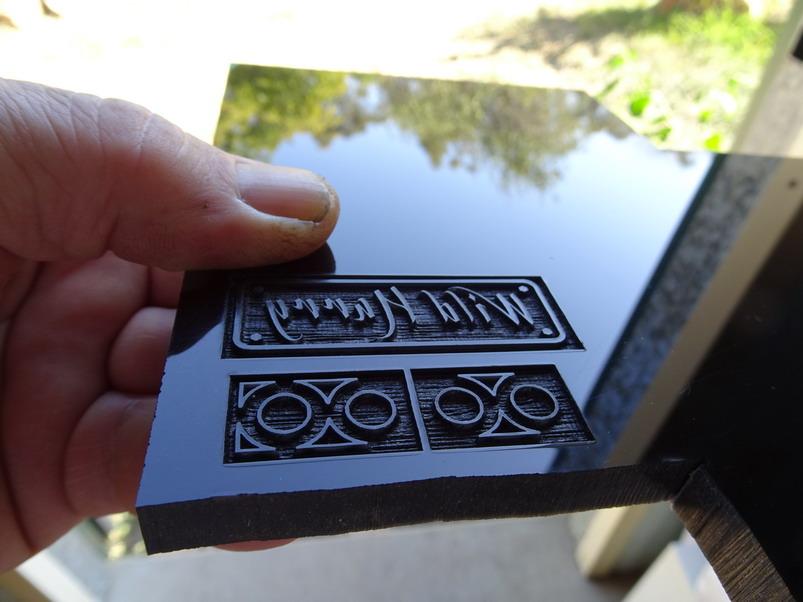
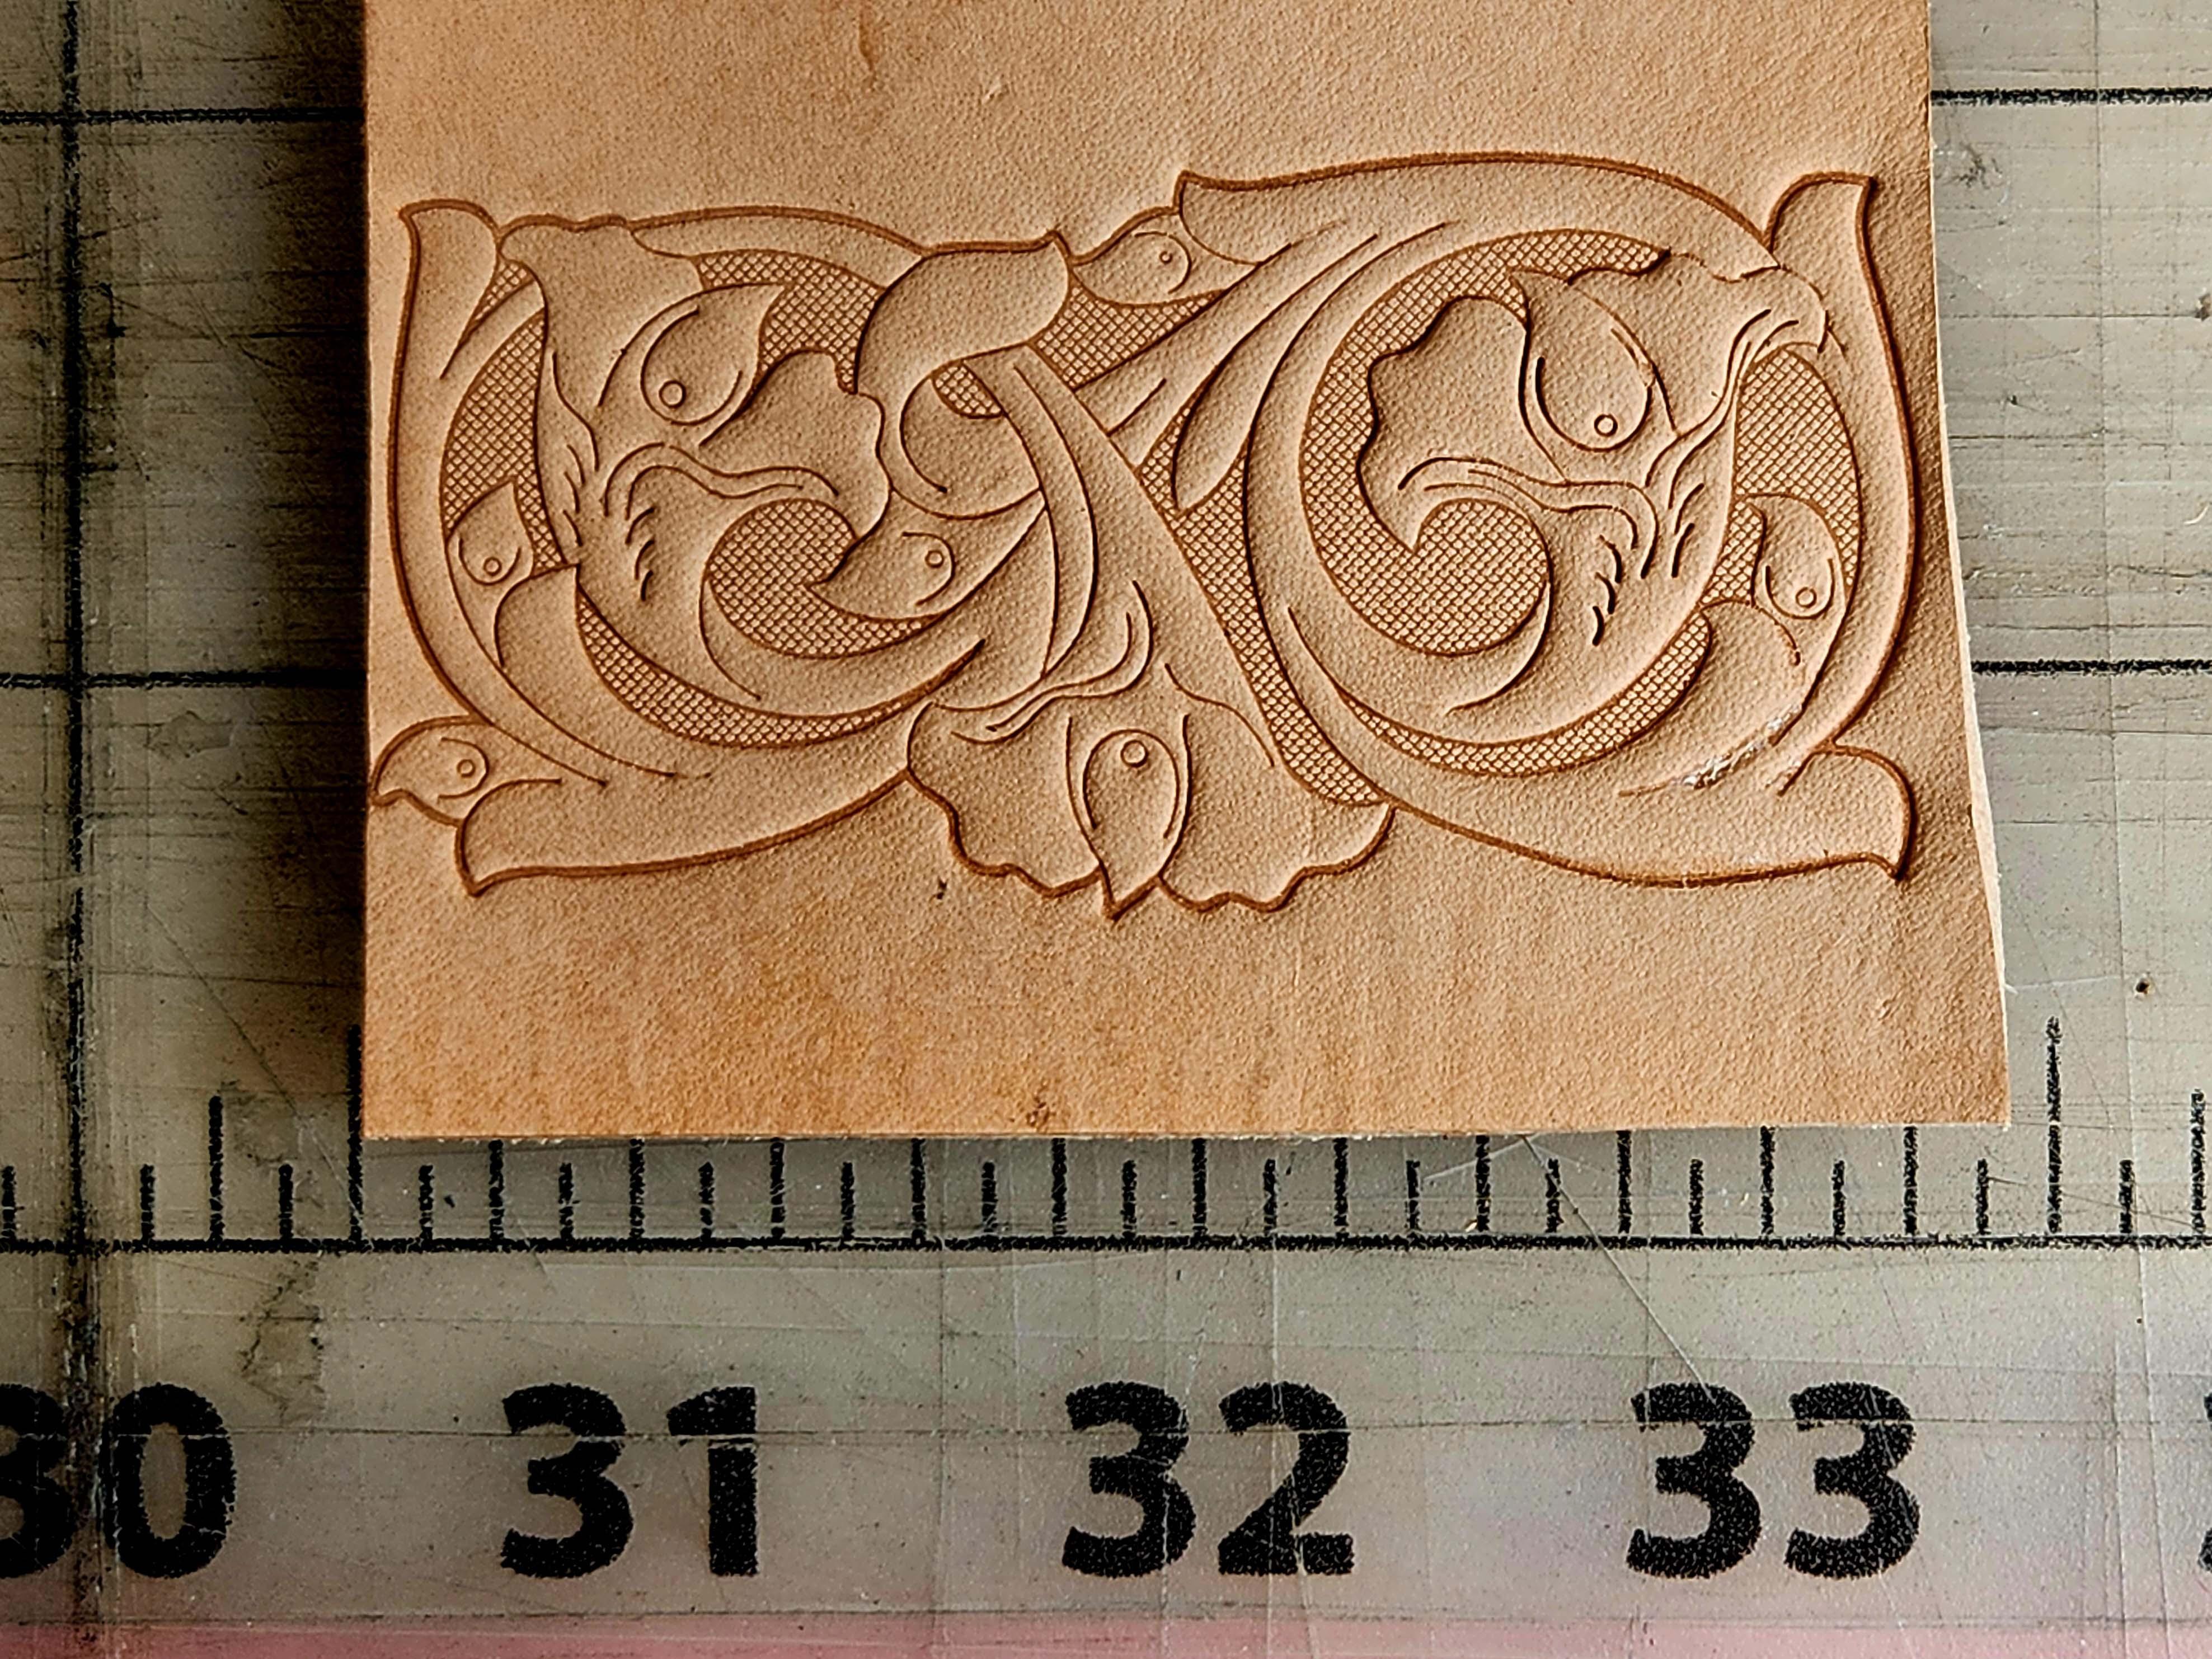
over the years I have purchased highly detailed embossing plates for my commercial work from a guy overseas. They are laser engraved 5mm acrylic and incredibly detailed. I have produced hundreds and hundreds of wholesale items with these plates but they are starting to wear out and time to reorder... That's the problem. It's been a number of years and seems like I purchased these on Ebay. I remember he was either in Russia or Ukraine, because the package arrived with cyrillic on it.
It's not only the craftsmanship of the embossing plates but also the actual graphics he uses that are excellent.
If anyone has an contact information I would be very grateful.
I can make my own 3D stamps which I have been doing for years, but these are far beyond my capabilities. The increments below are in inches.
Thanks,
Bob
-
Customer gave me some lame excuses why he wants to "wait" on the belt... Never trust any music producers from Nashville. Ask me how I know!
Bob
(former WEA recording artist) -
I want to make a 1"x18" leather stropping belt for a Work Sharp Ken Onion knife sharpener. I am trying to figure out how to join the two ends to avoid either a hump or snapping the belt. Clearly will skyve the leather to 50% at the joint and possibly glue some light weight fabric as a reinforcement on the back, but otherwise have no idea how to do it.
Thanks!
Bob
-
Thanks Tom,
The problem is to maintain the qualities (soft padding and non slip) of the flesh side without turning the musicians shirts orange... The Resolene did the trick as far as sealing the dye but killed all the supple padding qualities of the flesh side but sounds like an interesting product for other projects.
Best regards,
Bob
-
UPDATE: I was contacted by the owner Doug, and it looks like he is going to resolve the situation. He seemed alarmed that any of his employees would hang up on a customer and surprised at what I was told.
I have been purchasing Bison hides of various shades for the past few years, primarily for the production of guitar straps. I have purchased numerous sides from Tandy and lately The Hide House in California and most recently Montana leather Company. I am able to make the straps quickly and because there is virtually no finishing required I am able to offer them at a reasonable price. I also have a wholesale contract with a guitar manufacturer to produce branded bison straps
The bison is great for straps because the flesh side is soft, comfortable on the shoulder and also essentially padded. I sometimes purchase 10-12 oz and then skive the strap to 6-7 oz but leaving the middle like a built in shoulder pad.
In addition I make a range of instrument cases using drum dyed leather in various shades from Wicket and Craig. I also use their dyed leather for musical instrument straps for guitars, banjos and mandolins. So over the past 15 years or so I have been through many dyed hides with no issues.I purchased two Bison sides from Montana Leather Company a few weeks ago, one was brown and the other had a reddish tint. I though the red tint would be great for folks with red electric instruments. Opened the package a few days ago and last night I started trimming the sides, first the brown and then the red. When I started cutting the red hide, I notice my hands were turning orange! The red dye was bleeding from the flesh side and of course, it would have been a disaster to make a strap from that side. I called the company and spoke to Brandon. I explained the problem and assumed I had a defective dye job. I was the passed on the the manager, who I believe was Patrick, the owners son. I explained that the hide was defective, it was unusable for my application and what could they do to help me. He then told me "It's normal for all dyed leather to bleed" "I have sold thousands of hides and they all bleed" I explained that in my experience of purchasing commercially dyed hides, for many years, that they don't bleed, and neither does the other hide I purchased from them. He told me that all his customers seal the flesh side of the leather he sells them. "That's Normal" . I asked him what they use and he mentioned Resolene. I replied that I have a gallon of it but I doubt it will leave the flesh side as I required, in a soft comfortable condition but I agreed to try. I asked what they can do if it doesn't work and he basically told me to suck rocks and hung up. I called back and explained that if they refuse to accept responsibility, I will contest the transaction with my credit card company. He then stated it doesn't work like that, clearly having had this issue before.
This was the worst customer experience I have had in recent times with ANY vendor and I caution against doing business with this "bleeding" company.
The below images show the bison swatch from their web site and the flesh side and the effect of Resolene on the left side. The Resolene effect would be fine for a bison bag, wallet or similar but a guitar strap..not so much. Also if they had posted the bright orange flesh side on their web site I never would have purchased it.Any comments, or suggestions much appreciated.
Bob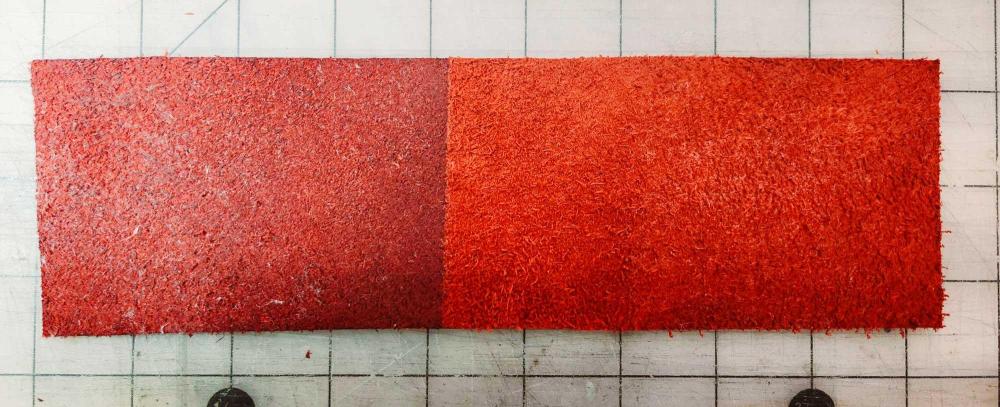
-
I have a special project which requires a heavier leather than I carry in inventory. Unfortunately the leather I required was not available in the weight and I was bit optimistic and ordered a heavier grade than I require and figured I could just skive the leather to the required thickness as needed. BIG MISTAKE. The straps I have to produce are 3" x 6'.
After a test with a sample strip of the heavy leather on my 6" manual Tandy skiver I realized this was a pipe dream.
Anyone know of a skiving service that could handle a 25 ft2 side of Vegtan or possibly 6" strips?
Thanks!
Bob
-
I was curious where it was just cost saving, expedience or some tradition. I suspect the former. This was used on stress bearing components, obviously to utilize the scraps of leather left over from the main parts. Probably easier to use garment machines on cardboard than solid leathers.
Thanks,
Bob


Cow Boy Bobbin storage
in Leather Sewing Machines
Posted · Edited by BDAZ · Report reply
Here is the final version. There is a flat panel to write the thread weight with a Sharpie, transparent, so one can get an idea of the amount of thread on the bobbin, a slot to see the actual thread color, and the fit (at least on my bobbins) is snug enough to invert the caddy while retaining the bobbin in place. The resin is top of the line and should last for years.
I have worked up pricing for folks on the forum:
6 Bob's Bobbin Caddys including packaging, USPS shipping and PayPal fees: $20
12 Bob's Bobbin Caddys including packaging, USPS shipping and PayPal fees: $30
Please PayPal to bob@sinkthestink.com (my day job: Gulf Stream International)
Thanks for your interest!
Bob
Wiz: As promised, a box is on the way as a thank you for all the help I received from you when I was starting out!