


FoamerAce
-
Content Count
43 -
Joined
-
Last visited
Everything posted by FoamerAce
-

CB2911C3-7BB9-4D2B-BB54-3EF6F23CA65A.jpeg
FoamerAce commented on Garyak's gallery image in More Leatherwork
 Outstanding
 -
6E31B8A0-1159-4675-B1E3-7210EC42EC61.jpeg
FoamerAce commented on GamberLeathercrafter's gallery image in Our Leatherwork Galleries
 What am I looking at?
 -
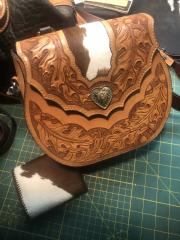
Tandy Leather Expedition Briefcase Kit
FoamerAce replied to Hooper26's topic in Leatherwork Conversation
Hello Musa. The pockets are pretty straight forward. I used one piece of leather for each pocket. I cut it wide enough for an 'S' fold gusset on each side and stitched the sides down. Then just riveted the bottom corners and stitched across the bottom. The lining is cotton fabric. If I were to do it again, I'd have glued it down better. I was afraid if I used too much glue it would feel hard to the touch so most of it is floating with only the edges really glued down hard. I built the bag on commission, so I don't know how it's holding up today. But I did do a one year follow up, and the owner reported that he still used it every day and was in good shape. -
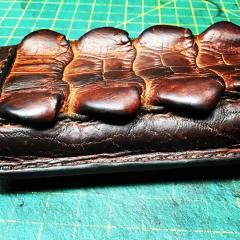
A commissioned wallet.
-
My first triweave belt bag
FoamerAce replied to stormdevil's topic in Purses, Wallets, Belts and Miscellaneous Pocket Items
A third of the way across you reversed your tool. How'd manage that? -
Not Your Grandpa's Briefcase
FoamerAce replied to DonorLeather's topic in Satchels, Luggage and Briefcases
Consider That Shit Stolen Son -
Not Your Grandpa's Briefcase
FoamerAce replied to DonorLeather's topic in Satchels, Luggage and Briefcases
I like the ouside pocket for convienence. You can throw a document or folder in there and grab it without having to open the case. I'd say if pigskin would have "rocketed up the price", you work too cheap. I'd be astonished if you had less than a hundred hours in that case. The tooling alone would have taken me a month. "Woody" is exactly how I'd describe that finish. I'm interested in the creases on the straps. Are they just creased? Cut? Grooved? Did you use oil dye on the straps as well? How did you keep it out of the creases. One thing, your edges look raw. I don't know if that's a look you're going for, but it rubs me wrong. All that work and just leave the edges unfinished. I was actually impressed with the thickness of the leather in Tandy's kit. Here's a video I made for the one I put together. -
Not Your Grandpa's Briefcase
FoamerAce replied to DonorLeather's topic in Satchels, Luggage and Briefcases
Awesome work there. I really dig the color choices and dye technique. Very impressive tooiing. I recognize the pattern as Tandy's Expedition Briefcase. It looks like you cut your own leather on it, but you followed it almost exactly, down to the mismatched hardware on the sides. But I think you left out the center divider. How did you finish the inside? Did you add any pockets or lining? My experience with that bag is that the handle is a weak point. There's only one rivet holding it on there. Don't know if you'd want to throw a couple stitches on there at this point though. Again, really excellent work. That full coverage tooling is really impressive. -
That is master level work. I'll die happy if I ever make anything that good.
-
Birds On Coin-Purses
FoamerAce replied to FoamerAce's topic in Purses, Wallets, Belts and Miscellaneous Pocket Items
I use Tandy's Eco-Flo dyes. They mix well and dilute with water. Applied with taklon artist brush you can pick up anywhere (I think I got mine at Walmart). I screwed up on the goldfinch. It was a brighter yellow, but when I applied the Super Shene finish, it picked up some of the black and made the yellow dingy. What I should have done, is done the black first, buffed it, then locked it in with a coat of finish before doing the yellow area. Painting with dye can be a bit tricky. Of course you need to work slow and careful to "stay inside the lines" but there are other things to keep in mind. I apply dye after tooling and before conditioning with any oils. At this point the leather is really "thirsty" and will soak up the dye well. Which is good because it colors the leather like you want it to, but it also has a tendency to bleed out. The dye simply refuses to recognize that line you cut and beveled and crosses right over. So you want your brush nearly dry when you get to the edges of where you want it. A bigger annoyance for me is when I make a brush stroke, as the brush comes off the leather the tips of the fibers will fling little drops of dye where you don't want it. -
Birds On Coin-Purses
FoamerAce replied to FoamerAce's topic in Purses, Wallets, Belts and Miscellaneous Pocket Items
Thanks MJ. I want my work to have distinctive look. The pic I posted looks too dark on this site. I adjusted the levels. See if this looks better -
Sorry I don't have better pics. Two pocket, creditcard sized, coin-purses. My dyeing technique is coming along.
-
Belt "grapes"
FoamerAce replied to Tatyana's topic in Purses, Wallets, Belts and Miscellaneous Pocket Items
+1 What stain/technique did you use? -
Eeeeep! You cut the groove with a swivel knife? You've got a steadier hand than I sir. A utility knife is a fine tool for cutting leather. I think a sharp blade and good technique will give you better results than a new knife. It's very impressive work for limited tools. With that kind of talent you could go full hobo using only tools you fabricated yourself from scrap. Not that I there's any reason you'd actually want to do that.
-
Made from maple with brass hinges. The jaws slope away at a 45 because the table saw blade wouldn't tilt any farther. Mostly not a problem, but there have been instances I'd have liked a bit more room. Last minute modification, a second set of holes for the bolt that holds the arms together. One close to the jaws for more clamping power. The other near the base for larger pieces of leather. I've not seen muti-shaft-holes before, but anyone could drill another set or two on their pony if they wanted. Mostly I keep it in the lower holes because even if I don't need all that throat, I don't want to squeeze all that hard either. But there are times.
-
Tandy Leather Expedition Briefcase Kit
FoamerAce replied to Hooper26's topic in Leatherwork Conversation
Yes I used cement to hold the lining. I don't know how well that worked. I put it on the leather and let it get tacky. Then I carefully laid the lining on and pressed it down with a piece of 1" PVC used like a rolling pin. I applied more cement around the edges to be sure they were fixed good and strong. Then I trimmed off the excess. The thing is, in some places it didn't stick at all, and in others it soaked through the fabric. Where it soaked through it got discolored. I rubbed it where it was soaked after a few days to dry, but with only partial results. When the lid is closed the lining crinkles up where it isn't stuck to the leather. My stain started out looking smudgy, but I kept applying Dr. Jackson's Hide Rejuvenator, especially to the dark areas, and it evened out quite a bit as the oils worked through the leather. The other thing is there's four or five coats of finish on there with a good buffing, which always removed pigment, after each coat. A word about Tandy's Waterstain, it's a good idea to dampen the leather when applying it. I didn't do this for the one piece that gets covered by the rear pocket and it looked like ass. -
Tandy Leather Expedition Briefcase Kit
FoamerAce replied to Hooper26's topic in Leatherwork Conversation
Update: After one month's use, a rivet popped out. When carried by the handle, the full weight is held by only two rivets and one let go. Could be I didn't set it properly. Could also be the rivets aren't quite long enough. But it's definitely the case that it's not designed well. It would be straight forward to add some stitching along side the handle rivets. Those are the only two that are being pulled apart from normal use. Unfortunately my customer is on the other side of the country. Fortunately setting rivets is easy to do, and that one is accessible. I mailed him an anvil and setter along with a couple rivets and gave him a link to a YouTube. Hopefully all will be well. If it pops loose again he'll have to send it back and I'll add the stitching. On the bright side, he tells me he is otherwise very pleased with the bag. He carries it to work every day and gets frequent complements. -
Hmm. Dyeing polyester at room temperature goes against what I've read. I wonder if your dyeing the wax.
-
Stamps Not Transferring To Leather
FoamerAce replied to fatbob1945's topic in Leatherwork Conversation
Too wet -
As would I. I was one of the opinion that it was not possible to dye polyester with acceptable results.
-
Tandy claims copper rivets are "the strongest rivet known to man". Seems dubious to me. But maybe they hold better than rapid rivets.
-
You dyed Tiger thread? So it's linen then. For some reason I thought it was nylon.
-
Amazing how? What makes it so much better?
-
Ah yes that is premium leather there. How do you finish the backs? If you don't mind me asking.
-
@Joe. People pay you over $20 for a basic leather belt? What do your belts have over department store belts?