

TSes
-
Content Count
138 -
Joined
-
Last visited
Everything posted by TSes
-
Looks good. I assume the goat pulls a little cart of some kind.
-
Wrapping handles - how do I line up the holes??
TSes replied to argentumleather's topic in How Do I Do That?
Try using a small round hole punch, or a round awl to make your holes. It looks like the diamond shaped holes are too big and allowing the cord to move to random locations in the hole when the cord is pulled tight. -
Here'a a pic out of that magazine. The strap does go through the holes.
-
I know it as a "bolo" or "bola" tie slide.
-
Looks good. That Celtic work can be real challenging.
-
Use a screw rivet that has an extra long shaft, so the caps don't press on the leather. Loc-tite on the threads.
-
Try making your stamping deeper. Looks very shallow in the picture. You can see where the antique is still in the tips of your stamping. Those tips are deeper than the rest of the impression. Give the tool a couple good whacks. Same goes for your line work. Deeper is better. When possible, wipe off the antique across the lines, and not with the lines.
-
Before eco-flo gel antique
TSes replied to D2G's topic in Dyes, Antiques, Stains, Glues, Waxes, Finishes and Conditioners.
Yes, Neat Lac will work. There are several other brands that will work, also. Put the word "resist" in the search area, and several posts will give you more information. -
That looks terrific. You did a great job. Too bad your customer wanted black, It kind of hides your hard work.
-
What YinTx said. A light coat of oil will slightly darken the natural color, but should not bother the blue. Experiment with a scrap piece to make sure. It will also restore the natural oil lost during the stamping process due to water evaporation.
-
This is the traditional way. 1-Apply 1or 2 coats of a resist. I prefer sheeps wool for this. Always wipe it on, never spray. Many types from many companies,Tandy, Feibings, RTC etc. (I use Tandy Neat Lac, but that's just me) Let dry a few hours. 2-Apply antique using sheeps wool and QUICKLY remove excess right away. I use folded paper towels. You can do this step in sections to make it easier if you have a large project. Let dry a few hours. 3-Apply top protective coat. Be careful and quick when wiping it on because antique might lift or smear. What you used for a resist could be used, but there are other options. I use a spray finish made for shoes which makes it quick and easy. Hope this helps. These are the basics, and I'm sure others will explain their style and favorite products. This will very slightly darken natural color, and actually make it look better, but the blue won't change.
-
Staying with the Tandy Craftools, A104 is probably the most popular. Then the A889,which is a little coarser than the A104. A step up would be the E294 and M884. I believe all four are still available, but not 100% sure.
-
Don't forget a background tool of some kind to fill in the inside areas.
-
A modern holster for one of my guns
TSes replied to AzShooter's topic in Gun Holsters, Rifle Slings and Knife Sheathes
Interesting design, but I can't figure out how the gun fits in it with that adjusting screw where it is. Does the upper part of the holster not cover anything? -
notebook cover
TSes replied to TSes's topic in Purses, Wallets, Belts and Miscellaneous Pocket Items
I've had 50 years of practice, so hang in there. Things will improve. -
notebook cover
TSes replied to TSes's topic in Purses, Wallets, Belts and Miscellaneous Pocket Items
Thanks. -
First Purse Ever
TSes replied to crmiller84's topic in Purses, Wallets, Belts and Miscellaneous Pocket Items
Fantastic job. -
I've broken granite that size while stamping basket weave and large lettering on heavy leather. My current slab is 2 1/2" thick.
-
If that doesn't hold up to the pounding, go to a shop that makes grave markers. Their stuff is a lot thicker and holds up well. They usually give away their mistakes, or cracked pieces.
-
If you're talking about 3-D type stamps, I think the most important quality is how clean the lines are, are if you get good depth on leather without the base of the stamp touching. Since these stamps aren't used real often, any material would probably be OK. If you mean carving type tools, my preference is stainless steel because of the durability. But that's just me.
-
My take on a Western Gun Rig
TSes replied to KrisQ's topic in Gun Holsters, Rifle Slings and Knife Sheathes
Really nice. Extremely clean lines and assembly work. -
A Bunch of Tooled Coasters
TSes replied to AlexOstacchini's topic in Purses, Wallets, Belts and Miscellaneous Pocket Items
They look great. Excellent job. I especially like the colors. -
Try running a large, shallow, smooth beveler down each cut line where the border stamp will go. Don't go too deep. Then carefully run a modeling spoon down the cut line to knock off the sharp corner that's left. Then do the border stamp.
-
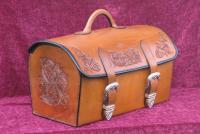
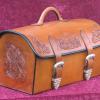
notebook cover
TSes replied to TSes's topic in Purses, Wallets, Belts and Miscellaneous Pocket Items
Thanks Rohn, AzShooter, and battlemunky. -
Haven't made anything for a while. Made this for personal use. Color is a little off. Not as gold as it appears.