


Calvus
-
Content Count
67 -
Joined
-
Last visited
Recent Profile Visitors
1,548 profile views
-
Actually, that's the same file that I got these from. But I see he's made available the cad file, which is awesome. Thanks tagadude!
-
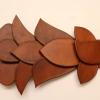
Here's what I'm talking about. I don't know what to call it, other than corner overlay. This would be for a long wallet, but I've seen it on book covers and other things with corners. This one is a perfect size, basically 3" x 2.25", but the thinner area is too narrow for my thread line offset from the edge. I've tried drawing one in AutoCAD, but I just can't make it work. Basically what I'm looking for is either a scale-able pattern or a how-to on drawing your own, free-hand or with CAD. If you don't have anything like that, would you help me find a proper name so I can google it? Thanks in advance, Calvus
-
3D Printed Belt Template
Calvus replied to Calvus's topic in Purses, Wallets, Belts and Miscellaneous Pocket Items
I'd say that it might take some pressing, but not much hammering. Definition might not be what you'd want, but that could be the fineness of the prints that I've done. As for noise, the model I used isn't bad. Our CNC machines are much louder. -
3D Printed Belt Template
Calvus replied to Calvus's topic in Purses, Wallets, Belts and Miscellaneous Pocket Items
I didn't even think about a spline; that would definitely work. I'll give FreeCAD a look. I also use DraftSight. Thanks! It's an Afinia H480, whether or not that's industrial I don't know. We have several at the college were I work. -
Album here. Hello everyone. It's been a while since I last posted, and honestly I haven't been doing much. Unfortunately hobbies take money, and there just hasn't been enough to spend on hobbies lately. This was inspired by a member on another site showing his 3D printed belt template. I have enough knowledge of CAD products to be dangerous, so I figured I'd give it a try. The linked album was the result. I used Sketchup, which I knew nothing about. After following the first 3 how-to's they have, this is what I came up with. Initially I tried importing my existing CAD template, but Sketchup wouldn't allow me to push/pull to make a 3d object. I think this took me about 30 minutes or so to whip up. Now that I know what to do it shouldn't take more than 5 for the other templates I have planned. The most complicated part was getting the point right. None of the arcs would make this type of English point. What I wound up doing is drawing an equilateral rectangle, then two circles centered on two points, then breaking everything outside of the intended point. Also, Sketchup doesn't have the ability to save in STL file format, which is what most 3d printers read. I had to install the "Sketchup STL" extension, which gave me the ability to export the STL file. I might make a 2nd version of this template. The holes are a tad too big for my scratch awl to properly/accurately center. If you're wondering about the odd length, it's because of the print area that's available on the 3d printer I used. The print field is 6"x6"x10", but max size on your parts can only be 1/4" less than that. I could have printed it vertically, but that would have required a support structure which I wasn't too interested in creating. If you have access to a 3d printer, give this a try. I don't think you'll be disappointed.
-
I almost called it a hybrid hybrid. Hybrid convertible will work too!
-
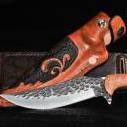
Album here. (Mobile/slow internet warning!!! 77 pictures) As far as actual leather work is concerned, this was pretty basic. Cut, poke, coat, and sew. I've got those processes down (or I should by now). I'm proud of my stitching, as that's where I'm weakest. This was my 2nd holster to make (the other is included in the pics) and had a blast making it. Thanks for looking and let me know what you think.
-
Wow! Very nice and very impressive. You've given me an idea for a gift for my sister.
-
I noticed the dimensions being inconsistent as well, and did not order because of this. CS Osborne has some as well that I'm considering.
-
Some Personal Rigs, Sig P238
Calvus replied to chiefjason's topic in Gun Holsters, Rifle Slings and Knife Sheathes
Very nice gun and very nice holsters. -
Thanks everyone! I gave him the belt yesterday and he was pretty excited.
-
You may have seen my thread about the co-worker who made me a drill press burnisher. Well, this is the belt this is the belt that I made him in return. Used 8oz veg tan, Fiebings Pro Oil Chocolate dye (diluted to 1 part dye, 2 parts denatured alcohol), and an antiqued brass buckle. Overall I'm pretty pleased with it. I had a few slips when hot creasing near the tip. I creased after dying and my edges were trimmed, which probably contributed to the slips. Let me know what you think.
-
I know that area well. I lived about a mile up the road in the early 2000's when I worked for FWISD and then CISD later. Unfortunately, I don't know an answer to your question. I live in another state and have been since I started leather work last year. We don't even have a Tandy in our state and the closest store is over 3.5 hours away. All of my shopping is done online unless I'm in another state where I know of a brick and mortar store.
-
Welcome Micah! Seems that we have quite a few similarities. I'm 34, lived in a rural 1972 trailer near Ft Worth, the neighbors acted like donkies, worked in IT in Ft Worth and Crowley, and love to shoot guns/bows and cook as well. As judged by my activity since the beginning of this year, you're going to find a wealth of knowledge and helpful experience on this site.
-
Dang it, I just found this thread - http://leatherworker.net/forum/index.php?showtopic=33270